

Using agents via AG-UI and CopilotKit in Angular applications
AG-UI defines the communication between frontend and agent. With @copilotkit/angular, an Angular integration is now available too. It comes from the team behind CopilotKit, the same environment AG-UI itself originated from.
This is exactly where this article comes in. Whereas the previous part reached a result quickly with the ready-made chat control, from here on we use CopilotKit's flexible headless mode: it provides the state and behavior of the chat but leaves the presentation entirely to the application. On that basis, the article shows how agents can be connected to an Angular application with CopilotKit, how client-side tools and widgets are defined, and where a small self-written helper function is still needed today.
📂 Source Code (see branch copilotkit)
The Example Application
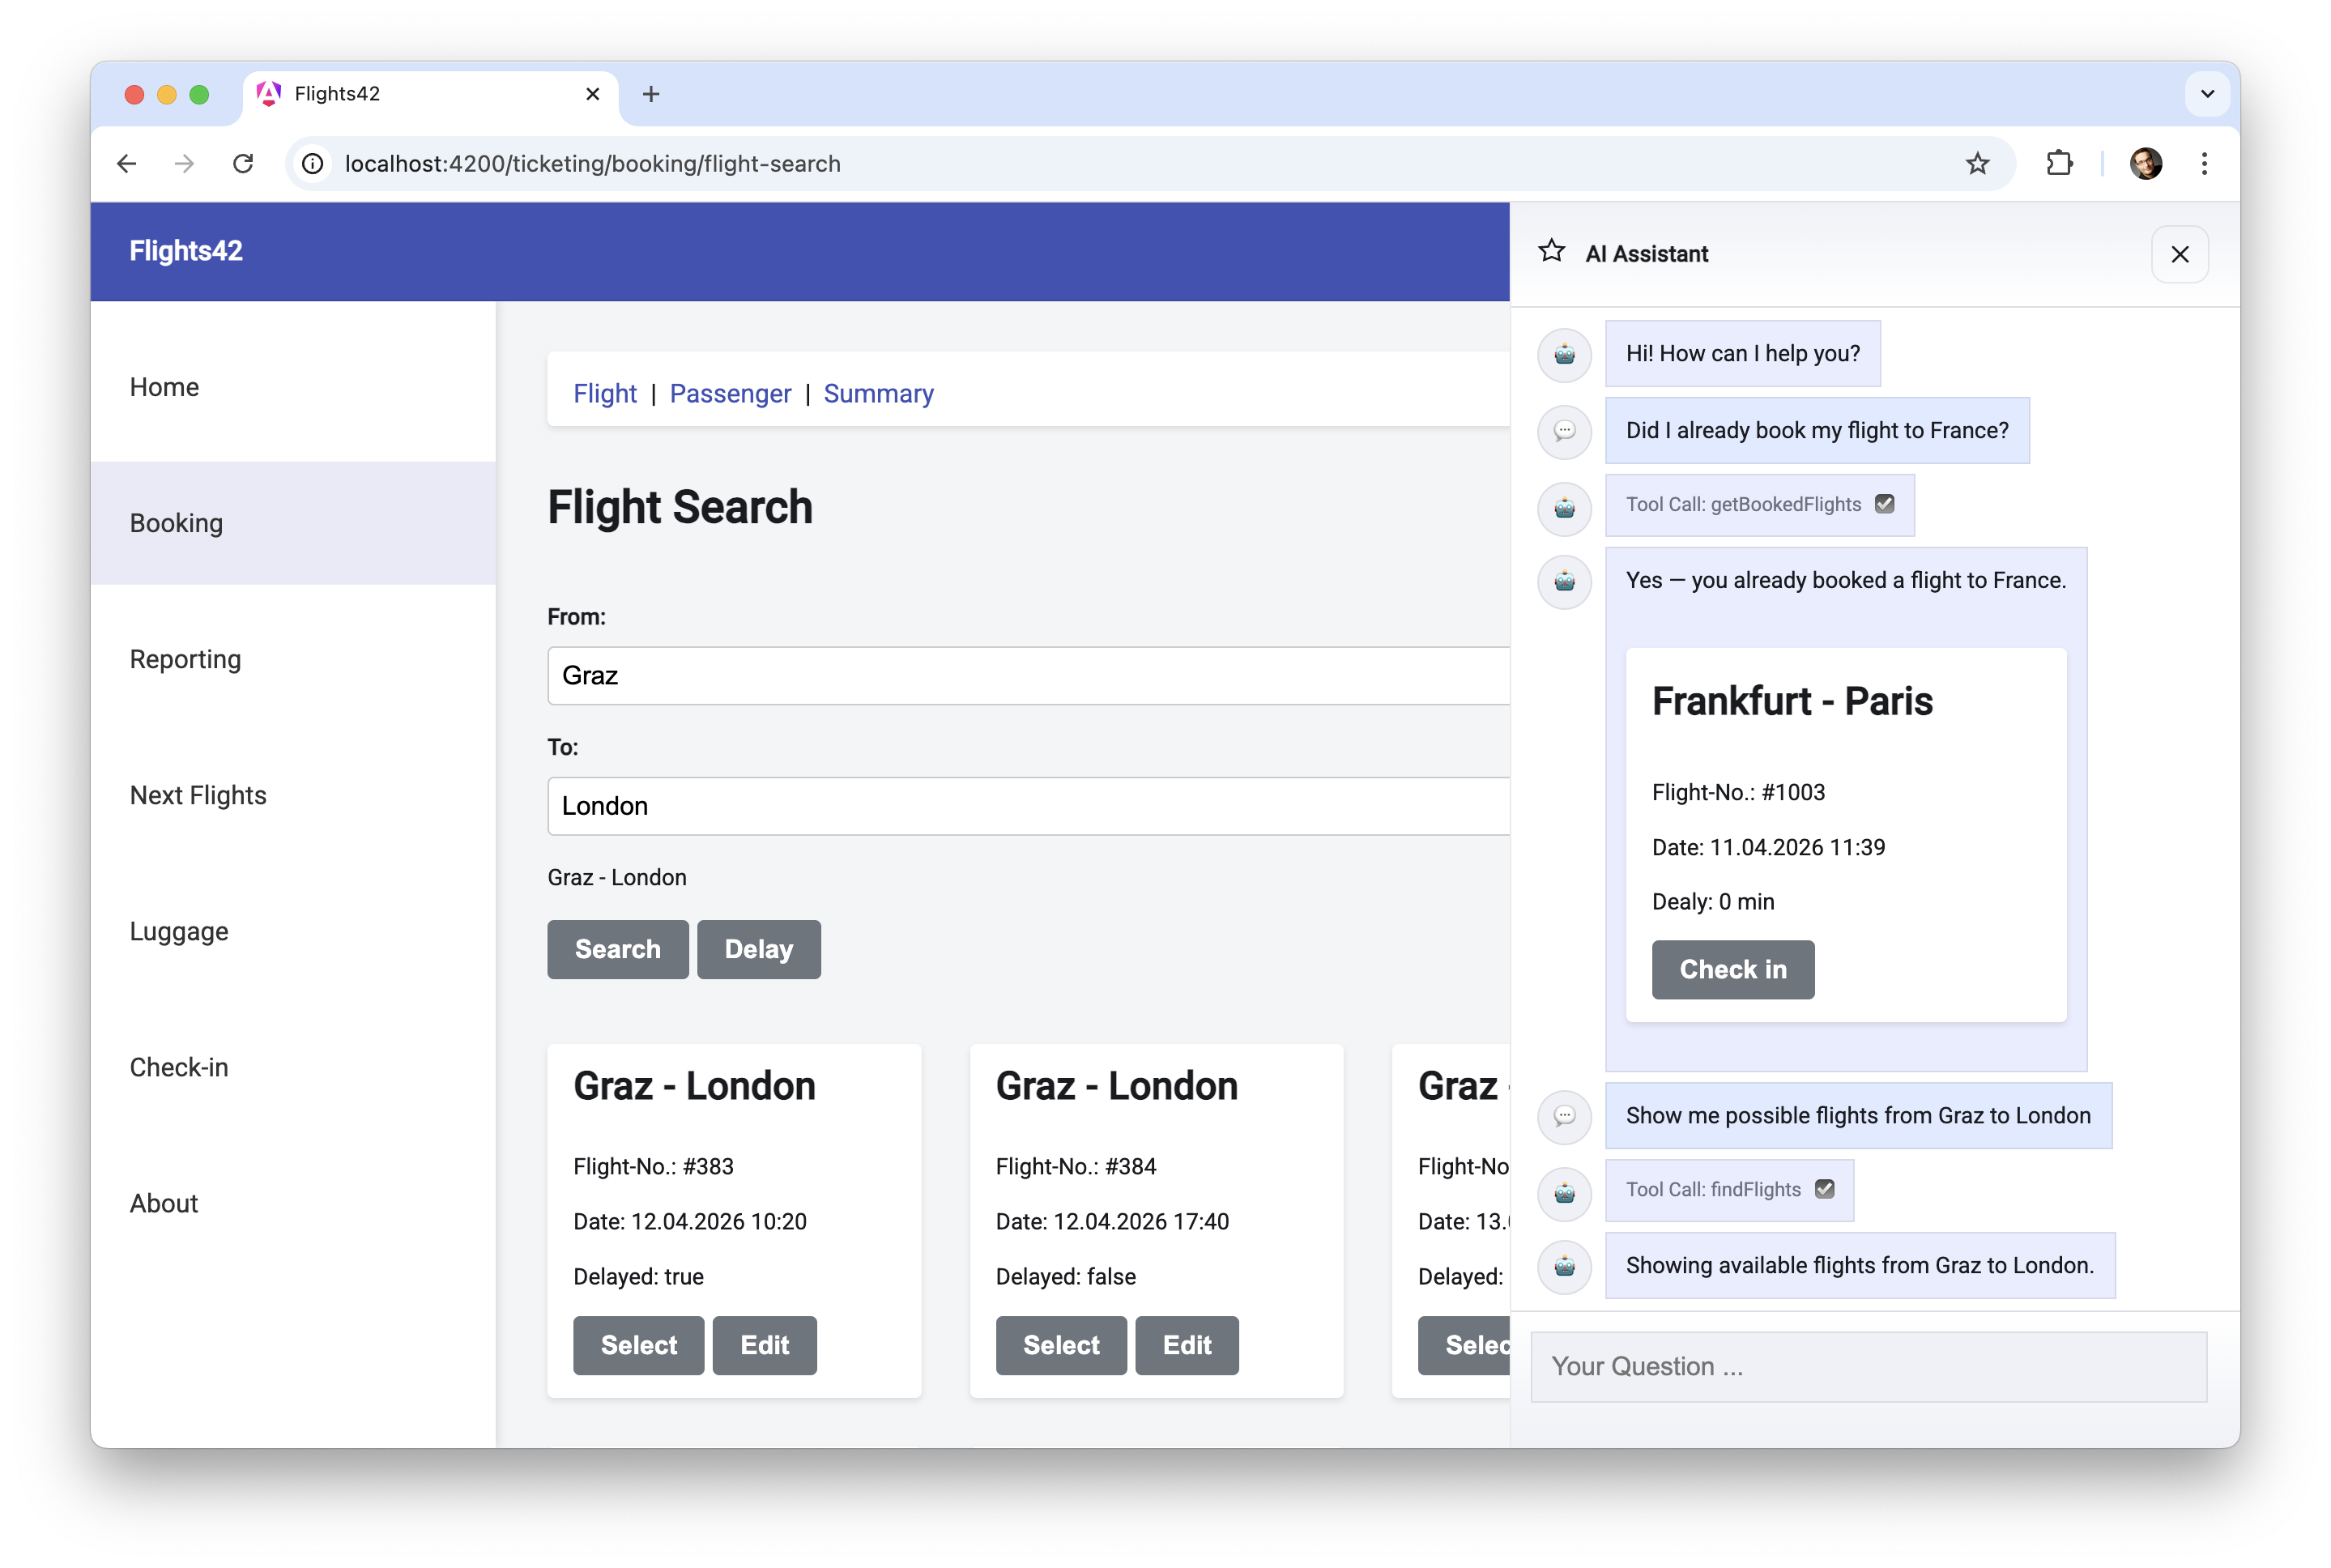
As a running example throughout the series, we use a flight-booking application. It works perfectly fine in the conventional way; but when users get stuck or want to shorten individual work steps, they activate a sidecar: a chat through which a server-side agent helps out. It answers questions with text, calls client- and server-side tools, and renders interactive components such as a flight card into the chat.
Integrating CopilotKit into Angular
CopilotKit builds directly on the AG-UI SDK discussed earlier: on the client side, the agent is represented by an HttpAgent from @ag-ui/client, which CopilotKit manages and whose streamed AG-UI events it translates into a signal-based chat history. The server-side implementation remains untouched by this – if you already have an AG-UI endpoint, you can keep using it unchanged.
Wiring it into the application happens as usual through a provider in app.config.ts:
// src/app/app.config.ts
import { provideCopilotKit } from '@copilotkit/angular';

export const appConfig: ApplicationConfig = {
  providers: [
    [...]
    provideCopilotKit({
      defaultToolRendering: true,
    }),
  ],
};
The defaultToolRendering option activates CopilotKit's built-in default renderer for tool calls without their own presentation component. As a result, such tool calls are logged in the chat history, making them traceable for users.
Thanks to AG-UI, the Angular example is independent of server-side technologies and models. To keep execution as simple as possible, the demo application includes an agent built with the extremely convenient TypeScript-based agent framework Mastra. Since the AG-UI SDK provides an adapter for Mastra, agents built with it can easily be connected through AG-UI.
The client was tested with both OpenAI's GPT 5 and Google's Gemini 3. Details on how to set up and start the demo can be found in the README.
Connecting Agents through an Agent Store
The centerpiece of CopilotKit's Angular integration is the so-called agent store. It represents a concrete agent together with its chat history and execution state. The demo project encapsulates the setup of the ticketing agent in a function called injectTicketingAgentStore:
// src/app/domains/ticketing/ai/ticketing-agent-store.ts
import { injectAgentStore } from '@copilotkit/angular';
import { initAgentStore } from '../../shared/util-copilotkit/init-agent-store';

[...]

export const TICKETING_AGENT_ID = 'ticketingAgent';

export function injectTicketingAgentStore() {
  initAgentStore({
    agentId: TICKETING_AGENT_ID,
    url: 'http://localhost:3001/ag-ui/ticketingAgent',
    useServerMemory: true,
    frontendTools: [
      findFlightsTool,
      getLoadedFlightsTool,
      toggleFlightSelectionTool,
      getCurrentBasketTool,
      displayFlightDetailTool,
      flightWidget,
    ],
  });

  return injectAgentStore(TICKETING_AGENT_ID);
}
The helper function initAgentStore registers the agent together with its client-side tools with CopilotKit; its structure is discussed in the next section. After that, injectAgentStore – provided by CopilotKit – returns the actual agent store: a Signal<AgentStore> that exposes, among other things, the chat history (messages) and the execution state (isRunning) as signals.
The configuration refers to the URL of the agent. Behind it sits a server-side ticketing agent that supports travelers with their flight bookings. For this, it has tools for looking up booked flights as well as for booking and cancelling them (findBookedFlightsTool, bookFlightTool, cancelFlightTool). In our case it is implemented with the TypeScript framework Mastra; for the integration shown here, however, that does not matter – all that counts is that the agent supports AG-UI.
With useServerMemory, the caller indicates whether the agent stores the chat history. If it does not, the client must repeat the entire chat history with every request.
In the frontendTools list, the consumer registers all client-side tools that the agent is allowed to request. Interestingly, this list also includes the widget flightWidget – the flight card shown at the beginning. That is no coincidence: in CopilotKit, widgets are nothing but frontend tools that have an Angular component assigned for their presentation.
Agentic UI with Angular
If you don’t just want to integrate AG-UI but embed it into a scalable architecture:
In my book Agentic UI with Angular, I cover exactly these patterns and trade-offs in depth.
The Helper Function initAgentStore
Currently, CopilotKit expects agents to be configured – and thus registered – when provideCopilotKit is called during application startup. For lazy-loaded feature areas, that is impractical: their tools and widgets should only reach the browser together with the respective bundle instead of ending up in the main bundle.
This is exactly the gap initAgentStore closes. It runs in an injection context and essentially does two things: it registers the agent at runtime as a so-called self-managed agent with CopilotKit and then registers all frontend tools for its agentId (slightly shortened):
// src/app/domains/shared/util-copilotkit/init-agent-store.ts
import { randomUUID } from '@ag-ui/client';
import { inject } from '@angular/core';
import { CopilotKit, registerFrontendTool } from '@copilotkit/angular';

[...]

export function initAgentStore(config: InitAgentStoreConfig): void {
  const copilotKit = inject(CopilotKit);

  const httpAgent = new AppHttpAgent(
    {
      agentId: config.agentId,
      url: config.url,
      threadId: randomUUID(),
    },
    { useServerMemory: config.useServerMemory },
  );

  copilotKit.updateRuntime({
    selfManagedAgents: {
      ...copilotKit.agents(),
      [config.agentId]: httpAgent,
    },
  });

  for (const tool of config.frontendTools ?? []) {
    registerFrontendTool({
      ...tool,
      agentId: config.agentId,
    });
  }

  [...]
}
The call to updateRuntime adds a new entry to the agents registered with CopilotKit. AppHttpAgent is a lean subclass of the HttpAgent from the AG-UI SDK. Among other things, it implements the useServerMemory option: if the server remembers the chat history, AppHttpAgent filters already transmitted messages out of the requests.
The subsequent loop registers the passed tools with CopilotKit using registerFrontendTool. In doing so, it binds each tool to the agentId – which keeps the tool definitions themselves agnostic and reusable.
A pleasant side effect: registerFrontendTool remembers the current injection context and later runs the tool handlers within it. That is why the handlers may use Angular's inject, as shown in the next section.
Defining Client-Side Tools
The demo project describes the individual tools with the helper function createFrontendTool:
// src/app/domains/ticketing/ai/tools/find-flights.tool.ts
import { inject } from '@angular/core';
import { Router } from '@angular/router';
import { z } from 'zod';

import { createFrontendTool } from '../../../shared/util-copilotkit/tool-definition';

[...]

export const findFlightsTool = createFrontendTool({
  name: 'findFlights',
  description: `Searches for flights and redirects the user to the result`,
  parameters: z.object({
    from: z.string().describe('airport of departure'),
    to: z.string().describe('airport of destination'),
  }),
  handler: async ({ from, to }) => {
    const store = inject(FlightStore);
    const router = inject(Router);
    store.updateFilter(from, to);
    await router.navigate(['/ticketing/booking/flight-search']);
    return { ok: true };
  },
});
Besides a name, a description, and parameter definitions based on Zod, the tool definition also includes a handler. When the agent requests the tool, CopilotKit executes this handler – including a working inject thanks to the injection context mentioned earlier.
The parameter object conforms to the TypeScript type inferred from the Zod schema. In our case, that is an object with the properties from and to. The implementation shown triggers a flight search by passing these search criteria to the FlightStore and then navigates the user to the results page.
Tools that gather data, such as local state or user responses, can report that data back to the model via their return value. One example is getLoadedFlightsTool, which informs the agent about the flights currently displayed to the user by the application:
// src/app/domains/ticketing/ai/tools/get-loaded-flights.tool.ts
export const getLoadedFlightsTool = createFrontendTool({
  name: 'getLoadedFlights',
  description: `Returns the currently loaded/displayed flights`,
  parameters: z.object({}),
  handler: async () => {
    const store = inject(FlightStore);
    return store.flightsValue().map(toFlightInfo);
  },
});
The Inner Workings of createFrontendTool
A look behind the scenes reveals that createFrontendTool is essentially an identity function that merely passes the tool definition through – it registers nothing and injects nothing. Only for followUp: false does it extend the description with the hint shown further below (slightly shortened):
// src/app/domains/shared/util-copilotkit/tool-definition.ts
import { type FrontendToolConfig } from '@copilotkit/angular';

export function createFrontendTool<Args extends Record<string, unknown>>(
  tool: FrontendToolConfig<Args>,
): FrontendToolConfig<Args> {
  [...]
  return tool;
}
The point of this pass-through lies in type inference: TypeScript derives the generic type parameter Args from the Zod schema passed in parameters and applies it to the entire definition. As a result, the handler knows the types of its parameters – in the case of findFlights, from and to as string – without the tool definition having to annotate them explicitly.
Without the helper function, only less convenient alternatives would remain: typing the definition by hand as FrontendToolConfig<...> and thus maintaining the parameter types redundantly alongside the schema, or forgoing typing altogether and only noticing typos in the handler at runtime.
Widgets Are Tools with a Component
For widgets such as the flight card, CopilotKit does not provide a dedicated concept – and does not need one. A widget is simply a frontend tool that has an Angular component assigned via the component property. When the agent calls the tool, CopilotKit renders that component in the chat history and passes it the parameters supplied by the LLM:
// src/app/domains/ticketing/ui/flight-widget.ts
const flightSchema = z.object({
  id: z.number().describe('The flight id'),
  from: z.string().describe('Departure city'),
  to: z.string().describe('Arrival city'),
  date: z.string().describe('Departure date in ISO format'),
  delay: z.number().describe('Delay in minutes'),
});

const flightWidgetSchema = z.object({
  flight: flightSchema,
  status: z.enum(['booked', 'other', 'none']).describe('Status of the flight'),
});

export const flightWidget = createFrontendTool({
  name: 'flightWidget',
  description: `Displays a concrete flight as an interactive card.
Use it when referring to one or more specific flights.`,
  parameters: flightWidgetSchema,
  component: FlightWidget,
  followUp: false,
  handler: async () => ({ shown: true }),
});
Here, the schema does not just describe the parameters of a function call but at the same time the data the component is supplied with. The option followUp: false tells CopilotKit that no further roundtrip to the agent is needed after displaying the widget – the widget concludes the response.
Important to note: followUp: false only controls the client. So that the model treats such calls as the end of its turn as well, createFrontendTool in the demo project automatically appends a corresponding hint to the tool description and thus to the prompt.
The assigned component implements the ToolRenderer interface and takes the tool call as an input. Through toolCall().args, it accesses the values passed by the LLM, typed by the schema:
// src/app/domains/ticketing/ui/flight-widget.ts
import { type AngularToolCall, type ToolRenderer } from '@copilotkit/angular';

@Component({
  selector: 'app-flight-widget',
  imports: [FlightCard, RouterLink],
  template: `
    @let flight = toolCall().args.flight;
    @if (flight) {
      <app-flight-card [item]="flight" [readonly]="true">
        [...]
      </app-flight-card>
    }
  `,
})
export class FlightWidget implements ToolRenderer<FlightWidgetArgs> {
  readonly toolCall = input.required<AngularToolCall<FlightWidgetArgs>>();
  [...]
}
Sending Requests to the Agent
The application's chat component – AssistantChat in the demo project – derives its state from the agent store. The following simplified version obtains the store directly through the function shown earlier; the real component receives it via a registry from the respective chat service, which calls injectTicketingAgentStore:
// src/app/domains/shared/ui-assistant/assistant-chat/assistant-chat.ts
import { CopilotKit } from '@copilotkit/angular';

[...]

export class AssistantChat {
  private readonly copilotKit = inject(CopilotKit);

  protected readonly store = injectTicketingAgentStore();

  protected readonly messages = computed(() => this.store().messages());
  protected readonly isRunning = computed(() => this.store().isRunning());

  protected submit(): void {
    void sendMessage(this.copilotKit, this.store, this.message());
  }
}
Sending is handled by the sendMessage function. It adds the user message to the agent and then triggers a run through CopilotKit:
// src/app/domains/shared/util-copilotkit/agent-store-helper.ts
export async function sendMessage(
  copilotKit: CopilotKit,
  store: Signal<AgentStore>,
  content: string,
): Promise<void> {
  const agent = store().agent;
  agent.addMessage({ id: randomUUID(), role: 'user', content });
  await copilotKit.core.runAgent({ agent });
}
The detour via copilotKit.core.runAgent is important: only this way do the previously registered frontend tools take part in the run. Now the client merely needs to display the response messages returned by the agent via AG-UI in the chat history.
Presenting the Chat History in Angular Templates
The entire chat history resides in the agent store's messages signal. The template iterates over the messages and, besides the textual response (content), also renders the requested tool calls. The latter is handled by the RenderToolCalls component provided by CopilotKit:
<!-- src/app/domains/shared/ui-assistant/chat-messages/chat-messages.html -->
@for (message of messages(); track message.id) {
  @if (message.content) {
    <div>{{ message.content }}</div>
  }
  @if (message.role === 'assistant' && message.toolCalls?.length) {
    <copilot-render-tool-calls
      [message]="message"
      [messages]="messages()"
      [agentId]="'ticketingAgent'" />
  }
}
For each tool call, RenderToolCalls looks up the registered presentation component – for flightWidget, this makes the interactive flight card appear. We do not need to take care of executing client-side tools ourselves, however, because CopilotKit handles that task without any further effort on our part.
The streamed AG-UI messages can be inspected through the browser's developer tools:
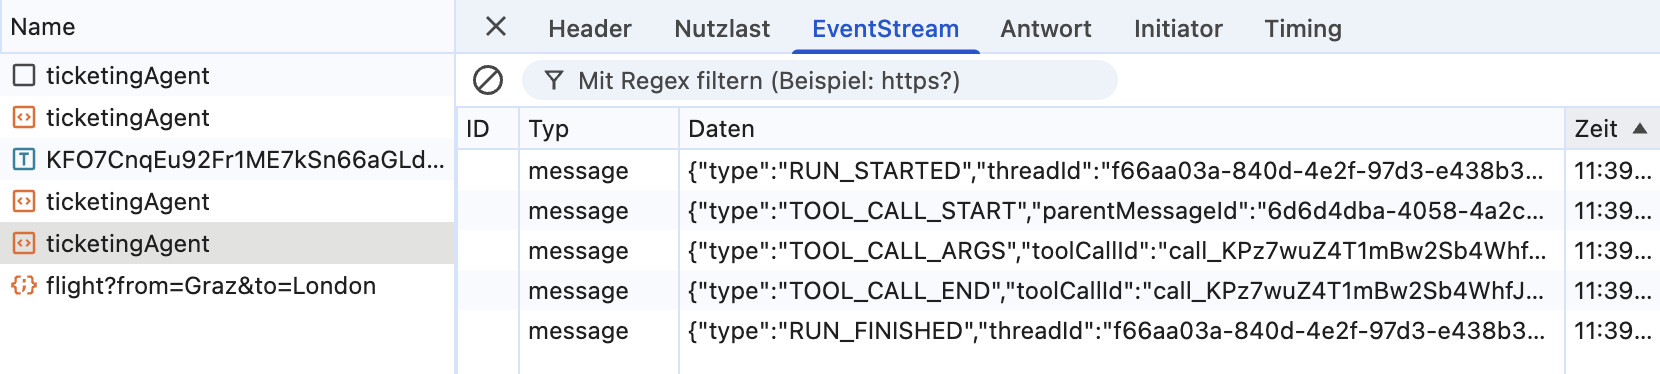
On the one hand, this makes the protocol tangible; on the other, it helps with troubleshooting.
Time for a Test
With that, everything is in place to try out the solution; details on starting the client and the agent can be found in the README of the demo project. If we ask the assistant for flights from Graz to Hamburg, for example, the agent requests the frontend tool findFlights, and the application navigates to the result list. Questions about concrete flights are answered with the flight card registered as a widget, directly in the chat history:
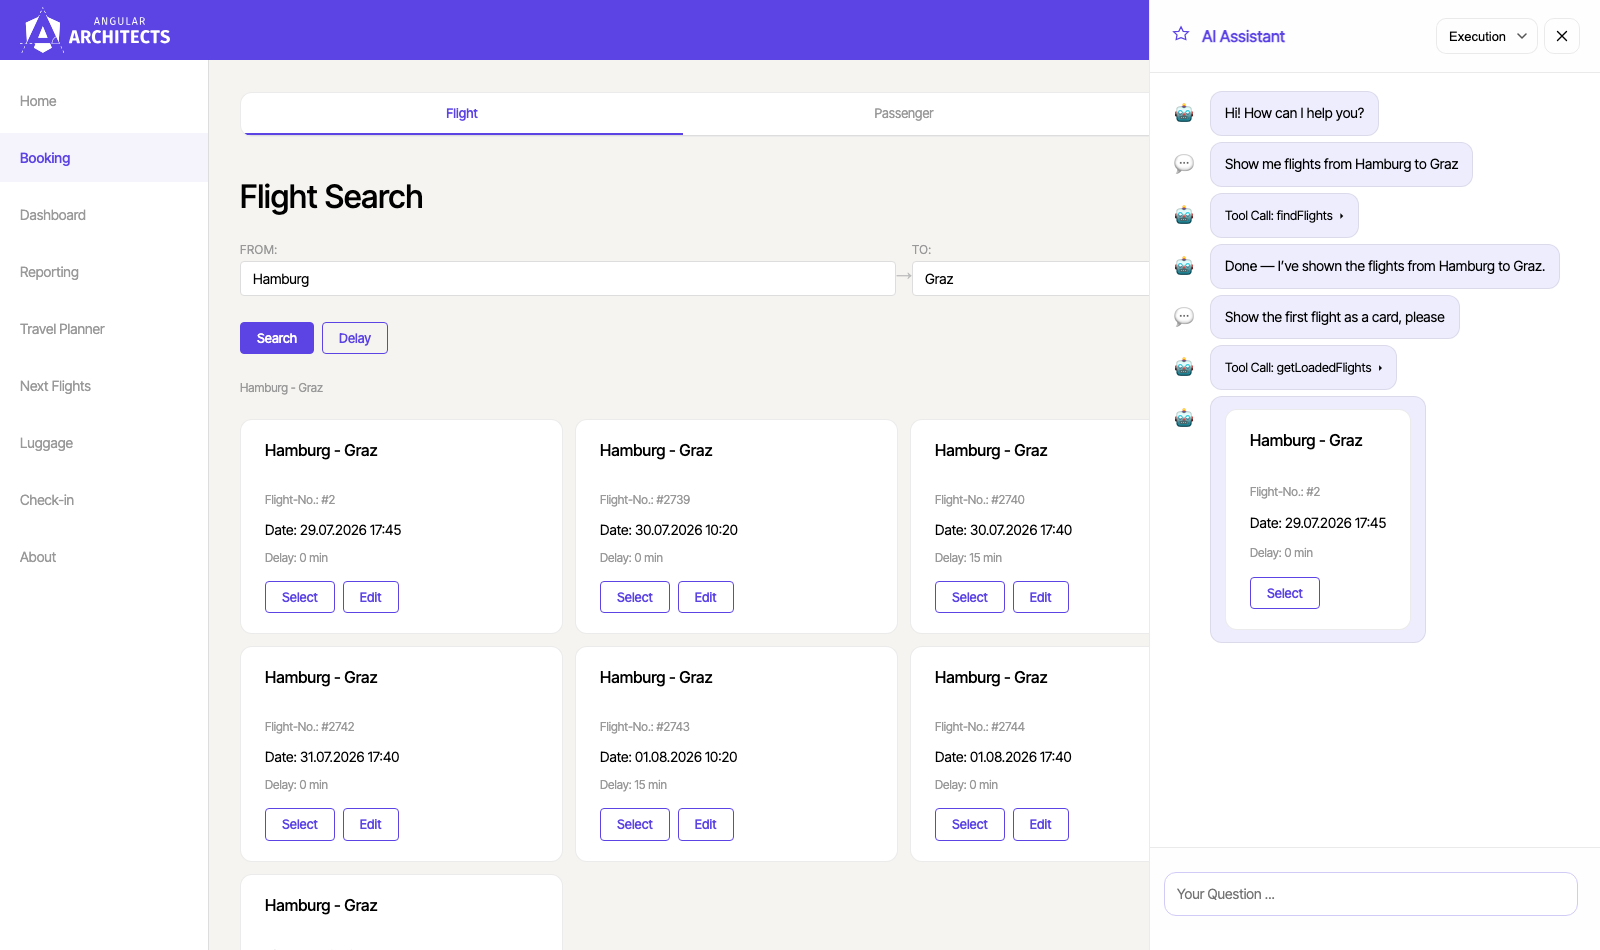
Looking up booked flights as well as booking and cancelling them is something the agent already handles too – backed by its server-side tools. Their calls are logged in the chat history by the default renderer activated at the beginning, so these actions remain traceable for users as well.
Summary
With @copilotkit/angular, AG-UI can easily be integrated into Angular. Client-side tools and widgets are described uniformly as frontend tools, with widgets merely bringing along an additional presentation component. Server-side tool calls appear in the chat history as well – rendered by CopilotKit's built-in default renderer, activated by the defaultToolRendering option. The agent store exposes the chat history as a signal, and the included RenderToolCalls component brings the registered components to the screen within the chat.
The Next Step
With AG-UI, the communication between frontend and agent is settled – the next series shows how the LLM itself can compose the UI from layout, display, and input primitives, without shipping new frontend code for every use case.
Interested in production-ready Agentic UI architectures?
In my workshop, we dig into AG-UI, A2UI, MCP Apps, HITL patterns, and modern Angular architectures for real-world agentic systems.

FAQ
How Can AG-UI Be Integrated into Angular?
With @copilotkit/angular, an Angular integration is available that builds directly on the AG-UI SDK. It manages the agent, executes client-side tools, and exposes the chat history as a signal-based agent store.
What Is an Agent Store?
The agent store represents a concrete agent together with its state. injectAgentStore returns it as a Signal<AgentStore> that offers, among other things, the chat history (messages) and the execution state (isRunning) as signals.
What Is the Helper Function initAgentStore For?
CopilotKit currently offers no way to initialize agent stores for lazy-loaded feature areas after the fact. initAgentStore closes this gap: it registers the agent at runtime as a self-managed agent and registers the frontend tools for its agentId.
How Do Widgets End Up in the Chat History?
Widgets are frontend tools with an assigned Angular component. When the agent requests such a tool, the CopilotKit component RenderToolCalls renders the registered component in the chat history and supplies it with the parameters passed by the LLM, typed by the Zod schema.
How Can Server-Side Tool Calls Be Visualized?
Server-side tool calls also appear in the chat history, even though the client does not execute them. The defaultToolRendering: true option of provideCopilotKit activates CopilotKit's built-in default renderer, which displays such calls as an expandable card including their parameters.