

The NGRX Signal Store, released shortly after Angular 17, offers a very lightweight solution for state management. With no direct dependencies on RxJS, it relies entirely on Signals. However, its greatest strength is undoubtedly its high degree of expandability. With so-called custom features, recurring tasks can be implemented very easily in a central way.
The first example of custom features presented here is very straightforward. After that, things get a little more challenging: The consumer of a feature must be able to determine the names of the signals and methods set up by the feature. Otherwise, naming conflicts will arise quickly. As the following examples show, this does not contradict strict typing in TypeScript.
The examples shown here are inspired by an example from Marko Stanimirović, the NGRX core team member behind the Signal Store, and the Entity management solution @ngrx/signals/entity shipped with the Signal Store.
📂 Source Code (Branch: arc-signal-store-custom-typed)
Signal Store 101
Before we start, I would like to quickly get everyone on board and summarize the most important aspects of the NGRX Signal Store. A detailed overview can be found in my article here.
The signal store comes with NGRX since version 17 and is located in the npm package @ngrx/signals. At the center is the signalStore function, which creates a new Signal Store. Technically, this is an Angular service that receives signals, derived (calculated) signals, and methods for state management:
import {
  patchState,
  signalStore,
  withHooks,
  withMethods,
  withComputed,
  withState,
} from '@ngrx/signals';

[…]

export const FlightBookingStore = signalStore(

  { providedIn: 'root' },

  // State Properties
  withState({
    from: 'Paris',
    to: 'London',
    initialized: false,
    flights: [] as Flight[],
    basket: {} as Record<number, boolean>,
  }),

  // Calculated State
  withComputed(({ flights, basket, from, to }) => ({
    selected: computed(() => flights().filter((f) => basket()[f.id])),
    criteria: computed(() => ({ from: from(), to: to() })),
  })),

  // Extension
  withCallState(),

  // Methods
  withMethods((state) => {
    const { basket, flights, from, to, initialized } = state;
    const flightService = inject(FlightService);

    return {
      load: async () => {
        if (!from() || !to()) return;

        // Updating the extension’s state (callState)
        patchState(state, setLoading());

        const flights = await flightService.findPromise(from(), to());
        patchState(state, { flights });

        // Updating the extension’s state (callState)
        patchState(state, setLoaded());

      },
    };

  })
);
Interestingly, the Signal Store is already based entirely on so-called features in this first expansion stage: withState , withComputed or withMethods are three features that enrich the store with properties (signals and calculated signals) and methods.
The function withCallState is a first simple custom feature that introduces a callState Signal. This signal informs, among other things, whether data is currently being loaded or whether the loading process has already been completed. It introduces the following signals:
callState: Can hold the valuesinit,loading,loaded,or an object with an error message.loading: Computed signal; returnstrueif thecallStatehas the valueloading.loaded: Calculated signal; returnstrueif thecallStatehas the valueloaded.error: Calculated signal; returns an error message that may be stored in thecallStateornull.
The CallState feature also offers so-called Updaters such as setLoading or setLoaded. These are functions used by consumers like Listing 1 for changing the value of the callState. In general,Updaters allow consumers to change the managed state without having to know exactly how it is structured.
The next listing shows a simple component that uses the FlightBookingStore. It delegates to the individual Signals and to its load method. It also accesses the loading signal set up by the CallState feature:
@Component({ … })
export class FlightSearchComponent {
  private store = inject(FlightBookingStore);

  // Getting Signals from Store
  from = this.store.from;
  to = this.store.to;
  basket = this.store.basket;
  flights = this.store.flights;
  selected = this.store.selected;

  // Getting Signal from Extension
  loading = this.store.loading;

  async search() {
    this.store.load();
  }
}
A Simple First Extension
Here is a first, very simple version of the CallState feature used in the last section:
import {
  SignalStoreFeature,
  signalStoreFeature,
  withComputed,
  withState,
} from '@ngrx/signals';

[…]

export type CallState = 'init' | 'loading' | 'loaded' | { error: string };

export function withCallState() {
  return signalStoreFeature(
    withState<{ callState: CallState }>({ callState: 'init' }),
    withComputed(({ callState }) => ({
      loading: computed(() => callState() === 'loading'),
      loaded: computed(() => callState() === 'loaded'),
      error: computed(() => {
        const state = callState();
        return typeof state === 'object' ? state.error : null
      }),
    }))
  );
}
This is a function that returns the result of signalStoreFeature. The signalStoreFeature function, in turn, simply groups existing features: withState introduces the callState property, and withComputed defines the previously discussed calculated signals based on it.
The Updaters provided by the feature only return a partial state object with the property to be updated:
export function setLoading(): { callState: CallState } {
  return { callState: 'loading' };
}

export function setLoaded(): { callState: CallState } {
  return { callState: 'loaded' };
}

export function setError(error: string): { callState: CallState } {
  return { callState: { error } };
}
Now it Really Starts: Typing
The CallState implementation in the last section briefly summarizes the solution to a recurring requirement. Once implemented, individual applications can integrate the feature into their stores.
A drawback of this implementation, however, is that the signals introduced have fixed names: callState, loading, loaded, and error. This quickly leads to naming conflicts, especially if the same store requires the feature more than once. An example of this is a store that wants to manage several callStates for different entities, e.g. for flights and passengers.
In this case, the consumer should be able to specify the names of the signals introduced. That's precisely what we'll take care of below. To make this extension type-safe, we first have to think a little about the typing of the withCallState function.
Our withCallState function does not currently have an explicit return type. Therefore, TypeScript infers this type by looking at the return value in the function. The compiler realizes that a callState property is available.
The type determined here by inference is a SignalStoreFeature<Input, Output>. The type parameter Input defines which signals and methods the feature expects from the store, and Output specifies which additional signals and methods the feature provides. Our feature does not place any expectations on the store, but provides a callState signal as well as several calculated signals such as loading. Respectively, our Input and Output types looks as follows:
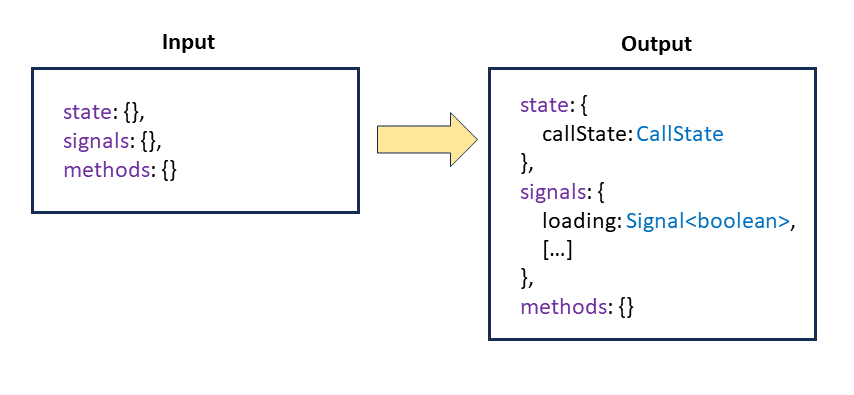
It should be noted that state describes the signal to be introduced, and the signals property represents the signals calculated from it. This representation at least corresponds to the simplified external view.
The internal view is a little more complex, especially since withState first introduces the callState signal and only then withComputed adds the calculated signals. That's why the inside view has two outputs, which are combined using a helper type.
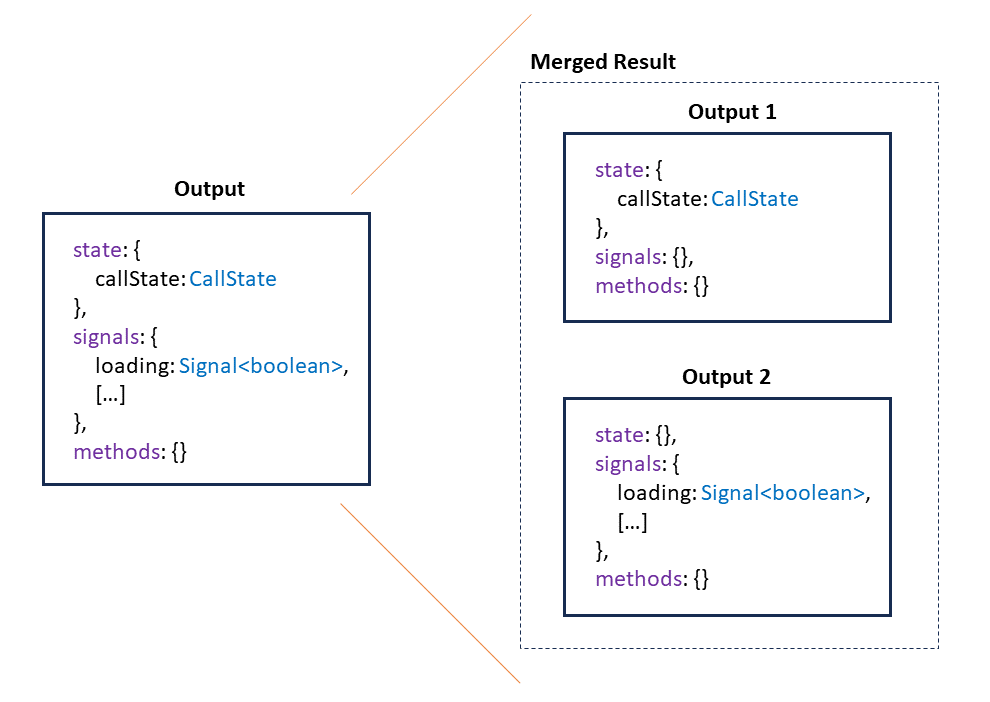
For the sake of simplicity, the previous image calls the helper type Merged Result. However, the truth is that the Signal Store has several internal types for this.
On a logical level, the the internal view und the external one are equivalent. TypeScript may need a little nudge in the form of a type assertion to recognize this. However, explicitly defining the internal view is a bit annoying and currently not really possible because the required helper types are not part of the Signal Store's public API. That's why I 'm using a pattern here that can also be found several times in the Signal Store code: A combination of a function overload with the external view and a function implementation that uses SignalStoreFeature instead of SignalStoreFeature<Input, Output> for the internal view:
// Overloading with External View
export function withCallState()
  : SignalStoreFeature<
    {
      state: {},
      signals: {},
      methods: {}
    },
    {
      state: {
        callState: CallState
      },
      signals: {
        loading: Signal<boolean>,
        loaded: Signal<boolean>,
        error: Signal<{ error: string } | null>
      },
      methods: {}
    }>;
// Implementation with Internal View
export function withCallState(): SignalStoreFeature {
  return signalStoreFeature(
    withState<{ callState: CallState }>({ callState: 'init' }),
    withComputed(({ callState }) => ({
      loading: computed(() => callState() === 'loading'),
      loaded: computed(() => callState() === 'loaded'),
      error: computed(() => {
        const state = callState();
        return typeof state === 'object' ? state.error : null
      }),
    }))
  );
}
The SignalStoreFeature type without type parameters uses more general types for Input and Output that do not assume specific names or data types.
More: Angular Architecture Workshop (online, interactive, advanced)
Become an expert for enterprise-scale and maintainable Angular applications with our Angular Architecture workshop!
All Details (English Workshop) | All Details (German Workshop)
Typing and Dynamic Properties – How do They Work Together?
Now that the basic structure of the typing is in place, we can extend it with configurable property names. Following the example of @ngrx/signals/entity, consumers should have the option to define a prefix when activating the feature:
export const FlightBookingStore = signalStore(
  { providedIn: 'root' },

  withState({ … }),
  withComputed(( … ) => ({ … })),

  withCallState({ prop: 'flights' }),
  withCallState({ prop: 'passengers'}),

  […]
);
This prefix should now be included in the property names defined by the feature. For example, the first call to withCallState should produce the following properties:
flightsCallState(state)flightsLoading(computed)flightsLoaded(computed)flightsError(computed)
The second call analogously leads to these properties:
passengersCallState(state)passengersLoading(computed)passengersLoaded(computed)passengersError(computed)
Setting up these properties at runtime isn't a big problem in the world of TypeScript, especially since the underlying JavaScript is a dynamic language anyway. The challenge, however, is to also inform the type system about these properties.
For this task, you first need to find a way to express the prefix in a type declaration. At this point, we benefit from the fact that literals can also be used as data types:
export type BoxStatus = 'open' | 'closed';
const candyBox: BoxStatus = 'open';
Such String Literal Union Types are often used in TypeScript applications to express enums. This is even closer to EcmaScript than using TypeScript's enum keyword. Funnily, nobody is forcing us to offer multiple options. That's why this variant is completely ok:
export type BoxStatusAfterHolidays = 'closed';So here we have a type that can hold exactly a single string value. We use this exact pattern to inform the type system about our prefix. First, we create a type that defines the name of the signal to be introduced based on the prefix:
export type NamedCallState<Prop extends string> = {
  [K in Prop as `${K}CallState`]: CallState;
};
This is a so-called mapped type, which maps one type to a new one. The type parameter Prop extends string describes the original type. It can be any string used as a type. String must also be written in lowercase because, at this point, we are referring to a specific string and not the String object type. The notation K in Prop also reduces to this string. In more complex cases, one could use the keyword in, for instance, to loop through the properties of the original type.
We can proceed analogously for the calculated signals to be introduced:
export type NamedCallStateComputed<Prop extends string> = {
  [K in Prop as `${K}Loading`]: Signal<boolean>;
} & {
    [K in Prop as `${K}Loaded`]: Signal<boolean>;
} & {
    [K in Prop as `${K}Error`]: Signal<string | null>;
};
Since a mapped type can only have a single mapping, several mapped types are used here. They are combined with the &-operator (intersection operator). With these two types we can now specify the typing of our withCallState function:
export function withCallState<Prop extends string>(config: {
  prop: Prop;
}): SignalStoreFeature<
  { state: {}, signals: {}, methods: {} },
  {
    state: NamedCallState<Prop>,
    signals: NamedCallStateComputed<Prop>,
    methods: {}
  }
>;
export function withCallState<Prop extends string>(config: {
  prop: Prop;
}): SignalStoreFeature {
[…]
}
Now, the type system knows about our configured properties. In addition, it is now important to set up these properties at runtime. An auxiliary function getCallStateKeys is used for this purpose:
function getCallStateKeys(config: { prop: string }) {
  return {
    callStateKey: `${config.prop}CallState`,
    loadingKey: `${config.prop}Loading`,
    loadedKey: `${config.prop}Loaded`,
    errorKey: `${config.prop}Error`,
  };
}
This helper function returns the same mappings at runtime as the previously introduced types during compile time. The updated implementation of withCallState picks up these names and sets up corresponding properties:
[…]
export function withCallState<Prop extends string>(config: {
  prop: Prop;
}): SignalStoreFeature {
  const { callStateKey, errorKey, loadedKey, loadingKey } =
    getCallStateKeys(config);

  return signalStoreFeature(
    withState({ [callStateKey]: 'init' }),
    withComputed((state: Record<string, Signal<unknown>>) => {

      const callState = state[callStateKey] as Signal<CallState>;

      return {
        [loadingKey]: computed(() => callState() === 'loading'),
        [loadedKey]: computed(() => callState() === 'loaded'),
        [errorKey]: computed(() => {
          const v = callState();
          return typeof v === 'object' ? v.error : null;
        })
      }
    })
  );
}
So that the updaters can cope with the dynamic properties, they also receive a corresponding parameter:
export function setLoading<Prop extends string>(
  prop: Prop
): NamedCallState<Prop> {
  return { [`${prop}CallState`]: 'loading' } as NamedCallState<Prop>;
}
This idea can also be found in @ngrx/signals/entity. The updater is then used as follows:
load: async () => {
  patchState(state, setLoading('flights'));
  […]
}
More Examples: CRUD and Undo/Redo
In the previous article, I demonstrated features for implementing CRUD and Undo/Redo. The following repo contains a version of these custom features using dynamic properties as shown here.
📂 Source Code (see 🔀 branch arc-signal-store-custom-examples-typed)
Conclusion
The NGRX team is known for being exceptionally skilled at leveraging the possibilities of the TypeScript type system. The result is an extremely easy-to-use and type-safe API.
In this article, we switched perspectives and discussed how you can leverage the patterns used by the NGRX team for your custom Signal Store features. This enables to configure property names and thus avoid naming conflicts without compromising type safety.
To do this, we have to deal with aspects of TypeScript that application developers usually don't get in contact that often. That's why the patterns used may sometimes seem a bit complicated. The good news is that we only need these patterns if we are developing highly reusable solutions. As soon as we switch back to the role of application developer, we have a type-safe solution that is comfortable to use.
What's next? More on Architecture!
Please find more information on enterprise-scale Angular architectures in our free eBook (5th edition, 12 chapters):
- According to which criteria can we subdivide a huge application into sub-domains?
- How can we make sure, the solution is maintainable for years or even decades?
- Which options from Micro Frontends are provided by Module Federation?

Feel free to download it here now!