

Over the last few weeks I've written about which LLM is best for Angular development and, right after, about which app or harness to use around it. In that second post I treated the words app and harness as more or less the same thing and never really drew a line between them. This post is the follow-up that does exactly that.
It zooms in on the harness: what it actually is, and how to set one up for your Angular projects so the agent not only runs smoothly, but produces generated and refactored code that I would actually accept in long-lived, continuously evolving Angular codebases.
So What Is the Harness?
Small naming note for Angular readers: I do not mean the Angular CDK ComponentHarness for testing components. In this post, a harness is the software around the model.
The harness is the thing that contains the model. And here's what a lot of people miss: on its own, even a strong LLM is basically just fancy autocomplete, like the one we've been using for years from GitHub Copilot. The only thing it can really do is respond to our messages by writing text. So how is it possible that it can edit our code at all?
This is where the harness comes in. It gives the model the power of tool calling, and suddenly that autocomplete can do real work: list the current directory, search the whole project for inject(, open a file, apply an edit, run ng build. Instead of only writing text back to us, the model emits a structured tool call, the harness actually runs it, and then feeds the result back into the conversation. (Simon Willison has a really nice, no-nonsense walk-through of how coding agents work if you want to go one level deeper.) So in short: the harness is the wrapper around the model that lets it read our projects and then actually change them.
And that feedback loop is the whole trick. A coding agent is really just our LLM running in a loop: it proposes an action, the harness runs the tool and hands the output back, the model reads that output and decides what to do next – open another file, fix the error it just caused, run the tests again. This loop is what most people mean today when they talk about AI agents: the harness manages the context, the tools, the prompts, and the control flow, while the model does the actual reasoning.
My personal take? The harness, not the model, is where most of the day-to-day quality comes from. Two developers can run the exact same Opus or GPT model and still get wildly different results, simply because one harness has the right tools, the right project context, and sensible guardrails – and the other doesn't. And that's exactly why this post exists: the harness is the part you control, so setting it up properly for Angular is not some nice-to-have. In my opinion, it's the highest-leverage thing you can do.
Model, Harness, App – What's the Difference?
We now know what a harness does – but it's easy to confuse it with the model underneath it and the app around it. So let me make that concrete with the exact setup I've been using for Angular development today:
- The model (our LLM): Opus – the brain (BTW, I hope we get Fable 5 back soon 😏).
- The harness: Claude Code – gives Opus its tools and runs the loop we just talked about.
- The app: the Claude Desktop app – the window I happen to be looking at all of this through.
Here's the part that trips a lot of people up: we can swap the app without touching the harness or the model at all. The exact same Claude Code + Opus combination can live in a bunch of different places:
- in the Claude Desktop app,
- in the Claude Code CLI, right in our terminal – that's really its native home,
- as the official Claude extension in VS Code,
- as the official Claude plugin in WebStorm (and the other JetBrains IDEs),
- and even inside Cursor – whose extension is basically the same one we use in VS Code, since Cursor is a VS Code fork.
Same brain, same harness, five different windows. The app is mostly just the UI we sit in front of.
Now it gets interesting. Inside Cursor, we don't have to use the Claude extension at all – we can switch to Cursor's own harness instead, still running Opus underneath. So suddenly we have one app and one model, but two different harnesses to choose from. That's the cleanest way I know to actually feel the difference: nothing changed except the harness.
And harnesses are not created equal. In my experience – and in some benchmark results – Cursor's own harness can squeeze noticeably more out of the same Opus model than the Claude extension does: better scores, smoother experience. The gap can be surprisingly large: in an independent benchmark cited in Paweł Józefiak's harness comparison, the same planning task with the same model went from 77% running in Claude Code to 93% in Cursor – nothing changed but the harness. That does not mean Cursor wins every harness benchmark; the Artificial Analysis chart below shows a different picture for a different Opus comparison. The point is narrower and more important: the wrapper changes the result.
And the reason isn't magic, it's tuning: a team like Cursor's pours real effort into shaping its tools, system prompt, and tool descriptions for each new model, and that hand-tuning is what wrings the extra points out. So why would anyone still pick the Claude extension inside Cursor? One big reason: cost. With the Claude extension you can run Opus on your existing Claude subscription, while Cursor's harness bills you per API token. For heavy daily Angular work, that's the difference between a flat monthly fee and a frankly scary API bill.
So that's the whole picture: the model is the brain, the harness is what gives it hands and runs the loop, and the app is just the window we watch it through. We can mix and match them surprisingly freely – and as the rest of this post will show, the harness is the layer that's really worth getting right.
When the Claude Code Harness Leaked
If you ever doubted that the harness is its own engineering layer, March 2026 gave us an accidental case study. A Claude Code npm package included source maps that exposed a large part of the TypeScript source, so developers could inspect the harness from the inside.
And what was visible? No secret model, no hidden API – mostly the harness. The leaked code exposed Claude Code's system prompt, the definitions and logic for its tools (bash, read, write, edit, glob, grep), the shape of its agentic loop, and how it pulls in CLAUDE.md. In other words: exactly the stuff we've been calling "the harness" all along. Anthropic's public statement framed it as a release packaging issue rather than a customer-data breach.
For me, the fascinating part is what it confirmed: a huge amount of what makes Claude Code feel so capable lives in the system prompt and the tool descriptions, not only in the model weights. That's the harness doing its job – and a pretty good reminder that this layer is something real, inspectable, and very much worth getting right.
So Which Harness Is Best for Angular?
So if the harness is the layer worth getting right, the obvious next question is: which one should we actually use for Angular? Short answer: I can't prove it. There's no benchmark that measures the "best harness for Angular" specifically, and honestly I don't think there could be one – so everything in this section is my personal, subjective verdict, same as the rest of this series.
If you live in the terminal, here are the harnesses worth knowing about, roughly in the order I'd reach for them today:
- opencode – if you only want one recommendation, start here. It's the open-source community favorite – a polished, terminal-native harness with a huge user base, and it's just as bring-your-own-key and model-agnostic as the rest, so you can point it at Opus, GPT, Gemini or even a local model.
- Pi – the alternative for the tinkerers among us. A refreshingly minimal harness built around a tiny core that you extend yourself with TypeScript extensions and skills. Lovely if you enjoy reshaping your tools; probably overkill if you just want to get coding.
- Claude Code – a few months ago, this was the one to beat: one of the best harnesses and one of the best overall experiences you could get in the terminal, full stop. Honestly, though, I wouldn't reach for it there anymore. It's the same harness that now powers the Claude Desktop app, and the experience inside that app – and the other super apps – has become so much better that the bare CLI just doesn't feel worth it today.
Personally, though, I keep coming back to the super apps: Codex, the Claude Desktop app, and Cursor. As I wrote in the apps and harnesses post, these three give me the biggest, most polished feature set – and they happen to ship really good harnesses, too. As an app, I personally like Codex the most.
But if we're talking strictly about the harness, the interesting part is that we can now compare some setups with the model held fixed. The Artificial Analysis Coding Agent Index is one of the few benchmarks where that is actually possible. For example, here is the same Opus model at medium effort running through opencode, Cursor CLI, and Claude Code:
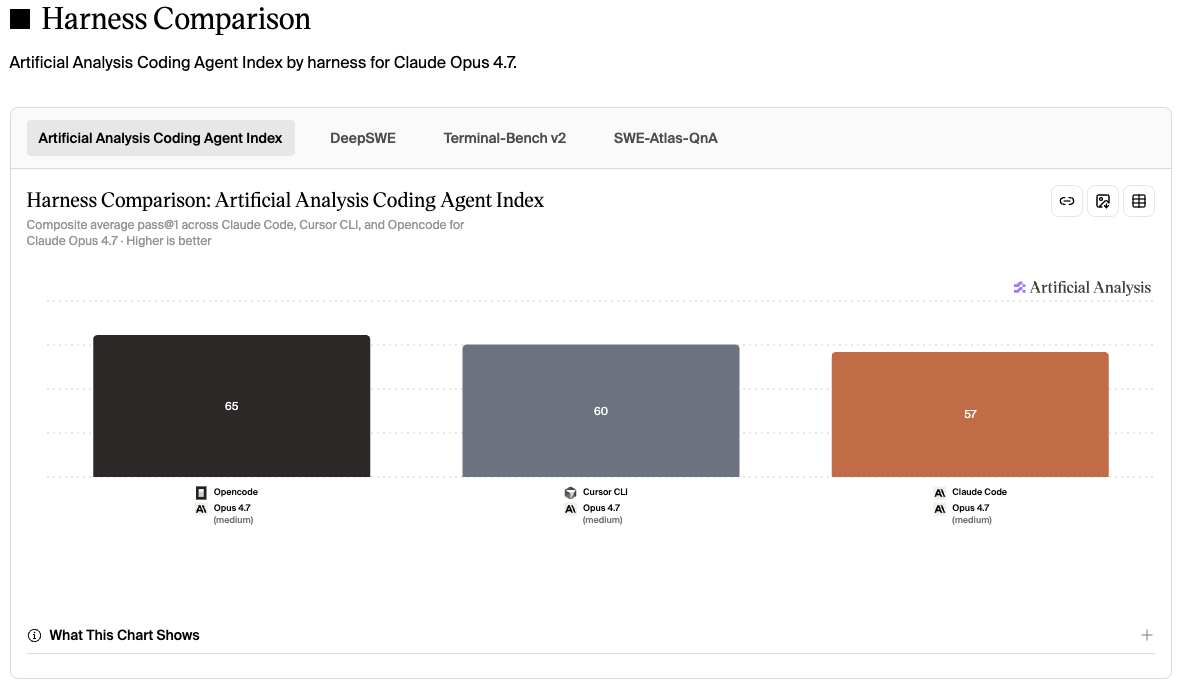
Harness comparison by Artificial Analysis for the same Opus model at medium effort across opencode, Cursor CLI, and Claude Code – click the chart for the live comparison. That's exactly what makes it a harness benchmark and not just another model leaderboard.
So where does that leave us? All three of my go-to super apps (Codex, the Claude Desktop app and Cursor) are genuinely good choices. For me it mostly comes down to whether I want GPT or Opus doing the work – and whether I feel like switching between them depending on the task. If you like to switch, you can either juggle several apps and harnesses (what I usually do), or just use Cursor for everything, since it happily runs all the major models under its own harness. As always, though: this is not a benchmark, just my personal verdict.
One setup I'd gently steer you away from, even though it's still the most common one I see: plain VS Code with GitHub Copilot. The GPT model inside is perfectly capable – this isn't a model problem. It's that Copilot grew out of autocomplete, and its agent experience still feels a step behind the purpose-built harnesses to me. Tellingly, even VS Code's own team now frames Copilot around "the harness" – "The model is the engine. The harness is the car." – and says it's where they spend most of their engineering time. They're right. So if your whole AI setup is still VS Code plus Copilot, that's exactly the setup worth outgrowing.
The Fourth Factor: Your Codebase
So far this post has been about three things you assemble: the model, the harness, and the app. But there's a fourth factor that quietly shapes everything the agent produces, and it's the one you can't pick from a menu: your existing codebase.
Here's why it matters so much. An agent doesn't write Angular in a vacuum – it reads the code around the change first, and then it imitates. Give it a clean, modern, consistent codebase and it has the best possible reference: it sees your real components, your signal stores, your services, and writes new code that looks like what's already there. In a codebase like that, honestly, the harness setup matters less – the style guide, the AGENTS.md, the lint rules are still worth having, but the code itself is already doing half the teaching.
Now flip it. Point the same agent at a legacy codebase – any everywhere, NgModules, *ngIf, RxJS where signals belong, no strict typing, a barely-there ESLint config – and it imitates that instead. It will happily match the mess, because the mess is what it sees. This is where the setup stops being a nice-to-have and becomes the thing holding the line: a strong style guide, strict TypeScript, a serious ESLint rule set, and an opinionated AGENTS.md are what override the bad examples in the surrounding code and pull the output back up to the standard you actually want.
So there's an inverse relationship worth internalizing: the worse your codebase, the more your harness setup matters. On a pristine greenfield project you can get away with a light touch. On the brownfield codebases most of us actually work in, the guardrails and the style guide aren't decoration – they're the only thing between you and an agent that cheerfully writes 2019-era Angular because that's what it found lying around.
With a harness picked – and a clear-eyed sense of the codebase you're aiming it at – the real work only starts: actually setting it up so it writes Angular the way we want. That's what the rest of this post is about.
So How Do I Actually Set This Up?
Enough theory – let me show you the exact setup I use. Everything below lives in a companion repo, ng-agentic: a small Angular workspace I generated fresh with the Angular CLI 22 and then turned, commit by commit, into something every agent can work in. Clone it, read through the history, or just follow along here and build the same thing into your own project – either way, the goal is one workspace where the harness produces the Angular code we actually want.
At a high level, the setup has five parts:
- start from a clean CLI baseline, or identify the brownfield baseline you already have
- make formatting and linting non-negotiable
- hand the agent your Angular style guide
- turn
AGENTS.mdinto an operating contract - wire every app, IDE, and agent back to the same rules
That greenfield-or-brownfield choice shows up immediately, at the very first command. I went greenfield for this repo – a fresh ng new – because it makes every step easy to show on its own. But let's be honest: most of us aren't starting from scratch. We're dropping the agent into an existing Angular app – brownfield, legacy or not – the more common case by far. The good news is that almost everything below is identical either way. The only greenfield-only step is the ng new itself – on an existing project you simply skip it and layer the same tooling and conventions on top of what you already have.
Start from a Clean ng new
The greenfield path is the boring one – a fresh project straight from the Angular CLI:
ng new ng-agenticThat gives us the usual scaffold – config, dependencies, a starter component, an initialized Git repo. The CLI can also generate agent config for us along the way – either when ng new asks which AI tools we use, or later via ng generate ai-config – and that's where the first AGENTS.md comes from, the file every agent reads first. We'll make that file do real work further down; for now it just needs to exist.
The only cleanup on that first commit was trimming a few duplicated instructions out of the generated AGENTS.md and running the formatter over everything:
pnpm format # runs prettier --write .Doing that by hand on every commit gets old fast – which is exactly the next thing to automate.
Make Formatting and Linting Non-Negotiable
Here's the thing about handing an agent the keys: it'll write code in whatever style the prompt nudges it toward, and it'll just as happily commit a half-formatted mess if nothing stops it. So before I teach the harness how I want my Angular written, I give it a hard floor it can't sink below – formatting and linting that run automatically on every commit, whether the code came from me or from the model.
The enforcer is a Husky pre-commit hook:
pnpm add -D husky
pnpm exec husky init
husky init creates .husky/pre-commit; I point it at the project's format script, so every commit gets prettier-formatted before it lands. No more "fix formatting" commits, and no more arguing with the agent about quotes and trailing commas.
Formatting is the easy half. For real code quality I add Angular ESLint, which understands Angular and not just plain TypeScript:
ng add @angular-eslint/schematicsLinting the whole project on every commit is slow, so I scope it to the staged files with lint-staged and run that from the hook instead:
{
  "lint-staged": {
    "*.{html,js,ts}": ["eslint --fix", "prettier --write"],
    "*.{css,json,md,scss}": ["prettier --write"]
  }
}
The default Angular ESLint preset is fairly relaxed, so I tighten eslint.config.js with the stricter rules I actually care about, then do a one-time cleanup pass with ng lint --fix.
And here's a small moment that captures the whole point of this post. After the auto-fix, two issues are left that ESLint won't touch on its own – a component missing OnPush, and a function missing its return type. Both are mechanical, so I don't fix them by hand: I hand them to the agent and let the harness close its own loop. The guardrail flags the problem, the model fixes it, and the hook verifies the fix on the way back in.
One word for the brownfield crowd: that first ng lint won't print two warnings, it'll print a few hundred. Don't --fix the whole pile in one heroic commit – treat that wall as your honest baseline, the real starting state of the code, and chip away at it deliberately. It's exactly the kind of backlog the agent is good at later, but that's a story for another post.
Hand the Agent Your Style Guide
If you take only one thing from this entire post, take this one. The style guide is the single highest-leverage file in the whole setup – it matters more than the linting, more than the MCP servers, more than the clever AGENTS.md we'll get to next.
Here's why. A strong model already knows Angular – generically. Ask it for a component and you'll get a perfectly reasonable, perfectly generic one: maybe Jest where you use Vitest, maybe half-remembered NgModules from 2021, maybe RxJS where you'd reach for a signal. What the model doesn't know is how your team writes Angular – your stack, your conventions, your taste. The style guide is where you hand it exactly that. And the moment you do, the harness stops writing generic Angular and starts writing yours.
In the repo this lives in a style-guide/ folder. One general style-guide.md sets the baseline – it pins the target stack (Angular v22+, TypeScript 6, zoneless, Vitest + Playwright) and lays out plain Do / Should / Don't rules. It's a living document, too – versioned (2.0.1 as I write this), not a one-off.
Around that baseline sit focused, file-type-specific guides. Start with the Angular Coding Style Guide itself, then jump straight to whichever specific one is relevant:
- TypeScript (Angular) files
- HTML view templates
- SCSS styling files
- Accessibility (a11y)
- Testing (Vitest & Playwright)
- Git commits
- Markdown files
- NPM packages
Two design choices in here are worth copying:
- It's written for humans and agents at once. Same document, one source of truth. A new teammate reads it on day one; the agent reads it on every task. No second set of conventions quietly drifting out of sync.
- It's split by file type on purpose. When the agent edits a template, it should pull in the HTML guide – not the SCSS rules, not the testing checklist, not the entire wall of conventions at once. This isn't just tidiness: a model's accuracy actually drops as its context fills up, and burying the one rule that matters among hundreds that don't is the worst needle-in-a-haystack problem you can hand it. Picture fixing a bug when you're shown the two files it might live in versus all two thousand. Narrower, relevant context means sharper focus and better output, and it pays off more and more as the guide grows.
So this is the section to spend real time on. Borrow the structure from the repo if you like, but fill it with your rules – the ones you'd give a sharp new hire in their first week. That document is what turns a capable-but-generic harness into one that writes Angular the way your codebase actually wants it written.
And mine is genuinely never finished. I keep refining this style guide as Angular moves and as I learn what actually holds up in practice – so if you spot something missing, something you'd do differently, or a rule that has aged badly, I'd honestly love to hear it. Open an issue or a pull request on the repo, or just reach out and tell me. Good conventions are a team sport, and this one gets a little better every time someone pushes back on it.
Turn AGENTS.md Into an Operating Contract
If the style guide is about how the code should look, AGENTS.md is about how the agent should behave – the rules of engagement it reads before it touches anything. The version the CLI generates is fine, but generic. So I rewrote it into a repo-specific operating contract: a short document that tells the harness exactly how to act in this codebase.
The part I care about most is the workflow rules, because this is where a model goes from "powerful but a bit reckless" to "careful teammate." A few that earn their place:
- Preserve my edits. Before changing a file, check its current state and don't revert, rewrite, or drop my changes or comments unless I asked. It's the same rule I'd give any human collaborator – and the one I try to hold myself to.
- Keep fixes local. When fixing a bug, change the minimum needed. No opportunistic refactors, no "while I'm here" cleanups smuggled into the diff. Spotted a worthwhile refactor? Suggest it; don't sneak it in.
- Stay in your lane. Don't touch unrelated files, prefer minimal diffs, and run lint and the relevant tests before declaring a task done.
- Don't start the dev server. Never fire up
ng serveon its own – I usually already have one running on:4200.
This is also where the two layers connect. AGENTS.md is the primary instruction – the one file the agent always loads, on every task, no exceptions. The style guides are not; they come in through progressive disclosure, just-in-time, only when the agent actually touches a matching file. Create or edit a template and the HTML guide loads; touch a .scss and the styling guide loads; nothing else competes for the model's attention. AGENTS.md spells out that contract in one decisive line – read only the narrowest relevant guide – plus a precedence rule: project rules override generic Angular advice and any skill's examples. That precedence is what stops a confident model from quietly defaulting to the Angular it learned two years ago.
There's a deeper reason this file pulls its weight. An agent starts every session knowing nothing about your repo – and if something isn't in its context, it may as well not exist for the model – so without AGENTS.md it has to spend tool calls rediscovering how the project is laid out, every single time. AGENTS.md front-loads just enough to skip that: not the whole codebase, but the always-true orientation – your conventions, where things live, which narrow guide to read next – so the agent starts pointed in the right direction instead of guessing.
And it bakes in the modern Angular v22+ defaults so I don't have to repeat them in every prompt: standalone and zoneless, signals over decorators (input(), output(), computed(), .set()/.update() – never .mutate()), native code>@if/code>@for instead of ngIf/ngFor, resource()/rxResource() for data fetching, inject() over constructor injection, strict TypeScript with no any, ever, AXE/WCAG AA on every template, and no .spec.ts files unless a real Vitest or Playwright setup exists. (Always worth mentioning: computed() is my favorite feature in modern Angular.)
One warning from experience, though. The moment you have three layers of rules – AGENTS.md, the style guides, and the ESLint config – they can quietly start to contradict each other, and a contradiction is worse than no rule at all. If AGENTS.md says "Signal Forms" while a style guide still shows a Reactive Forms example and ESLint enforces neither, the agent picks one almost at random and burns a round-trip second-guessing itself. So I treat the three as a single system: they have to say the same thing, and wherever a rule can become an ESLint rule, I make it one – a check the harness actually runs beats a sentence it merely reads. Manfred takes this same principle all the way up to architecture itself – turning layer and domain boundaries into checks the agent must satisfy, with Sheriff and feedback hooks.
The whole thing fits on a screen or two – you can read the full AGENTS.md in the repo. Steal what fits, drop what doesn't; the point isn't my exact rules, it's that the agent should walk into every task already knowing how your team works instead of guessing.
Wire Up Every Agent
The last step is pure plumbing, but it's what makes the whole thing portable. Everything so far lives in AGENTS.md and the style guide, so the final move is simply to make every tool read them. Each assistant – Claude Code, Codex, Cursor, Junie, Gemini, Windsurf, GitHub Copilot, plain VS Code – gets a thin little file (.cursorrules, .gemini/GEMINI.md, .github/copilot-instructions.md and friends) that does nothing but point back to AGENTS.md. Yes, that includes the ones I'd nudge you away from – if a teammate still reaches for Copilot, it should at least follow the same rules as everyone else. One brain, many front-ends: switch tools and the rules come with you.
Two small things round it out. I register the project's MCP servers once in .mcp.json (Angular CLI, Spartan UI, Chrome DevTools, Figma) so any agent can reach the same extra tools, and I harden an .aiignore so no agent ever reads secrets or environment files – .env, .pem, .key, Angular's environment*.ts. The rest is housekeeping: a .prettierrc.json rename and an ng:update script for upgrades. It's all in the repo if you want the exact files.
And that's the setup. None of these last pieces are clever on their own, but together they mean the harness behaves the same whether I open Codex today or Cursor tomorrow – and that every one of them writes Angular the way I actually want. Which is the whole point of getting the harness right: the model does the reasoning, but the harness is where your quality lives.
Agentic Engineering Workshop
Everything in this post – the guardrails, the Angular Coding Style Guide, the opinionated AGENTS.md, and the work of keeping all three in sync – is exactly the kind of setup we build together, hands-on.
If you want to build this kind of setup for your own Angular projects – an AI-ready workspace, real guardrails, and a strict human-in-the-loop workflow where every generated line still looks handcrafted – join our Agentic Engineering Workshop, available in English and German.
In this workshop, advanced Angular developers learn how to move from vibe coding to traceable Agentic Engineering workflows: AI-ready project setup, guardrails, spec-first and plan-first workflows, UX and component prototyping, code review, testing, and brownfield refactoring.
- 🤖 Agentic Engineering Workshop – 2 days, remote
Conclusion
If there's one line to take away, it's the same idea this post started with: the harness, not the model, is where your day-to-day Angular quality comes from. The model will keep getting better whether you do anything or not – that part is out of your hands. The harness is the part you control, and it's what decides whether a strong model writes generic Angular or writes yours.
And setting it up isn't mysterious. A clean baseline, formatting and linting that run themselves, a style guide that actually encodes your taste, an opinionated AGENTS.md, and every tool wired back to the same rules – that's the whole game. If you invest in only one piece, make it the style guide: it's the cheapest, highest-impact way to turn a capable-but-generic harness into one that feels like a teammate who already knows your codebase.
The best part is that none of this is locked to a vendor. The same AGENTS.md and style guide work whether I'm in Codex today, Cursor tomorrow, or some app that doesn't exist yet – so when the next model or the next super app shows up, I just point it at the setup I already have. That's exactly why I'd rather invest in the harness than chase the model leaderboard.
Everything here lives in the ng-agentic repo – clone it, steal what fits, and make it yours. And this is really just the foundation: in upcoming posts I'll build on top of it with reusable agent skills, the workflows that decide how much structure a task needs, and the part I'm most excited about – using all of this for real brownfield refactoring of dusty Angular code.
Thank you for reading 🙏 this blog post was written by Alexander Thalhammer. For feedback, remarks or questions, please reach out to me ❤️