What would you say if you could implement a Signal Store for a (repeating) CRUD use case including Undo/Redo in just 7 (!) lines of code?
To make this possible, we need some custom features for the Signal Store. In this article, I show how this all works.
As always, my work is highly inspired by the implementation of the NGRX Signal and the examples provided by Marko Stanimirović, the NGRX core team member who envisioned and implemented the Signal Store.
📂 Source Code (Branch: arc-signal-store-custom-examples)
Goal
The goal of this article is to show how to implement custom features for the Signal Store that allow for the following:
- Searching for entities
- Selecting several entities
- Displaying the selected entities
- Undo/Redo
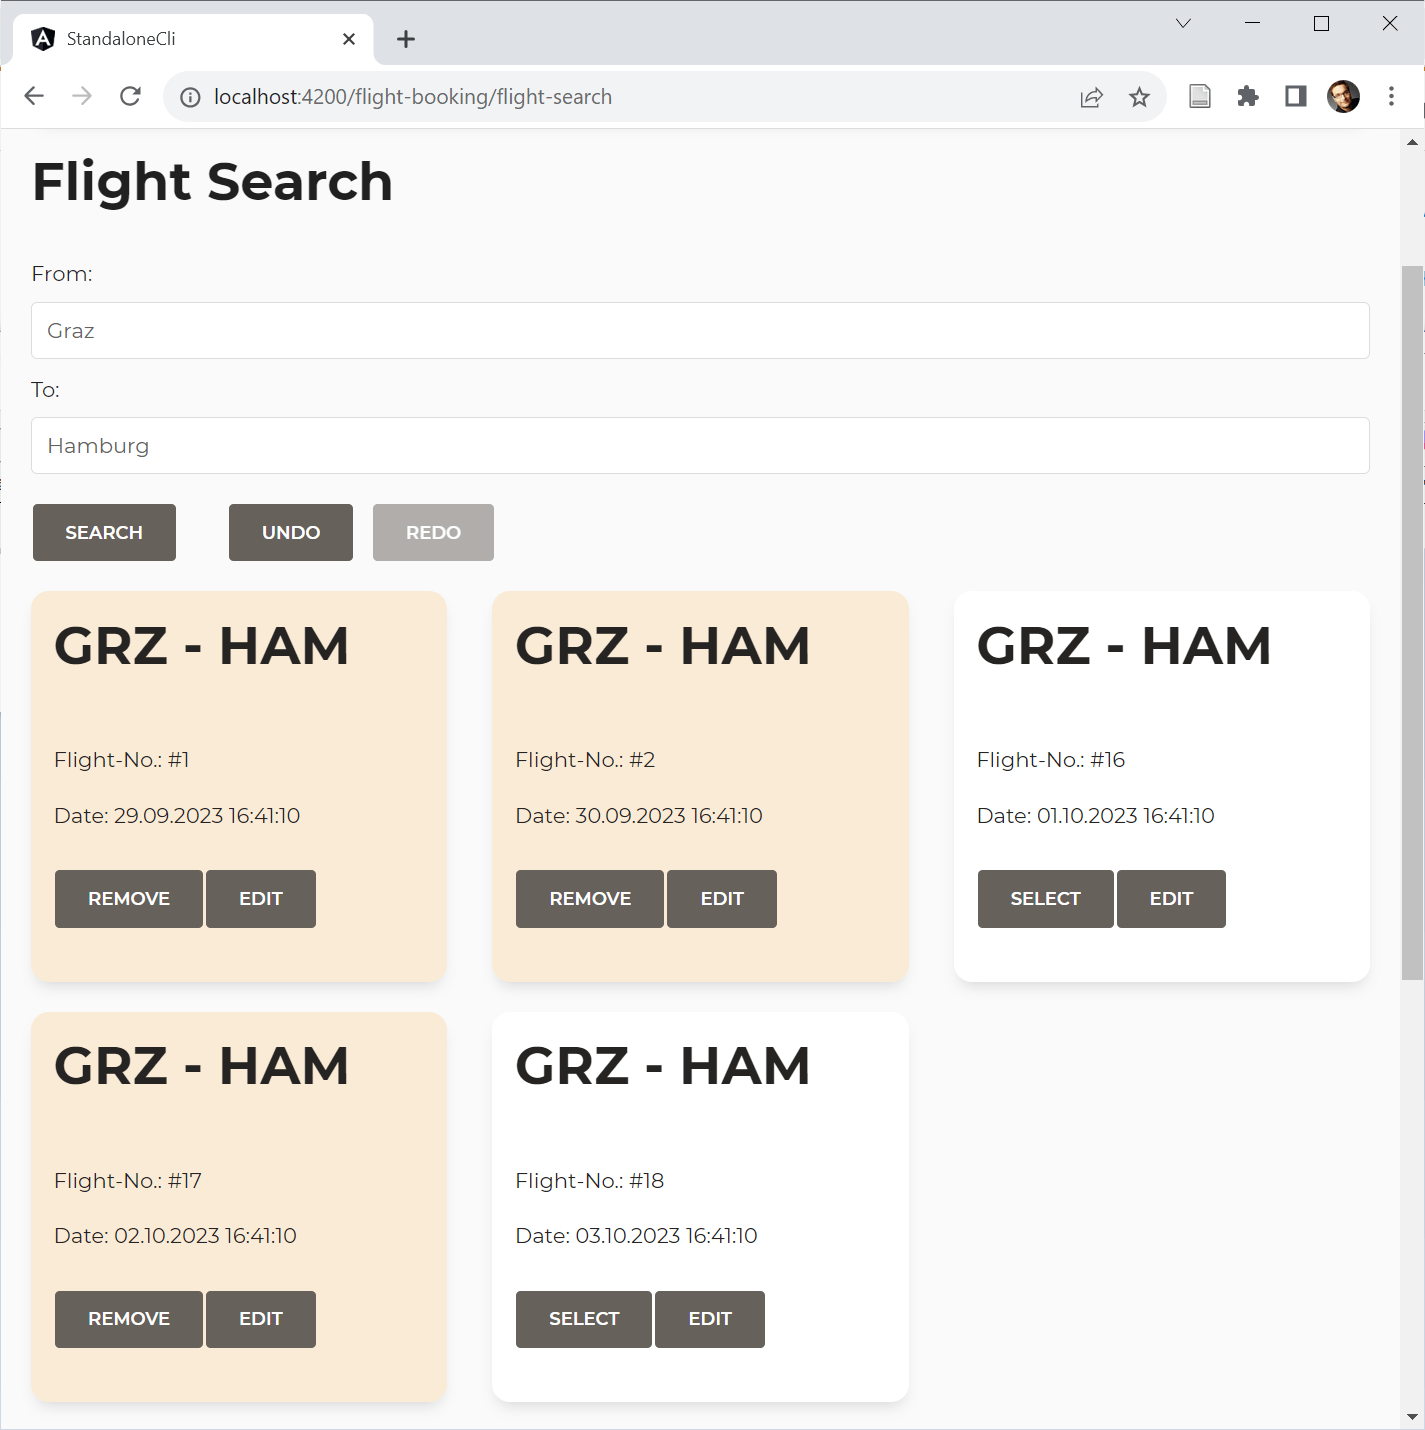
This is how the demo application I've built on top of these custom features looks like:
And this is the whole code we need to set up the store, including Undo/Redo and connecting it to a Data Service fetching the entities from the backend:
export const FlightBookingStore = signalStore(
  { providedIn: 'root' },
  withEntities<Flight>(),
  withCallState(),
  withDataService(FlightService, { from: 'Graz', to: 'Hamburg'} ),
  withUndoRedo(),
);
As you can see, I'm using the @ngrx/signals/entities package for managing entities. Besides this, I moved the remaining logic into three reusable custom features: withCallState was already discussed in a previous article. This article discusses withDataService and provides the code for withUndoRedo.
DataService Custom Feature
The idea behind the DataService feature is to set up state for a search filter and to connect an Angular Service that uses this filter to search for entities. In a further development stage, the feature could also call the DataService for saving and deleting entities. However, as these implementations would not add additional insights here, I decided to skip them for the sake of brevity.
To make the DataService feature generic, we need some general types describing everything the feature interacts with:
import { EntityId } from "@ngrx/signals/entities";
[...]

export type Filter = Record<string, unknown>;
export type Entity = { id: EntityId };

export interface DataService<E extends Entity, F extends Filter> {
    load(filter: F): Promise<E[]>;
}
These types describe how our search filter is structured, what we mean when referring to an entity, and how a DataService should look like. The type EntityId comes from @ngrx/signals/entities and accepts a string or a number.
Expecting that an entity is an arbitrary object with an id property is one of the conventions @ngrx/signals/entities provides for shorten your code. If your primary key is called otherwise, you can tell @ngrx/signals/entities accordingly. However, to keep the presented example small, I've decided to stick with this convention.
More: Angular Architecture Workshop (online, interactive, advanced)
Become an expert for enterprise-scale and maintainable Angular applications with our Angular Architecture workshop!
All Details (English Workshop) | All Details (German Workshop)
Implementing A Generic Custom Feature
The function withDataService returns the DataService feature:
export function withDataService<E extends Entity, F extends Filter, S extends DataService<E, F>>(dataServiceType: Type<S>, filter: F) {
    [...]
}
Its type parameter describes the Entity to manage, the corresponding search filter, and the DataService. When calling this generic method we just need to pass in the DataService and an initial filter. TypeScript infers the rest:
withDataService(FlightService, { from: 'Graz', to: 'Hamburg'} ),The withDataService function calls signalStoreFeature to setup our custom feature:
export function withDataService<E extends Entity, F extends Filter, S extends DataService<E, F>>(dataServiceType: Type<S>, filter: F) {
    return signalStoreFeature(
        // Our expectations to the store:
        {
            state: type<{
                callState: CallState,
                entityMap: Record<EntityId, E>,
                ids: EntityId[]
            }>(),
            props: type<{
                entities: Signal<Entity[]>
            }>(),
            methods: type<{}>()
        },

        // Composing several features:
        withState( [...] ),
        withComputed( [...] ),
        withMethods( [...] )
    );
}
As shown in the first article of this series, the signalStoreFeature function basically composes existing features into a new one. For instance, we can introduce new state properties with withState, computed Signals with withComputed, or methods with withMethods.
However, one little thing is a bit different this time: Our feature has some expectations for the Signal Store it is used with. It expects the callState feature and the entity feature to be in place. The former one sets up a callState property we need; the latter one sets up an entityMap and an ids property as well as a calculated Signal entities.
These expectations are defined by the first parameter passed to signalStoreFeature. It describes the expected state properties (state), computed signals (signals), and methods. As we don't expect any methods, we can also omit the key methods instead of pointing to type<{}>().
To avoid naming conflicts, the entity feature allows using different property names. To keep things simple, I'm sticking with the default names here. However, in a further article of this series, you learn how to deal with dynamic property names in a type-safe way.
The remaining parts of this custom feature are just about adding state properties, computed Signals, and methods on top of the expected features:
export function withDataService<E extends Entity, F extends Filter, S extends DataService<E, F>>(dataServiceType: Type<S>, filter: F) {
    return signalStoreFeature(
        // First parameter contains
        // Our expectations to the store:
        // If they are not fulfilled, TypeScript
        // will prevent adding this feature!
        {
            state: type<{
                callState: CallState,
                entityMap: Record<EntityId, E>,
                ids: EntityId[]
            }>(),
            props: type<{
                entities: Signal<Entity[]>
            }>(),
            methods: type<{}>()
        },
        withState({
            filter,
            selectedIds: {} as Record<EntityId, boolean>,
        }),
        withComputed(({ selectedIds, entities }) => ({
            selectedEntities: computed(() => entities().filter(e => selectedIds()[e.id]))
        })),
        withMethods((store) => {
            const dataService = inject(dataServiceType)
            return {
                updateFilter(filter: F): void {
                    patchState(store, { filter });
                },
                updateSelected(id: EntityId, selected: boolean): void {
                    patchState(store, ({ selectedIds }) => ({
                        selectedIds: {
                            ...selectedIds,
                            [id]: selected,
                        }
                    }));
                },
                async load(): Promise<void> {
                    patchState(store, setLoading());
                    const result = await dataService.load(store.filter());
                    patchState(store, setAllEntities(result));
                    patchState(store, setLoaded());
                }
            };
        })
    );
}
Providing a Fitting Data Service
To make our data services work with our custom feature, they need to implement the above-mentioned DataService interface that is to be typed with the Entity in question and a search filter expected by the load method:
export type FlightFilter = {
    from: string;
    to: string;
}

@Injectable({
  providedIn: 'root'
})
export class FlightService implements DataService<Flight, FlightFilter> {
  baseUrl = `https://demo.angulararchitects.io/api`;

  constructor(private http: HttpClient) {}

  load(filter: FlightFilter): Promise<Flight[]> {
    [...]
  }

  [...]
}
Undo/Redo-Feature
The Undo/Redo feature is implemented in a very similar way. Internally, it managed two stacks: an undo stack and a redo stack. The stacks are basically arrays with StackItems:
export type StackItem = {
    filter: Filter;
    entityMap: Record<EntityId, Entity>,
    ids: EntityId[]
};
Each StackItem represents a snapshot of the current search filter and the information the entity feature uses (entityMap, ids).
For configuring the feature, a UndoRedoOptions type is used:
export type UndoRedoOptions = {
    maxStackSize: number;
}

export const defaultUndoRedoOptions: UndoRedoOptions = {
    maxStackSize: 100
}
The options object allows us to limit the stack size. Older items are removed according to the First In, First Out rule if the stack grows to large.
The withUndoRedo function adds the feature. It is structured as follows:
export function withUndoRedo<_>(options = defaultUndoRedoOptions) {

    let previous: StackItem | null = null;
    let skipOnce = false;

    const undoStack: StackItem[] = [];
    const redoStack: StackItem[] = [];

    [...]

    return signalStoreFeature(
        // Expectations to the store:
        {
            state: type<{
                filter: Filter,
                entityMap: Record<EntityId, Entity>,
                ids: EntityId[]
            }>(),
        },
        [...]
        withMethods((store) => ({
            undo(): void { [...] },
            redo(): void { [...] }
        })),
        withHooks({
            onInit(store) {
                effect(() => {
                    const filter = store.filter();
                    const entityMap = store.entityMap();
                    const ids = store.ids();

                    [...]
                });
            }
        })

    )
}
Please note that in current TypeScript versions the dummy type parameter _ is needed to make such a feature composable with other typed features.
Similar to the withDataService function discussed above, it calls signalStoreFeature and defines its expectations for the store using the first argument. It introduces an undo and a redo method, restoring the state from the respective stacks. To observe the state, the onInit hook at the end creates an effect. After each change, this effect stores the original state on the undo stack.
One thing is a bit special about this implementation of the Undo/Redo feature: The feature itself holds some internal state -- like the undoStack and the redoStack -- that is not part of the Signal Store.
Please find the full implementation of this feature in my 📂 GitHub repository (🔀 Branch: arc-signal-store-custom-examples). If you want to see a different implementation that also stores the feature-internal state in the Signal Store, please look at the 🔀 arc-signal-custom-examples-undoredo-alternative branch.
Using the Store in a Component
To use our 7-lines-of-code-signal-store in a component, just inject it and delegate to its signals and methods:
@Component( [...] )
export class FlightSearchComponent {
  private store = inject(FlightBookingStore);

  // Delegate to signals
  from = this.store.filter.from;
  to = this.store.filter.to;
  flights = this.store.entities;
  selected = this.store.selectedEntities;
  selectedIds = this.store.selectedIds;

  // Delegate to methods
  async search() {
    this.store.load();
  }

  undo(): void {
    this.store.undo();
  }

  redo(): void {
    this.store.redo();
  }

  updateCriteria(from: string, to: string): void {
    this.store.updateFilter({ from, to });
  }

  updateBasket(id: number, selected: boolean): void {
    this.store.updateSelected(id, selected);
  }

}
Conclusion and Outlook
Implementing repeating tasks with generic custom features allows you to shrink down your source code dramatically. In this article, we implemented a Signal Store for a simple use case with just 7 lines of code. While implementing such features in a generic way adds some overhead in the first place, this effort pays off for sure once you have several use cases structured that way.
To reuse existing custom features, our custom feature delegates to them. The API provided by the NGRX Signal Store allows the custom feature to ensure the other features have been configured. It defines which state properties, computed signals, and methods it expects. If they are not present, TypeScript brings up a compilation error.
For the sake of simplicity, we just went with the default property names introduced by the orchestrated features. However, to avoid naming conflicts, it is also possible to configure these names. For instance, the entity feature that ships with the Signal Store supports such dynamic properties without compromising type safety. In the next article, I show how to use this idea for our custom features, too.
What's next? More on Architecture!
Please find more information on enterprise-scale Angular architectures in our free eBook (5th edition, 12 chapters):
- According to which criteria can we subdivide a huge application into sub-domains?
- How can we make sure, the solution is maintainable for years or even decades?
- Which options from Micro Frontends are provided by Module Federation?

Feel free to download it here now!