

Update on 2022-10-10: Updated for Angular 14.2.0.
In the last article of this series, we discussed Standalone Components planned for future Angular releases. As they are self-contained and don't need NgModules, application become more lightweight.
Now the question arises how to prepare an existing Angular solution for a future without Angular modules. In this article I show four options to do so.
Option 1: Ostrich Strategy
Let's start with the simplest option - the ostrich strategy. Stick your head in the sand and ignore everything around you:

Even if that sounds smug, there is actually nothing wrong with it. Nobody is forcing us to convert applications to Standalone Components. Angular will continue to support Angular modules. After all, the entire ecosystem is based on it. You can therefore safely ignore Standalone Components or only use this new option in new applications or application parts.
Option 2: Just Throw Away Angular Modules
This strategy also seems smug at first glance: You simply remove all Angular modules from your source code. This doesn't have to be done in one go either, because Standalone Components play wonderfully together with Angular modules. Angular modules can be imported into Standalone Components and vice versa.
For instance, the following listing shows a Standalone Component importing further NgModules:
import { Component, OnInit } from '@angular/core';
import { TicketsModule } from '../tickets/tickets.module';

@Component({
    selector: 'app-next-flight',
    standalone: true,
    imports: [
        // Existing NgModule imported
        // in this standalone component
        TicketsModule
    ],
    [...]
})
export class NextFlightComponent implements OnInit {
    [...]
}
To illustrate the other way round, this listing shows an NgModule importing a Standalone Component:
@NgModule({
  imports: [
    CommonModule,

    // Imported Standalone Component:
    FlightCardComponent,
    [...]
  ],
  declarations: [
    MyTicketsComponent
  ],
  [...]
})
export class TicketsModule { }
This mutual compatibility is made possible by the mental model behind Standalone Components.
Accordingly, a standalone component is a combination of a component and a module. Even if the actual technical implementation does not set up any dedicated Angular modules, this idea helps to bridge the gap between the two worlds. It also explains why Angular modules and Standalone Components can import each other.
If you go with this strategy, you need to import the compilation context directly into the Standalone Component using its imports array. I like to think about this compilation context as about the component's neighbor hood: It contains all other Standalone Components, Standalone Directives, and Standalone Pipes but also NgModules the component in question needs.
Hopefully, the Angular language service and hence editors/ IDEs like Visual Studio Code or WebStorm/ IntelliJ will provide auto imports for this task. To help with this too, my colleague Rainer Hahnekamp wrote a nice schematic that automates some of the steps needed. Currently, we don't think that full automation is possible here, because for this we need some knowledge about the application. For instance, we need to know which providers are used where.
Option 3: Replace Angular Modules with Barrels
Barrels are EcmaScript files that (re)export related building blocks:
import { NavbarComponent } from './navbar/navbar.component';
import { SidebarComponent } from './sidebar/sidebar.component';
The consumer can now import everything the barrel provides:
import { NavbarComponent, SidebarComponent } as shell from '../shell';If the barrel is called index.ts, it is sufficient to import only the barrel folder. In addition to grouping, this approach also has the advantage that barrels can be used to define public APIs: All building blocks exported by the barrel can be used by other parts of the application. They just need to import from the barrel. Everything else is considered an implementation detail that should not be accessed by other application parts. Hence, such implementation details are quite easy to change without producing breaking changes somewhere else. This is a simple but effective measure for stable software architectures.
In a further step, each barrel could also receive a path mapping in the tsconfig.json. In this case, the application can access the barrel using nice names similar to npm package names:
import { NavbarComponent, SidebarComponent } from '@demo/shell';However, barrels also come with challenges: For example, they are often the cause of cyclical dependencies:
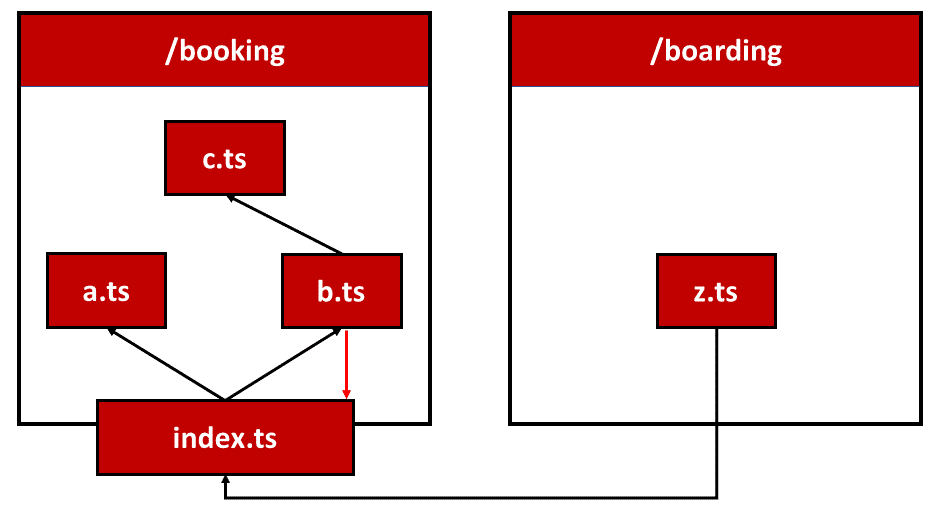
Here, b.ts on the one hand is referenced by the barrel index.ts and on the other hand accesses the barrel.
This problem can be avoided from the start with two simple rules that must be followed consistently:
- A barrel may only publish elements from its "area". The "area" extends over the barrel's folder as well as its subfolders.
- Within each "area", files reference each other using relative paths without using the barrel.
Although these rules sound a bit abstract at first glance, the implementation of this rule is easier than you would think:
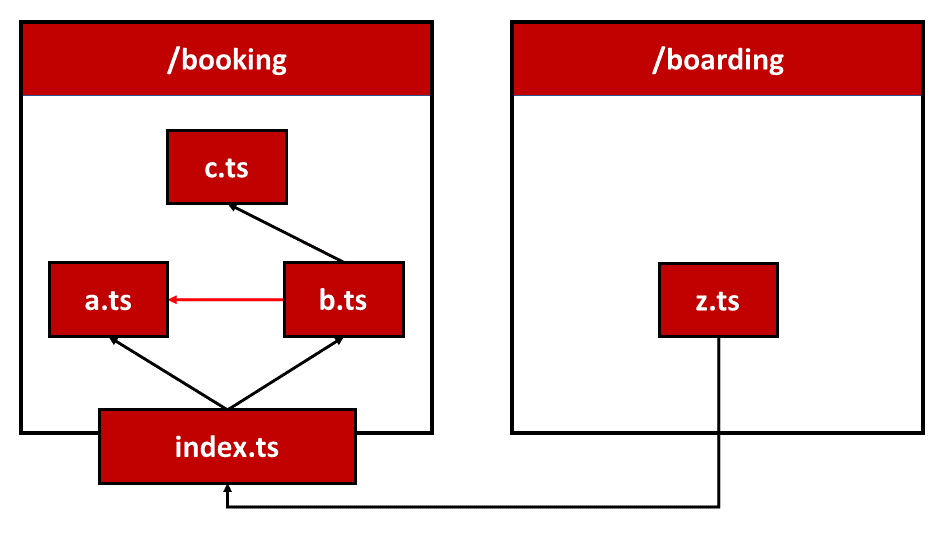
Here, b.ts directly accesses a.ts located in the same "area" to avoid the cycle shown earlier. The detour the barrel is avoided.
Another disadvantage is that each part of the program can bypass the specified barrels - and thus the public API created with them. Relative paths to private parts of the respective "areas" are sufficient for this.
This problem can be solved with linting. A linting rule would have to detect and denounce unauthorized access. The popular tool Nx comes with such a rule, which can also be used to prevent other unwanted accesses. The next section takes up this idea.
Option 4: Nx Workspace with Libraries and Linting Rules
The popular tool Nx is based on the Angular CLI and brings a lot of convenience for developing enterprise-scale solutions. Nx allows a large project to be broken down into different applications and libraries. Each library has a public API that specifies a barrel named index.ts. Nx also provides path mapping for all libraries. In addition, Nx brings a linting rule that prevents bypassing the barrel and also allows other restrictions.
This linting rule allows enforcing a fixed frontend architecture. For example, the Nx team recommends dividing a large application vertically by subject domains and horizontally by technical library categories:
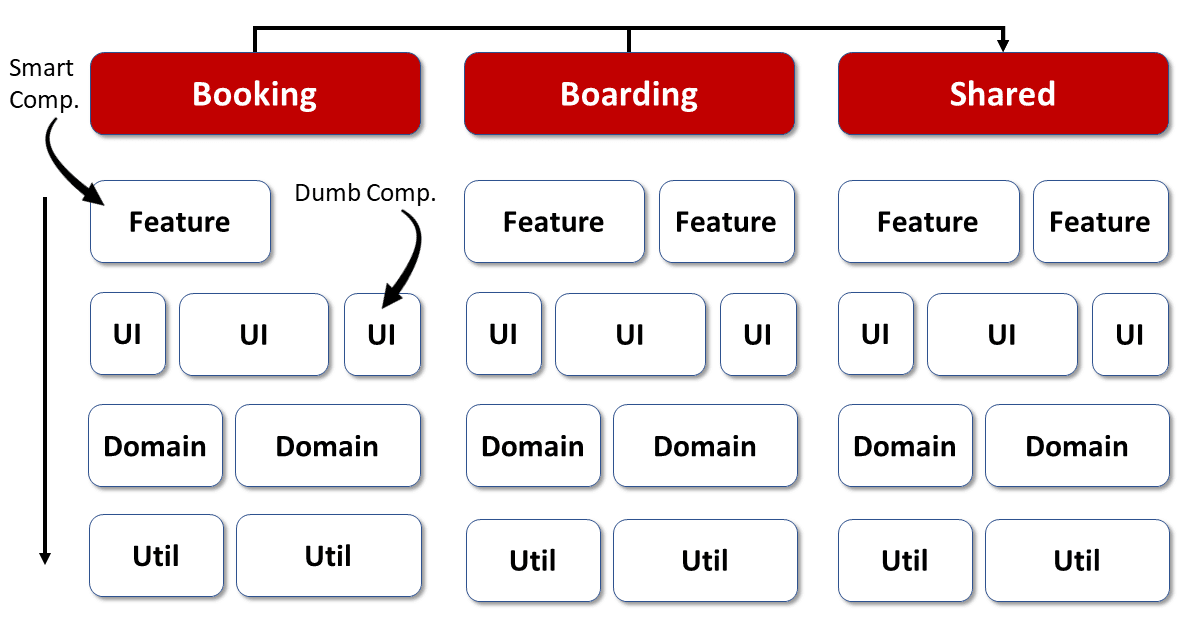
Feature libraries contain smart components that implement use cases, while UI libraries house reusable dump components. Domain libraries encapsulate the client-side domain model and services that operate on it, and utility libraries group general utility functions.
With the linting rules mentioned, it can now be ensured that each layer may only access the layers below it. Access to other domains can also be prevented. Libraries from the Booking area are therefore not allowed to access libraries in Boarding. If you want to use certain constructs across domains, they should be placed in the shared area, for example.
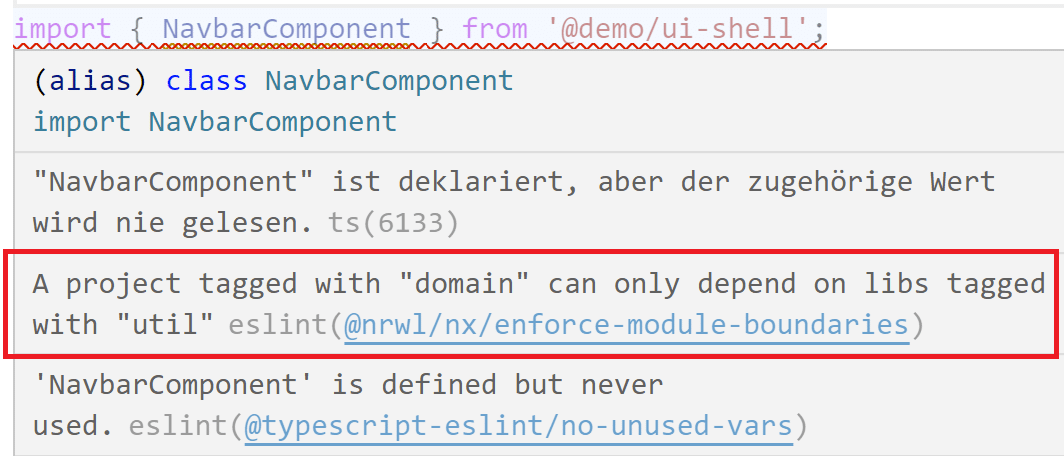
If someone violates one of these rules, the linter gives instant feedback:
The folder structure used for this by Nx reflects the architecture matrix shown:
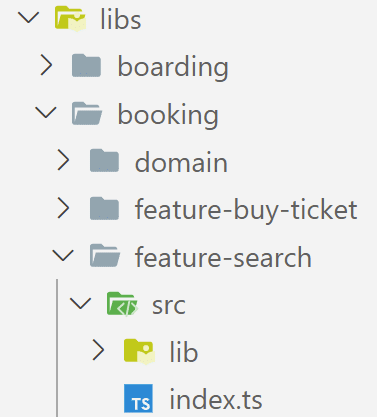
The subfolders in libs represent the domains. The libraries found in it get a prefix like feature- or domain-. These prefixes reflect the technical categories and thus the layers.
More details on this can be found in our Nx tutorial.
The nice thing about this fourth option is that it has long proven itself in interaction with Angular modules for structuring large solutions:
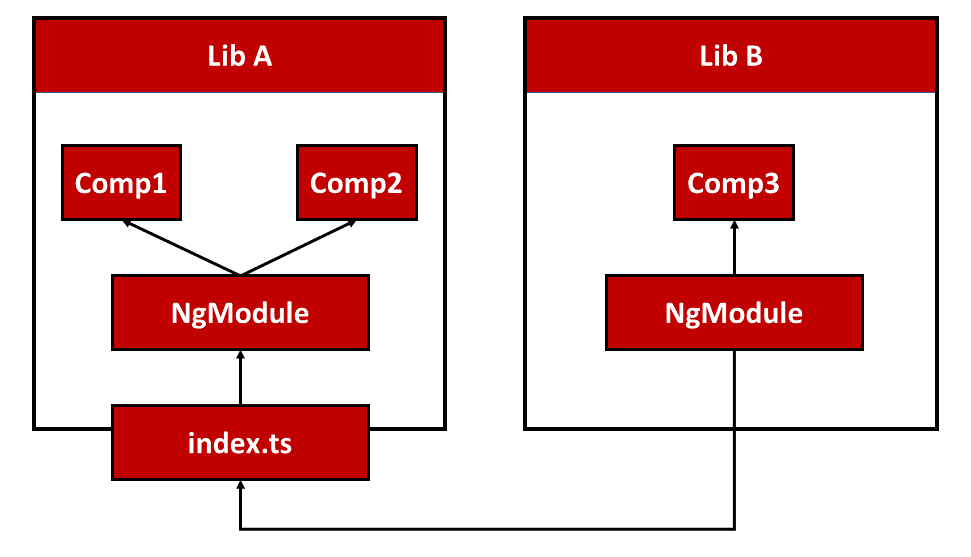
Thanks to Standalone Components, the Angular modules can be omitted now:

In this case, only the libraries are used for structuring: their barrels group related building blocks, such as Standalone Components, and thanks to the linting rules mentioned, we can enforce our architectures.
What's next? More on Architecture!
So far, we've seen that Nx can help to structure Angular-based applications and that it's concepts fit perfectly to the new world of Standalone Components. However, when dealing with Nx, several additional questions come in mind:
- According to which criteria can we sub-divide a huge application into libraries and sub-domains?
- Which access restrictions make sense?
- Which proven patterns should we use?
- How can we evolve our solution towards micro frontends?
Our free eBook (about 100 pages) covers all these questions and more:
Feel free to download it here now!