

Contents
- Prerequisites
- Setting up Your Nx Workspace
- Generating a New Nx Workspace
- Implementing Your Data Library
- Implementing a Feature Library
- Consuming your Feature Library
- Leveraging Nx Features
- Creating a Dependency Graph
- Using the Build Cache
- E2E-Testing with Cypress: A Sneak Peek
- Access Restrictions
- Final Finishing Touches
- What's next ?!
Nx is a famous extension for the Angular CLI provided by former Angular core team members. It's a great solution (not only) for structuring big enterprise-scale applications.
This tutorial shows how to get started with Nx. It starts from scratch with an empty Nx workspace. You learn the following things:
- Creating a new Nx workspace
- Using the dependency graph
- Visualizing changed libs and using the build cache
- A sneak peek into E2E testing with Cypress
- Enforcing your architecture via access restrictions (for me, the most important aspect)
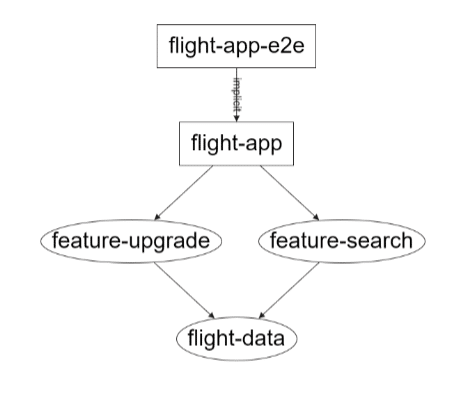
At the end, you will have a structure like this:
Also, thanks to access restrictions, your architecture will be protected. Hence, if a library is not intended to access another library, you will get an error like this one:
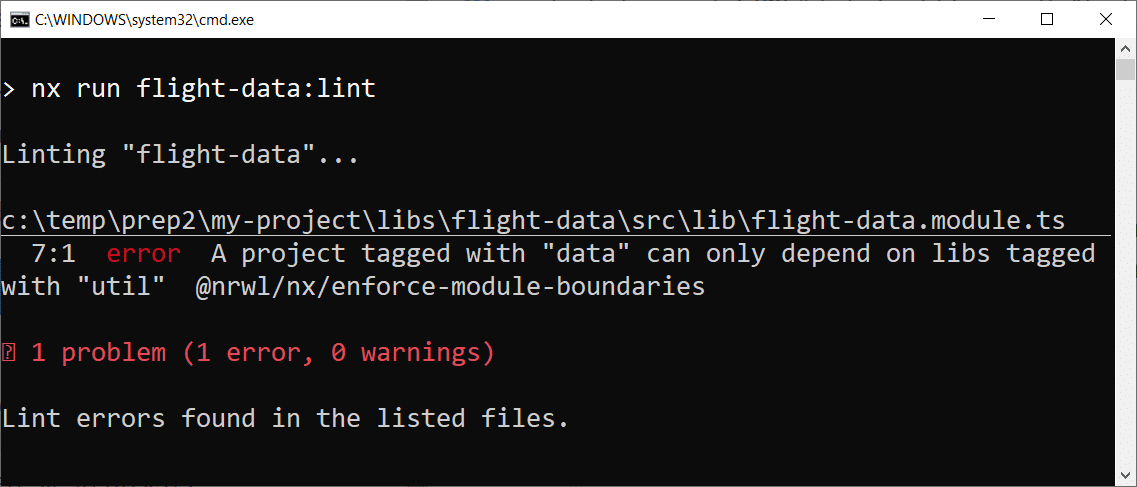
Of course, you get the same error in your editor/ IDE if it supports eslint. However, as this also works on the command line, you can automate this check and e. g. prevent merging code into your main branch if it violates your architecture, or as I put it: No broken windows anymore!
Btw: You can find the source code of this tutorial's solution in my GitHub account. For the sake of retracing, there is one separate for each of the below sections.
Prerequisites
For this tutorial, you need the following software packages:
- Editor like Visual Studio Code
- Git Client
- NodeJS in current LTS-Version
- Angular CLI (
npm i -g @angular/cli) - Nx CLI (
npm i -g @nrwl/cli)
Setting up Your Nx Workspace
In this section, you generate an Nx workspace from scratch and add a data access library as well as two feature libraries.
While these tasks are quite "mechanical", they will help you to understand how everything fits together. In practice, you can automate such tasks with code generators and Nx plugins like @angular-architects/ddd.
Remark: While we use a rather simple application here, the project setup we are showing is intended for huge enterprise-scale applications. Please keep this in mind when it feels a bit over-engineered.
Hint: Also, it's a good idea to use your editor's features to jump between files. Visual Studio Code e. g. provides the shortcut CTRL-p for quickly jumping to other files.
Generating a New Nx Workspace
Now, let scaffold an empty Nx workspace:
-
Use
npm initto generate a new Nx Workspace:npm init nx-workspace my-projectAnswer the questions you get as follows:
- What to create in the new workspace: angular
- Application name: flight-app
- Default stylesheet format: scss
- Use Nx Cloud: No
Generating the workspace will take one minute or two.
-
Switch into the generated project:
cd my-project -
Generate some libraries:
ng g lib flight-data --buildable
ng g lib feature-search --buildable
ng g lib feature-upgrade --buildable
Hint: The buildable switch allows to build each library separately. This in turn allows chaching each library so that it doesn't need to be rebuild as long as it doesn't change.
Hint: There is also a directory switch allowing you to subdivide your apps and libs into sub-directories. Each sub-directory can reflect a part (a sub-domain) of your solution.
-
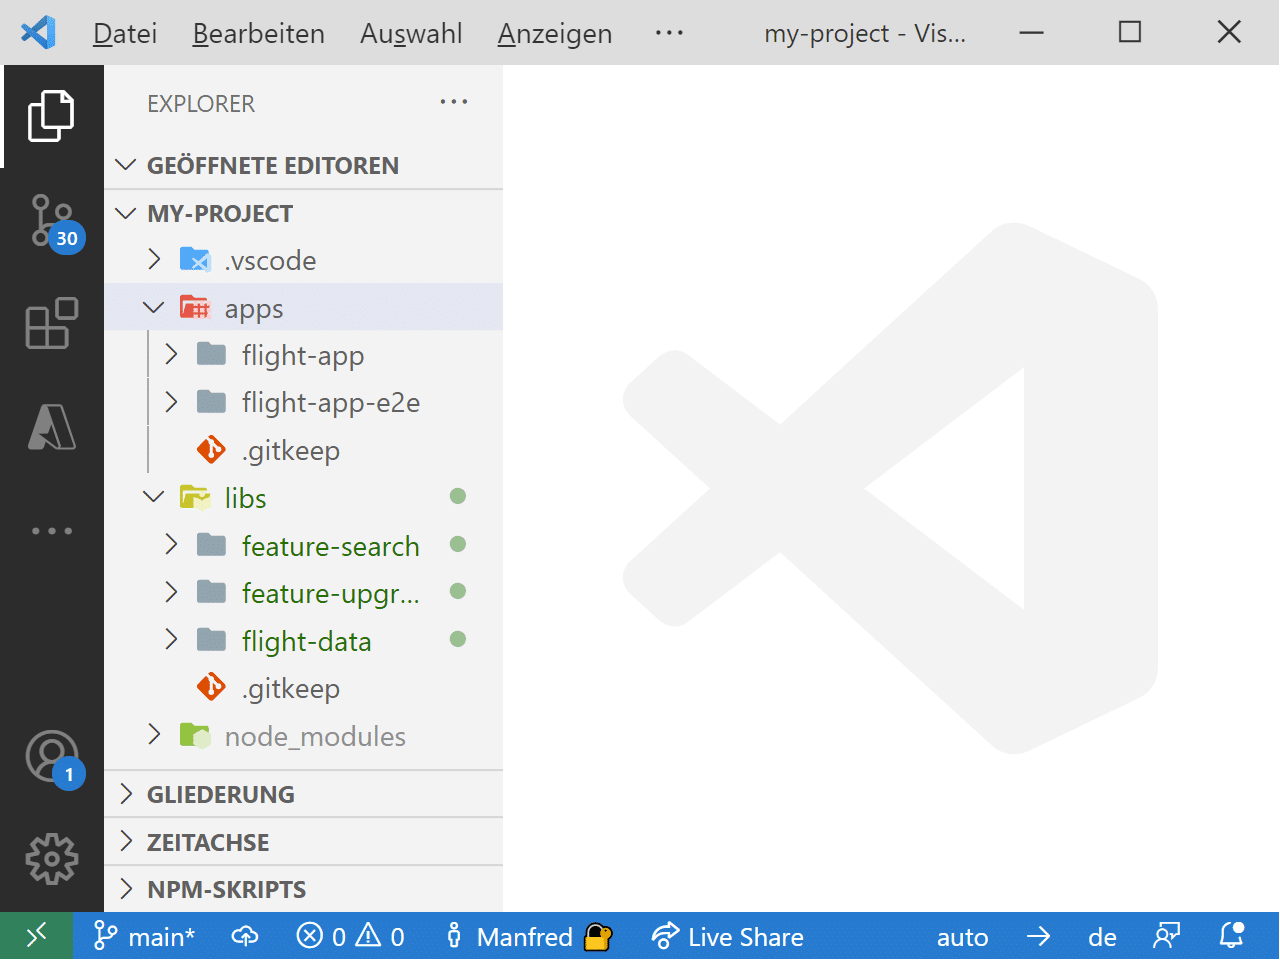
Open your workspace in your editor. You should see the following generated structure:
Implementing Your Data Library
The first library we add is for data access:
-
In your
folder libs/flight-data/src/lib, add a subfoldermodel: -
Add a file
flight.tsto your newly createdmodelfolder:// libs/flight-data/src/lib/model/flight.ts export interface Flight { id: number; from: string; to: string; date: string; } -
Generate a
FlightDataServicein yourflight-datalibrary:ng g service flight-data --project flight-data -
Implement your
FlightDataServiceas follows:// libs/flight-data/src/lib/flight-data.service.ts import { Injectable } from '@angular/core'; import { Observable, of } from 'rxjs'; import { Flight } from './model/flight'; @Injectable({ providedIn: 'root' }) export class FlightDataService { load(): Observable -
Export your model and your service via the library's
index.ts:// libs/flight-data/src/index.ts export * from './lib/flight-data.module'; // Add these lines: export * from './lib/flight-data.service'; export * from './lib/model/flight';
Now, we have our data access lib in place. In the next section, we will use it on one of our feature libraries.
Angular Architecture Workshop (Online)
This topic is one of the many topics we cover in our Angular Architecture Workshop. You can book a ticket for one of our public online workshops or a dedicated workshop for your whole team.
Implementing a Feature Library
Now, let's add two further library for features:
-
In your
feature-searchlibrary, generate a newFlightSearchComponent:ng g c flight-search --project feature-search --export -
Implement your component so that it displays the flights provided from your
FlightDataServicein a table.// libs/feature-search/src/lib/flight-search/flight-search.component.ts import { Component } from '@angular/core'; // You might need to add this by hand: import { FlightDataService } from '@my-project/flight-data'; @Component({ selector: 'my-project-flight-search', templateUrl: './flight-search.component.html', styleUrls: ['./flight-search.component.scss'] }) export class FlightSearchComponent { flightList$ = this.flightService.load(); constructor(private flightService: FlightDataService) { } }<h1>Flights</h1> <table class="table"> <tr *ngFor="let flight of flightList$ | async"> <td>{{flight.id}}</td> <td>{{flight.from}}</td> <td>{{flight.to}}</td> <td>{{flight.date | date}}</td> </tr> </table>/* libs/feature-search/src/lib/flight-search/flight-search.component.scss */ td { border: 1px solid black; padding: 10px; } -
Export your new component via your feature library's
index.ts:// libs/feature-search/src/index.ts export * from './lib/feature-search.module'; // Add this line: export * from './lib/flight-search/flight-search.component';
Consuming your Feature Library
As we have everything in place now, let's consume a feature in our app:
-
Switch to your
flight-appand import theFeatureSearchModuleinto yourAppModule:// apps/flight-app/src/app/app.module.ts import { NgModule } from '@angular/core'; import { BrowserModule } from '@angular/platform-browser'; import { AppComponent } from './app.component'; // You might need to add this line by hand: import { FeatureSearchModule } from '@my-project/feature-search'; @NgModule({ imports: [BrowserModule, // Import FeatureSearchModule FeatureSearchModule ], declarations: [AppComponent], providers: [], bootstrap: [AppComponent], }) export class AppModule {} -
Call your feature component in your
app.component.html. For this, replace the whole content with the following one:<my-project-flight-search></my-project-flight-search> -
Start your application:
ng serve flight-app -oThe result should look as follows:
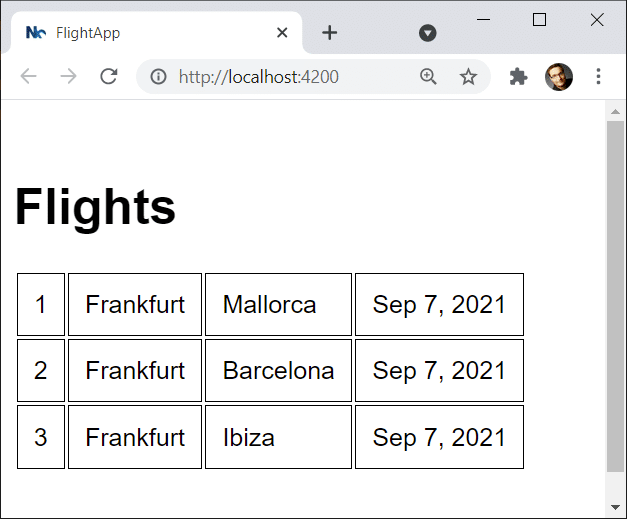
Frankly, this is quite a simple application. However, it's complex enogh to show how Nx helps with building enterprise-scale Angular applications.
Leveraging Nx Features
Now, we can finally play around with the cool features provided by Nx.
Creating a Dependency Graph
Let's start with generating a dependency graph.
-
Call the following command to display a dependency graph for your solution:
nx dep-graphTo see the whole dependency graph, click
Select Allon the left: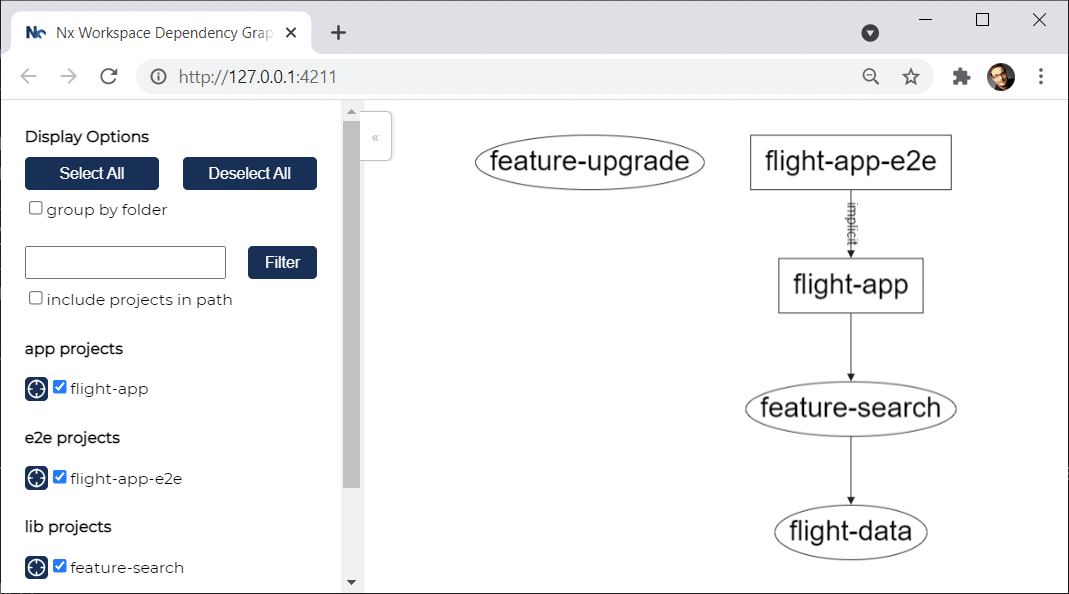
Obviously, the feature-upgrade library hasn't been used so far. We'll do this in another exercise.
-
Important: Close the process that started
nx dep-graph, because otherwise it blocks a TCP port we need for showing further dependency graphs. -
Open your
nx.jsonin your workspace's root directory. Make sure, thedefaultBaseproperty contains the name of your main git branch (defaultmaster; I and many others prefermain):{ "npmScope": "my-project", "affected": { "defaultBase": "main" }, [...] } -
Add all your files and commit them via git:
git add * git commit -m "Creating a Dependency Graph" -
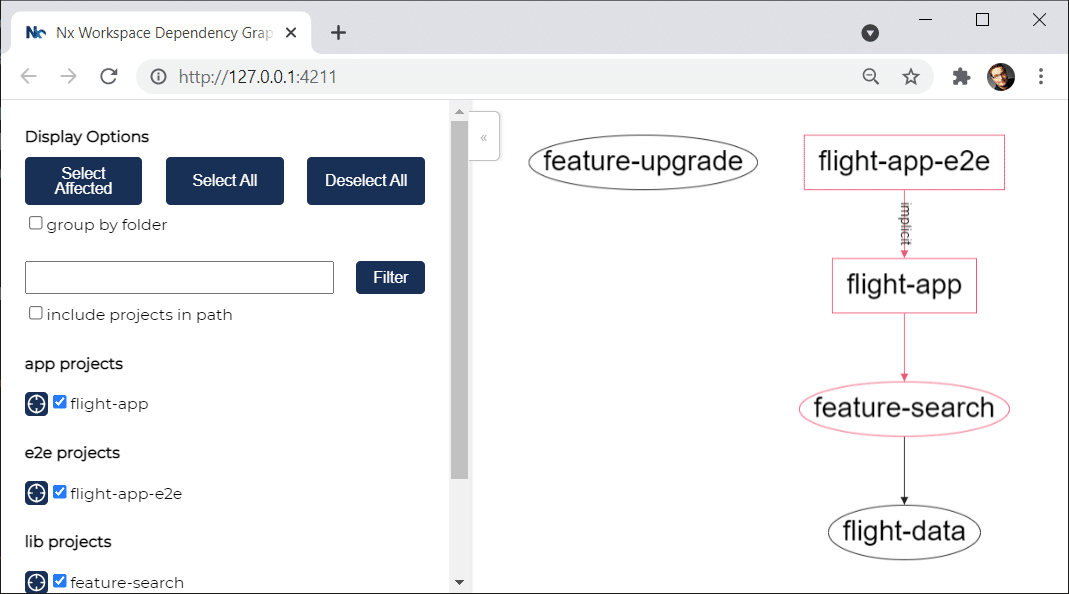
Change your file
libs/feature-search/src/lib/feature-search.module.tsby adding a line break to the end. -
Create a dependency graph showing all affected libraries:
nx affected:dep-graphBy clicking "Select All" you display all libraries and applications. The changed one and the ones affected by the change are red; the others are black:
-
You can get the same information on your console using the following commands:
nx affected:apps
nx affected:libs
Using the Build Cache
Thanks to the build cache, you only need to rebuild (retest and relint) the changed parts of your repo.
-
Build your application:
nx build flight-app -
Build it again and see that now the result is taken out of the cache:
nx build flight-app -
Once again, change your file
libs/feature-search/src/lib/feature-search.module.tsby adding a line break to the end. -
Build your application again and see that now only the changed lib and the app that was affected by this change (as it uses the lib) is rebuild:
nx build flight-app
Hint: By default, you find your build cache in the folder node_modules\.cache\nx.
E2E-Testing with Cypress: A Sneak Peek
One of the cool things of Nx is that it automatically integrates famous community solutions and de-facto standards like Cypress for E2E testing. Here, you get a sneak peak of it:
-
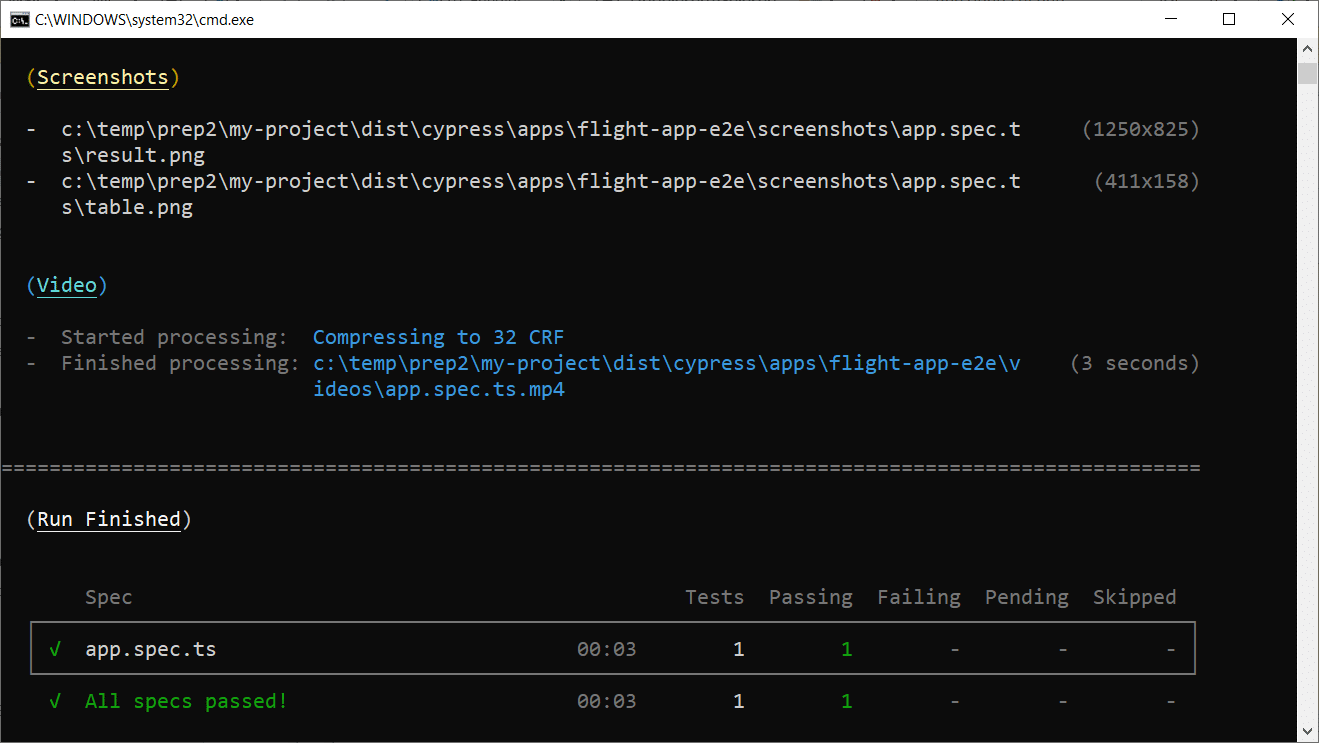
Update the E2E test for your
AppComponentas follows:// apps/flight-app-e2e/src/integration/app.spec.ts describe('flight-app', () => { beforeEach(() => cy.visit('/')); it('should display welcome message', () => { cy.get('h1').contains('Flights'); cy.screenshot('result'); cy.get('table').screenshot('table'); }); }); -
Run your e2e test:
nx e2e -
Make sure the test passes and have a look to the generated screenshots and the recorded video (you find the paths on command line).
Access Restrictions
This is the most important feature for sustainable enterprise-scale architectures: Access Restrictions. They prevent coupling between libraries. For this, you define which library is allows to access which other libraries:
-
Open your
nx.jsonin your project's root and add the following tags:[...] "projects": { "feature-search": { "tags": ["feature"] }, "feature-upgrade": { "tags": ["feature"] }, "flight-app": { "tags": ["app"] }, "flight-app-e2e": { "tags": [], "implicitDependencies": ["flight-app"] }, "flight-data": { "tags": ["data"] } } [...] -
Add the following constraints to your
.eslintrc.json:"@nrwl/nx/enforce-module-boundaries": [ "error", { "enforceBuildableLibDependency": true, "allow": [], "depConstraints": [ { "sourceTag": "app", "onlyDependOnLibsWithTags": ["feature"] }, { "sourceTag": "feature", "onlyDependOnLibsWithTags": ["data"] }, { "sourceTag": "data", "onlyDependOnLibsWithTags": ["util"] } ] } ] -
Import the
FeatureUpgradeModuleinto yourFlightDataModuleto break your architecture:// libs/flight-data/src/lib/flight-data.module.ts import { NgModule } from '@angular/core'; import { CommonModule } from '@angular/common'; // You might need to add this by hand: import { FeatureUpgradeModule } from '@my-project/feature-upgrade'; @NgModule({ imports: [ CommonModule, // Import FeatureUpgradeModule // (to break your architecture) FeatureUpgradeModule ], }) export class FlightDataModule {} -
Start the linter to get informed about your constraint violation:
nx lint flight-dataIf you have an eslint plugin installed, you should get the same linting error in your editor. You might need to restart your editor so that the changed configuration files are reloaded and respected.
Final Finishing Touches
Now, let's correct the incorrect access paths introduced in the last section and finish our tutorial.
-
Remove the
FeatureUpgradeModulefrom theFlightDataModuleto get rid of the linting error you got in the last section:// libs/flight-data/src/lib/flight-data.module.ts import { NgModule } from '@angular/core'; import { CommonModule } from '@angular/common'; // Remove this: // import { FeatureUpgradeModule } from '@my-project/feature-upgrade'; @NgModule({ imports: [ CommonModule, // Remove this: //FeatureUpgradeModule ], }) export class FlightDataModule {} -
Import the
FlightDataModuleinto theFeatureUpgradeModule:// libs/feature-upgrade/src/lib/feature-upgrade.module.ts import { NgModule } from '@angular/core'; import { CommonModule } from '@angular/common'; // You might need to add this by hand: import { FlightDataModule } from '@my-project/flight-data'; @NgModule({ imports: [ CommonModule, // Add this line: FlightDataModule ], }) export class FeatureUpgradeModule {} -
Also, import the
FeatureUpgradeModuleinto yourAppModule:// apps/flight-app/src/app/app.module.ts import { NgModule } from '@angular/core'; import { BrowserModule } from '@angular/platform-browser'; import { AppComponent } from './app.component'; import { FeatureSearchModule } from '@my-project/feature-search'; // You might need to add this line by hand: import { FeatureUpgradeModule } from '@my-project/feature-upgrade'; @NgModule({ imports: [ BrowserModule, FeatureSearchModule, // Add this line: FeatureUpgradeModule ], declarations: [AppComponent], providers: [], bootstrap: [AppComponent], }) export class AppModule {} -
Generate a dependency graph:
nx dep-graphIt should have the following final structure:
What's next ?!
So far, we've seen how to use Nx for building enterprise-scale Angular applications. However, there are some unanswered questions:
- According to which criteria can we sub-divide a huge application into libraries and sub-domains?
- Which access restrictions make sense?
- Which proven patterns should we use?
- How can we evolve our solution towards micro frontends?
Our free eBook (about 100 pages) covers all these questions and more:
Feel free to download it here now!