

In the previous article of this series, I've shown how to use Webpack Module Federation for loading separately compiled Micro Frontends into a shell. As the shell's webpack configuration describes the Micro Frontends, we already needed to know them when compiling it.
In this article, I'm assuming a more dynamic situation where the shell does not know the Micro Frontend upfront. Instead, this information is provided at runtime via a configuration file. While this file is a static JSON file in the examples shown here, it's content could also come from a Web API.
Important: This article is written for Angular and Angular CLI 14 or higher. Make sure you have a fitting version if you try out the examples! For more details on the differences/ migration to Angular 14 please see this migration guide.
The following image displays the idea described in this article:
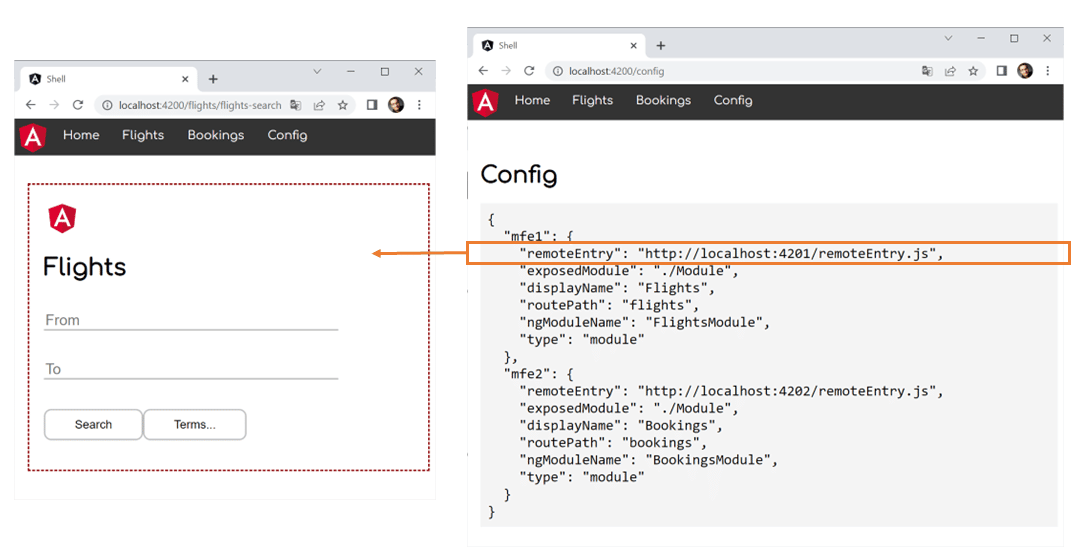
For all Micro Frontends the shell gets informed about at runtime, it displays a menu item. When clicking it, the Micro Frontend is loaded and displayed by the shell's router.
📂 Source Code (simple version, see branch: simple)
A Simple Dynamic Solution
Let's start with a simple approach. For this, we assume that we know the Micro Frontends upfront and just want to switch out their URLs at runtime, e. g. with regards to the current environment. A more advanced approach, where we don't even need to know the number of Micro Frontends upfront is presented afterwards.
Adding Module Federation
The demo project used contains a shell and two Micro Frontends called mfe1 and mfe2
npm i -g @angular-architects/module-federation -D

 ng g @angular-architects/module-federation --project mfe1 --port 4201 --type remote

 ng g @angular-architects/module-federation --project mfe2 --port 4202 --type remote
Generating a Manifest
Beginning with the plugin's version 14.3, we can generate a dynamic host that takes the key data about the Micro Frontend from a JSON file -- called the Micro Frontend Manifest -- at runtime:
ng g @angular-architects/module-federation --project shell --port 4200 --type dynamic-hostThis generates:
- a webpack configuration
- the manifest and
- some code in the
main.ts
The manifest can be found here: projects/shell/src/assets/mf.manifest.json
{
     "mfe1": "http://localhost:4201/remoteEntry.js",
     "mfe2": "http://localhost:4202/remoteEntry.js"
 }
After generating the manifest, make sure the ports match.
Loading the Manifest
The generated main.ts
import { loadManifest } from '@angular-architects/module-federation';

 loadManifest("/assets/mf.manifest.json")
   .catch(err => console.error(err))
   .then(_ => import('./bootstrap'))
   .catch(err => console.error(err));
By default, loadManifest
Loading the Micro Frontends
To load the Micro Frontends described by the manifest, we go with the following routes:
import { Routes } from '@angular/router';
 import { HomeComponent } from './home/home.component';
 import { loadRemoteModule } from '@angular-architects/module-federation';

 export const APP_ROUTES: Routes = [
     {
       path: '',
       component: HomeComponent,
       pathMatch: 'full'
     },
     {
       path: 'flights',
       loadChildren: () => loadRemoteModule({
           type: 'manifest',
           remoteName: 'mfe1',
           exposedModule: './Module'
         })
         .then(m => m.FlightsModule)
     },
     {
       path: 'bookings',
       loadChildren: () => loadRemoteModule({
           type: 'manifest',
           remoteName: 'mfe2',
           exposedModule: './Module'
         })
         .then(m => m.BookingsModule)
     },
 ];
The option type: 'manifest' makes loadRemoteModule to look up the key data needed in the loaded manifest. The property remoteName
Configuring the Micro Frontends
We expect both Micro Frontends to provide an NgModule with sub routes via './Module'. The NgModules are exposed via the webpack.config.js
// projects/mfe1/webpack.config.js

 const { shareAll, withModuleFederationPlugin } = require('@angular-architects/module-federation/webpack');

 module.exports = withModuleFederationPlugin({

   name: 'mfe1',

   exposes: {
     // Adjusted line:
     './Module': './projects/mfe1/src/app/flights/flights.module.ts'
   },

   shared: {
     ...shareAll({ singleton: true, strictVersion: true, requiredVersion: 'auto' }),
   },

 });
// projects/mfe2/webpack.config.js
const { shareAll, withModuleFederationPlugin } = require('@angular-architects/module-federation/webpack');
module.exports = withModuleFederationPlugin({
name: 'mfe2',
exposes: {
// Adjusted line:
'./Module': './projects/mfe2/src/app/bookings/bookings.module.ts'
},
shared: {
...shareAll({ singleton: true, strictVersion: true, requiredVersion: 'auto' }),
},
});Trying it Out
For each route loading a Micro Frontend, the shell's AppComponent contains a routerLink
<!-- projects/shell/src/app/app.component.html -->
 <ul>
     <li><img src="../assets/angular.png" width="50"></li>
     <li><a routerLink="/">Home</a></li>
     <li><a routerLink="/flights">Flights</a></li>
     <li><a routerLink="/bookings">Bookings</a></li>
 </ul>

 <router-outlet></router-outlet>
That's it. Just start all the three projects (e. g. by using npm run run:all
Going "Dynamic Dynamic"
The solution we have so far is suitable in many situations: The usage of the manifest allows to adjust it to different environments without rebuilding the application. Also, if we switch out the manifest for a dynamic REST service, we could implement strategies like A/B testing.
However, in some situation you might not even know about the number of Micro Frontends upfront. This is what we discuss here.
Adding Custom Metadata to The Manifest
For dynamically setting up the routes, we need some additional metadata. For this, you might want to extend the manifest:
{
     "mfe1": {
         "remoteEntry": "http://localhost:4201/remoteEntry.js",

         "exposedModule": "./Module",
         "displayName": "Flights",
         "routePath": "flights",
         "ngModuleName": "FlightsModule"
     },
     "mfe2": {
         "remoteEntry": "http://localhost:4202/remoteEntry.js",

         "exposedModule": "./Module",
         "displayName": "Bookings",
         "routePath": "bookings",
         "ngModuleName": "BookingsModule"
     }
 }
Besides remoteEntry
Types for Custom Configuration
To represent our extended configuration, we need some types in the shell's code:
// projects/shell/src/app/utils/config.ts

 import { Manifest, RemoteConfig } from "@angular-architects/module-federation";

 export type CustomRemoteConfig = RemoteConfig & {
     exposedModule: string;
     displayName: string;
     routePath: string;
     ngModuleName: string;
 };

 export type CustomManifest = Manifest<CustomRemoteConfig>;
The CustomRemoteConfig type represents the entries in the manifest and the CustomManifest
Dynamically Creating Routes
Now, we need an utility function iterating through the whole manifest and creating a route for each Micro Frontend described there:
// projects/shell/src/app/utils/routes.ts

 import { loadRemoteModule } from '@angular-architects/module-federation';
 import { Routes } from '@angular/router';
 import { APP_ROUTES } from '../app.routes';
 import { CustomManifest } from './config';

 export function buildRoutes(options: CustomManifest): Routes {

     const lazyRoutes: Routes = Object.keys(options).map(key => {
         const entry = options[key];
         return {
             path: entry.routePath,
             loadChildren: () =>
                 loadRemoteModule({
                     type: 'manifest',
                     remoteName: key,
                     exposedModule: entry.exposedModule
                 })
                 .then(m => m[entry.ngModuleName])
         }
     });

     return [...APP_ROUTES, ...lazyRoutes];
 }
This gives us the same structure, we directly configured above.
The shell's AppComponent
@Component({
   selector: 'app-root',
   templateUrl: './app.component.html'
 })
 export class AppComponent implements OnInit  {

   remotes: CustomRemoteConfig[] = [];

   constructor(
     private router: Router) {
   }

   async ngOnInit(): Promise<void> {
     const manifest = getManifest<CustomManifest>();

     // Hint: Move this to an APP_INITIALIZER
     //  to avoid issues with deep linking
     const routes = buildRoutes(manifest);
     this.router.resetConfig(routes);

     this.remotes = Object.values(manifest);
   }
 }
The ngOnInit method retrieves the loaded manifest (it's still loaded in the main.ts as shown above) and passes it to buildRoutes. The retrieved dynamic routes are passed to the router. Also, the values of the key/value pairs in the manifest, are put into the remotes
<!-- projects/shell/src/app/app.component.html -->

 <ul>
     <li><img src="../assets/angular.png" width="50"></li>
     <li><a routerLink="/">Home</a></li>

     <!-- Dynamically create menu items for all Micro Frontends -->
     <li *ngFor="let remote of remotes"><a [routerLink]="remote.routePath">{{remote.displayName}}</a></li>

     <li><a routerLink="/config">Config</a></li>
 </ul>

 <router-outlet></router-outlet>
Trying it Out
Now, let's try out this "dynamic dynamic" solution by starting the shell and the Micro Frontends (e. g. with npm run run:all
Some More Details
So far, we used the high-level functions provided by the plugin. However, for cases you need more control, there are also some low-level alternatives:
-
loadManifest(...): The above usedloadManifestfunction provides a second parameter calledskipRemoteEntries. Set it totrueloadManifest("/assets/mf.manifest.json", true) .catch(...) .then(...) .catch(...) -
setManifest(...) -
loadRemoteEntry(...)Promise.all([ loadRemoteEntry({ type: 'module', remoteEntry: 'http://localhost:4201/remoteEntry.js' }), loadRemoteEntry({ type: 'module', remoteEntry: 'http://localhost:4202/remoteEntry.js' }) ]) .catch(err => console.error(err)) .then(_ => import('./bootstrap')) .catch(err => console.error(err)); -
loadRemoteModule(...): Also, if you don't want to use the manifest, you can directly load a Micro Frontend withloadRemoteModule{ path: 'flights', loadChildren: () => loadRemoteModule({ type: 'module', remoteEntry: 'http://localhost:4201/remoteEntry.js', exposedModule: './Module', }).then((m) => m.FlightsModule), },
In general I think most people will use the manifest in the future. Even if one doesn't want to load it from a JSON file with loadManifest, one can define it via setManifest
The property type: 'module' defines that you want to load a "real" EcmaScript module instead of "just" a JavaScript file. This is needed since Angular CLI 13. If you load stuff not built by CLI 13 or higher, you very likely have to set this property to script
{
     "non-cli-13-stuff": {
         "type": "script",
         "remoteEntry": "http://localhost:4201/remoteEntry.js"
     }
 }
If an entry in the manifest does not contain a
.typeproperty, the plugin assumes the valuemodule
What's next? More on Architecture!
So far, we've seen that Module Federation is a straightforward solution for creating Micro Frontends on top of Angular. However, when dealing with it, several additional questions come in mind:
- According to which criteria can we sub-divide a huge application into micro frontends?
- Which access restrictions make sense?
- Which proven patterns should we use?
- How can we avoid pitfalls when working with Module Federation?
- Which advanced scenarios are possible?
Our free eBook (about 100 pages) covers all these questions and more:
Feel free to download it here now!
Conclusion
Dynamic Module Federation provides more flexibility as it allows loading Micro Frontends we don't have to know at compile time. We don't even have to know their number upfront. This is possible because of the runtime API provided by webpack. To make using it a bit easier, the @angular-architects/module-federation plugin wrap it nicely into some convenience functions.