

In part I, we discussed the benefits of having a faster Initial Load. In part II, I've introduced some metrics and tools for the measurement of the Initial Load Performance. Now we want to improve a (tiny) Angular app by adding SSR including Client Hydration.
Links to source code and demos
To help understanding the Initial Load Optimization process, I've made commits for the successive steps. You can find the Git repo with all the used source code here:
Make sure to check out the live demo web apps here:
If you want, you can even run the Google PageSpeed Insights tests used to measure the Initial Load Performance by yourself:
I use the Flight App as the demonstration example. It is a small and simple Angular app. To get realistic results and timings we've added some links to big CSS files (by Bootstrap) and a big Chart library (by AnyChart) - the latter being lazy-loaded at least.
So please don't expect world breaking records here - we just want to demonstrate the improvements by adding SSR, Prerendering & Client Hydration.
The base case using Client Side Rendering
We want to use a nginx container to serve our Angular app called performance.
# Stage 0, Node.js, install deps & build the app
FROM node:16-alpine as builder

# set working directory
RUN mkdir -p /usr/src/app
WORKDIR /usr/src/app

# add app
COPY . /usr/src/app

# install deps and cli
RUN npm install
RUN npm install -g @angular/cli

# add .bin to $PATH
ENV PATH /usr/src/app/node_modules/.bin:$PATH

# build app
RUN ng build

# Stage 1, nginx, copy & serve app
FROM nginx:alpine

COPY --from=builder /usr/src/app/dist/performance/browser /usr/share/nginx/html/
COPY nginx.conf /etc/nginx/conf.d/default.conf
Please note that in this Dockerfile we assume that Angular Universal is already set up and therefore the Angular app resides in a subfolder called browser.
To enable gzip compression in nginx we need to modify the default nginx.conf. Make sure to add all mime-types that your app is using.
server {
    gzip on;
    gzip_types      application/javascript font/woff image/jpg image/png image/webp image/x-icon text/css text/plain;
    gzip_proxied    no-cache no-store private expired auth;
    gzip_min_length 1024;

    server_name localhost;
    listen      80;
    root        /usr/share/nginx/html;
    index       index.html;

    location / {
        try_files $uri $uri/ /index.html;
    }
}
Since we want to serve our Flight App via https, we also need to use the secure version of our Flight API.
-  url = 'http://www.angular.at/api/flight';
-  // url = 'https://demo.angulararchitects.io/api/Flight';
+  // url = 'http://www.angular.at/api/flight';
+  url = 'https://demo.angulararchitects.io/api/Flight';
Now let's run our first test on Google PageSpeed Insights:
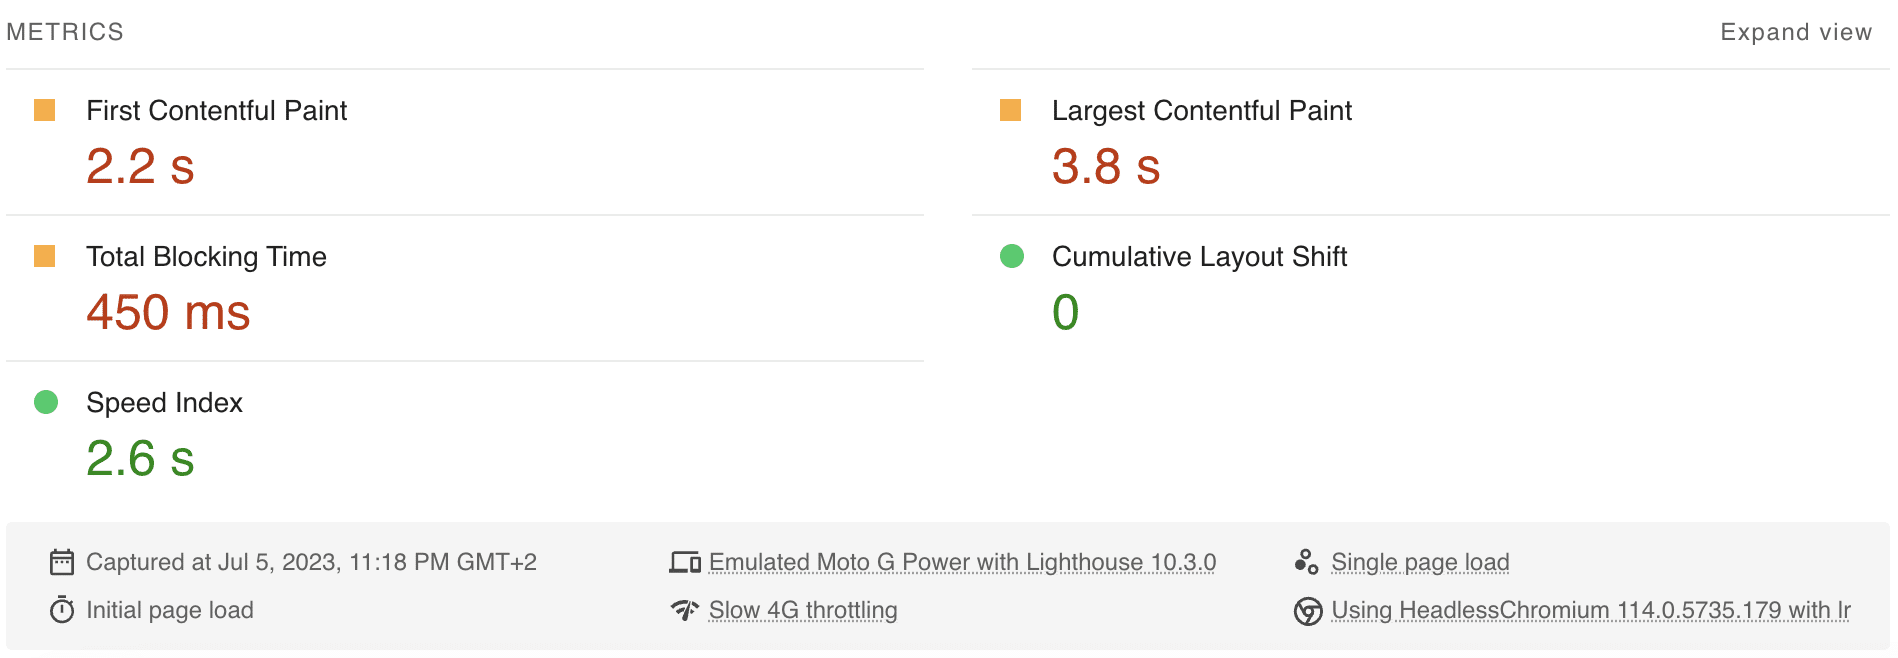
The base case takes 2.2s to show the FCP and 3.8s for the LCP. There is no CLS.
Step 1 - Implementing Server Side Rendering
To enable Server-Side Rendering we first need to install Angular Universal:
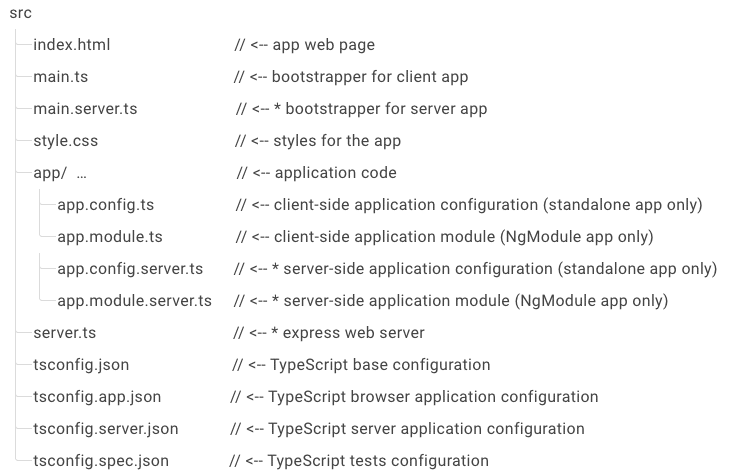
ng add @nguniversal/express-engineThis will add the dependencies and all the configuration files needed to run Angular in SSR mode:
Now we want to use a Node.js container to serve our Angular app.
Node.js is necessary to be able to render the page on the server.
# Stage 0, Node.js, install deps, build & run the app
FROM node:16-alpine as builder

# set working directory
RUN mkdir -p /usr/src/app
WORKDIR /usr/src/app

# add app
COPY . /usr/src/app

# install deps and cli
RUN npm install
RUN npm install -g @angular/cli

# add .bin to $PATH
ENV PATH /usr/src/app/node_modules/.bin:$PATH

# build app & server
RUN ng build
RUN ng run performance:server

# build default port
EXPOSE 4000

# start server
CMD ["node", "/usr/src/app/dist/performance/server/main.js"]
To be able to use this and not having to guess the main.js hash we disable hashing in the angular.json:
"outputHashing": "none",To enable gzip compression we firstly need to add the compression npm packages:
npm i compression --save
npm i @types/compression --save-dev
Secondly we need to update the server.ts:
-  server.engine('html', ngExpressEngine({
-    bootstrap: AppServerModule
-  }));
+  server.engine(
+    'html',
+    ngExpressEngine({
+      bootstrap: AppServerModule
+    })
+  );
+
+  // Compress all HTTP responses
+  server.use(compression());
So, now let's check the results with SSR:
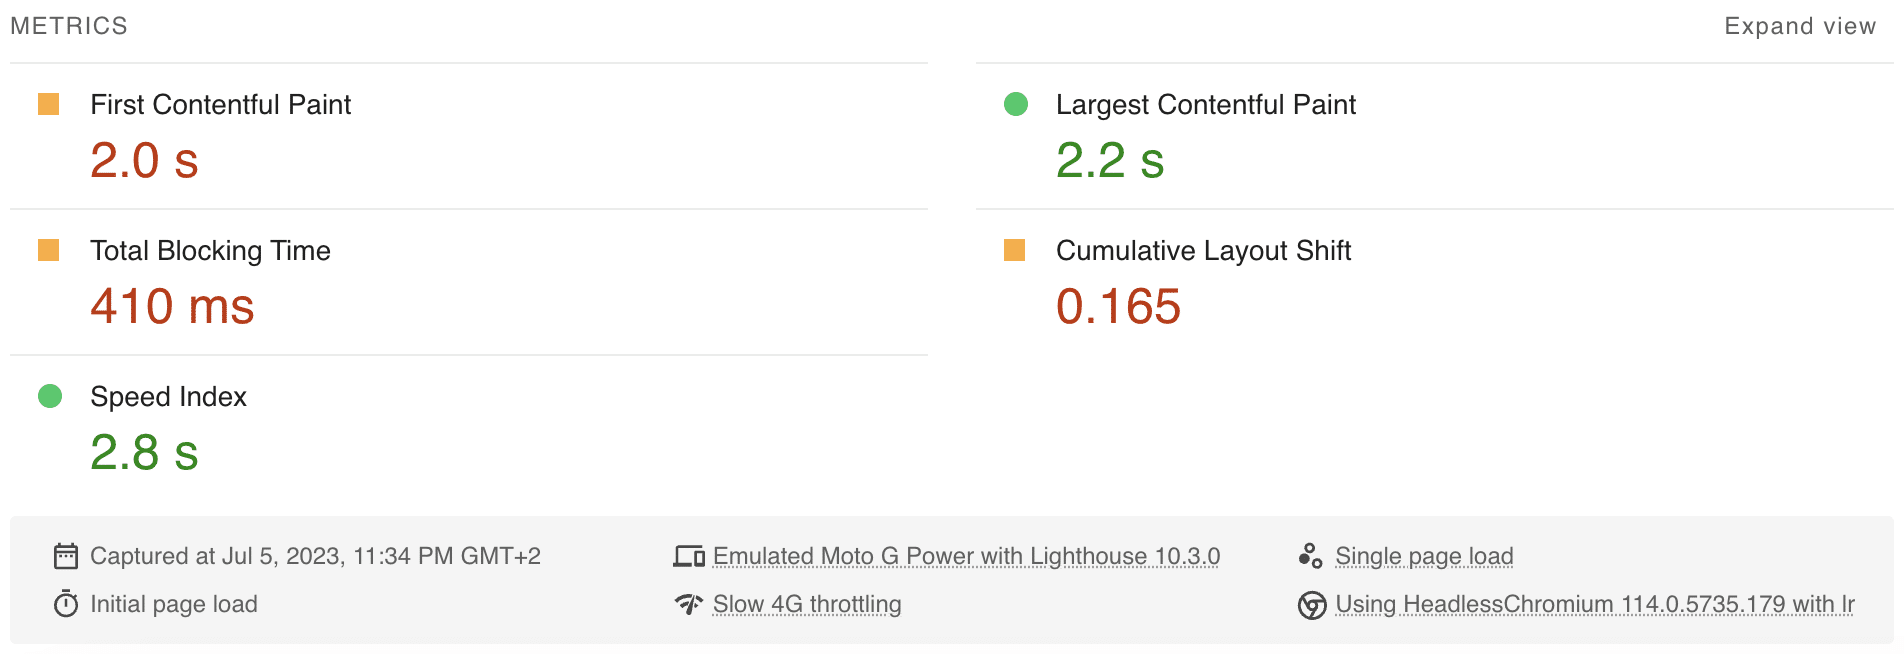
The server side rendered variant takes 2.0s (-0.2s) to show the FCP and 2.2s (-1.6s) for the LCP. There is a CLS of 0.165 because the page has to be rerendered in the client. It's already much faster than CSR, but you get a CLS which is not good. We can do better than that!
Step 2 - Implementing Prerendering of routes
Prerendering the routes allows the backend to prerender certain routes which then are cached on the server. So those pages don't have to be prerendered on-the-fly but instead will be delivered from the static cache on the server. However, if your App is behind a CDN like CloudFlare which caches each page as well you probably want to omit this step.
In your Dockerfile at the following line after build and before the run server:
# build app, prerender & run server
RUN ng build
RUN ng run performance:prerender
RUN ng run performance:server
In your angular.json you want to specify which routes should be prerendered:
"prerender": {
  "builder": "@nguniversal/builders:prerender",
    "options": {
      "routes": ["/", "/home", "/flight-booking/flight-search", "/flight-booking/charts"]
    },
Alternatively, you could also use a text file for specifying the static pages:
RUN ng run performance:prerender --routes-file routes.txtLet's check the results with prerendering:

The prerendered SSR variant takes 1.7s (-0.5s) to show the FCP and 2.4s (-1.4s) for the LCP. There is still a CLS of 0.165 because of the rerendering in the client. It's merely faster than the SSR without prerendering. This is because the Angular app is very simple and thus rendering on the server does not take very long.
Step 3 - Enabling Non-Destructive Hydration
To enable the Non-Destructive Hydration feature in Angular all we need to do is to add this provider in the AppModule. Of course this only works if we import it from the code>@angular/platform-browser</code with at least version 16.
// app.module.ts
@NgModule({
  providers: [
    [...],
    provideClientHydration()
  ],
})
export class AppModule {}
If you're using the standalone bootstrapping you can add the provider to the ApplicationConfig.
// app.config.ts
export const appConfig: ApplicationConfig = {
  providers: [
    [...],
    provideClientHydration(),
  ]
};
Let's check the final results:
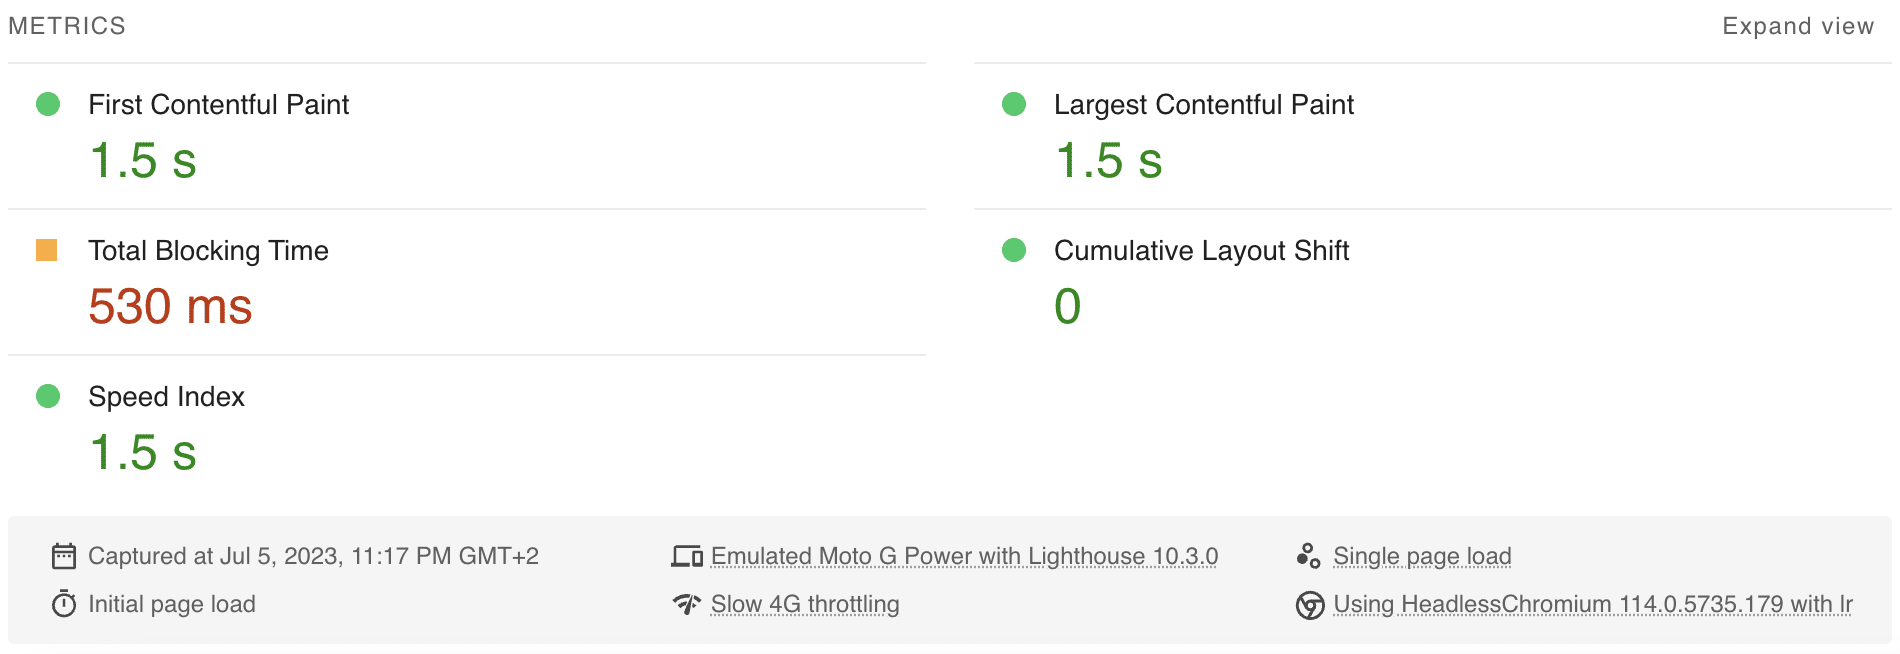
The SSR with Client Hydration variant takes 1.5s (-0.7s) to show the FCP and 1.5s (-2.3s) for the LCP. There is no CLS. It's blazingly fast and we get rid of the CLS, because the DOM does not have to be rerendered.
Performance Deep Dive Workshop
If you want to deep dive into Angular Performance, we offer a dedicated workshop - both in English and German:
- Performance Workshop 🚀
- Best Practices Workshop 📈 (including performance related topics)
- Accessibility Workshop ♿
Conclusion
Server Side Rendering is an effective technique for optimizing Initial Load Performance and delivering a faster, more seamless user experience. Angular V16's Non-Destructive Hydration complements SSR by transforming static HTML into an interactive application on the client-side without having to rerender (and thus repaint in the browser) it completely.
By combining the benefits of SSR & Hydration, your Angular apps can deliver faster initial load times, provide a seamless user experience, and achieve better search engine visibility. In the future the Angular framework will deliver even better Hydration support and features.
In this guide I showed you how easy it is to set up Angular SSR with Hydration and how much the Initial Load Performance improves as a result. So, if your Angular app is publicly available you should start using SSR & Hydration today!
This post was written by Alexander Thalhammer. Follow me on Linkedin, X or giThub.