Last Update: April 2026
Angular Signals make component state predictable and reactive, but classic form APIs still introduce a separate model for values, validation, and submission. Angular Signal Forms close that gap by representing form state itself with Signals, so user input, validation, and UI feedback follow the same reactive model.
This guide shows how Angular Signal Forms work in practice. Starting with a FlightEdit example, it covers the core API, FieldTree, schemas, submissions, advanced validation, nested forms, metadata, and custom controls so you can see where Signal Forms fit into modern Angular applications.
We will use the following FlightEdit component as the running example:
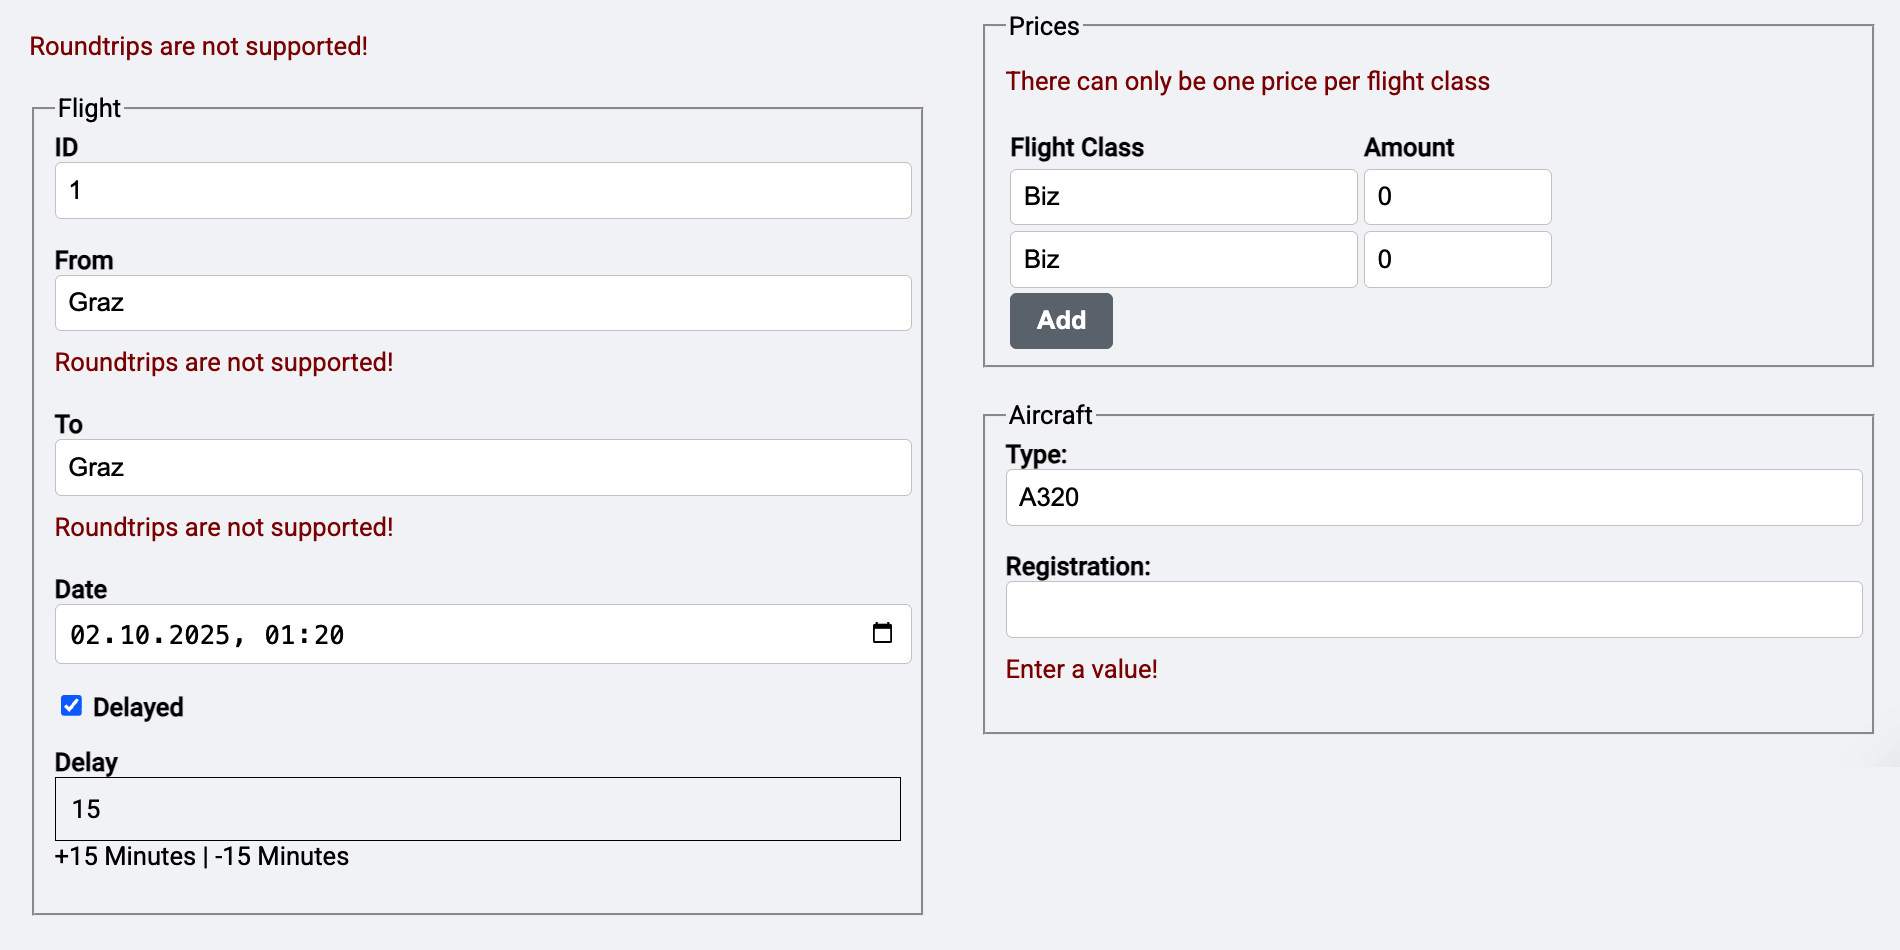
Table of Contents
- How to Create a Signal Form in Angular
- What Is the FieldTree Type in Signal Forms?
- How Signal Form Schemas Work
- How to Submit Signal Forms
- How Validation Works in Signal Forms: Custom, Conditional, Cross-Field, Async
- How to Work with Nested Signal Forms and Form Arrays
- How Signal Form Metadata Works
- Why Signal Forms Avoid Undefined Values
- How to Build Custom Controls for Signal Forms
- Angular Signal Forms FAQ
How to Create a Signal Form in Angular
Angular Signal Forms are part of @angular/forms/signals. Instead of maintaining a separate reactive form model, you bind a writable Signal to form(...) and get a FieldTree back that exposes values, validation state, metadata, and submission state as Signals.
To get started, we create a first form for the flight itself. In later sections, we will extend it to include nested forms for the connected airplane and the prices.
How to Set Up a Signal Form Component in Angular
Our implementation receives the flight to be displayed from a service named FlightDetailStore that is similar to the store discussed in @sec:state-services. To avoid repetition, we won’t go into its internals here. If you want to implement the concepts shown step by step, you can find a simplified version of this store for this chapter in the file simple-flight-detail-store.ts. In that case, also take a look at the FlightClient, which provides some additional methods used by this store.
Since a store is responsible for data consistency, it only publishes read-only data. On the other hand, we want to modify the data using the form: A two-way binding should transfer the user input directly to the bound flight and vice versa. Hence, we need a local working copy that can be represented by a linked signal:
// src/app/domains/ticketing/feature-booking/flight-edit/flight-edit.ts

[...]

import { linkedSignal } from '@angular/core';
import { form, minLength, required } from '@angular/forms/signals';
[...]

@Component([...])
export class FlightEdit {
  private readonly store = inject(FlightDetailStore);

  protected readonly flight = linkedSignal(() =>
    normalizeFlight(this.store.flightValue()),
  );

  // Set up the Signal Form with validation rules
  protected readonly flightForm = form(this.flight, (path) => {
    required(path.from);
    required(path.to);
    required(path.date);

    minLength(path.from, 3);
  });

  [...]
}
The helper function normalizeFlight converts the flight date into the right format to be used with an <input type="datetime-local">. This is an ISO string without a timezone designator at the end, e.g., 2030-12-24T17:30:00.000.
function normalizeFlight(flight: Flight): Flight {
  const localDate = flight.date.substring(0, 16);
  return {
    ...flight,
    date: localDate,
  };
}
The form function from Angular's Signal Forms package gets the linked signal representing the flight to edit.
The second parameter that is passed to form is a schema with validation rules. Angular provides the required and minLength rules out of the box. Further simple validators that ship with Signal Forms include maxLength, min, max, and pattern. The latter checks against a regular expression.
The path parameter of type SchemaPathTree is used to reference the individual properties we want to validate, e.g., from or to.
As a result, form returns a FieldTree that allows binding the individual properties of the flight to form controls in the template. We'll discuss this important data structure in the next section.
What Is the FieldTree Type in Signal Forms?
You can think of a FieldTree as a deeply nested Signal. Each property in the data structure is represented by a Signal with form state, e.g., value, dirty, invalid. Because these properties are Signal-based, we can bind them to form controls.
For instance, let's imagine the flight we pass to the function form looks like this:
{
  id: 1,
  from: 'Graz',
  to: 'Hamburg',
  date: '2030-12-24T17:30',
  delayed: false,
  delay: 0,
  aircraft: {
    type: 'T0815',
    registration: 'R4711'
  },
  prices: [
    { flightClass: 'economy', amount: 299 },
    { flightClass: 'business', amount: 599 },
  ]
}
In this case, the FieldTree returned by the form provides Signals for each property:
const date = this.flightForm.date().value();
const isDateDirty = this.flightForm.date().dirty();
const isDateInvalid = this.flightForm.date().invalid();
const dateErrors = this.flightForm.date().errors();
Here, the date itself is a signal, and value, dirty, invalid, and errors are as well. The property dirty is true when the user modified the value, and invalid is true when there was a validation error.
The errors property contains an array with all detected validation errors. For instance, the schema setup in the previous section requires from to be set. If this is not the case, this violation is reported by an object in the errors array. To get a better feeling for it, we'll display this array with the JsonPipe.
As the FieldTree is nested, we can also access the properties at deeper levels, such as the airplane's type or the prices:
const aircraftType = this.flightForm.aircraft.type().value();
const isAircraftTypeDirty = this.flightForm.aircraft.type().dirty();
[...]

const firstPriceAmount = this.flightForm.prices[0].amount().value();
const isFirstPriceAmountDirty = this.flightForm.prices[0].amount().dirty();
[...]
In our example, that means we can bind the properties of the flight itself, as well as those of the connected airplane and the connected prices. The next section is already binding some properties to the template.
How to Bind Angular Signal Forms to the Template
For binding parts of the Signal Form to the template, we need to import the FormField directive. For easily displaying validation errors during our first steps, we also import the JsonPipe:
// src/app/domains/ticketing/feature-booking/flight-edit/flight-edit.ts

[...]

import { JsonPipe } from '@angular/common';

import {
  form,
  FormField,
  minLength,
  required,
} from '@angular/forms/signals';

@Component({
  selector: 'app-flight-edit',
  imports: [
    [...]

    // Import FormField directive
    FormField,

    // Add JsonPipe
    JsonPipe,
  ],
  templateUrl: './flight-edit.html',
  changeDetection: ChangeDetectionStrategy.OnPush,
})
export class FlightEdit {
  [...]
}
This directive can be used to bind individual fields of our FieldTree to form controls such as input, select, and textarea:
<!-- .../ticketing/feature-booking/flight-edit/flight-edit.html -->

<fieldset>
  <legend>Flight</legend>

  <div class="form-group">
    <label for="flight-id">ID</label>
    <input
      class="form-control"
      [formField]="flightForm.id"
      type="number"
      id="flight-id"
    />
  </div>

  <div class="form-group">
    <label for="flight-from">From</label>
    <input
      class="form-control"
      [formField]="flightForm.from"
      id="flight-from"
    />
    @if (flightForm.from().invalid()) {
      <div>{{ flightForm.from().errors() | json }}</div>
    }
  </div>
  […]
</fieldset>
Please note that when binding a number, you need to use an <input type="number" ...> because Signal Forms also respects HTML semantics when ensuring type safety.
The errors property is an array containing all validation errors detected for the field, which the component outputs for illustrative purposes. The following screenshot shows this array in a case where the minLength validator was triggered:
 {width=50% }
However, the minLength validator isn't triggered for empty fields. This common approach supports optional fields. However, if the field isn't optional, a required validator handles the empty field.
Modern Angular
More about Signal Forms and modern Angular architecture can be found in my new eBook Modern Angular. It covers Signals, architecture, testing, AI assistants, and practical solutions for modern business applications.
How Signal Form Schemas Work
Besides validation rules, the schema passed to the form function also defines other aspects of the form's behavior. For instance, it could specify that changes are debounced or that some fields are read-only under certain conditions. In this section, I'll discuss these aspects in more detail.
How to Reuse Schemas in Angular Signal Forms
So far, the schema has been defined directly in the call to the form function. However, for larger schemas, this approach quickly becomes unwieldy. To make the individual components clearer, the schema can be refactored to a constant in a separate file. Since the schema defines general rules, it can be placed in the data folder.
// src/app/domains/ticketing/data/flight-schema.ts

import { required, minLength, schema } from '@angular/forms/signals';

import { Flight } from './flight';

export const flightSchema = schema<Flight>((path) => {
  required(path.from);
  required(path.to);
  required(path.date);

  minLength(path.from, 3);
});
The call to the function form can then refer to it:
// src/app/domains/ticketing/feature-booking/flight-edit/flight-edit.ts

import { flightSchema } from '../../data/flight-schema';
[...]

protected readonly flightForm = form(this.flight, flightSchema);
[...]
Schemas can also reference each other. This is useful, for example, if a form adds some specific validation rules to a schema with general ones:
import {
  apply,
  minLength,
  required,
  schema,
} from '@angular/forms/signals';

import { flightSchema } from '../../data/flight-schema';

export const flightFormSchema = schema<Flight>((path) => {
  apply(path, flightSchema);
  required(path.id);
});
The shown flightFormSchema uses apply to include all rules defined in flightSchema. In addition, it requires the flight's ID to be set.
Another case where schemas refer to other schemas is conditional validation rules. In the next section, we will discuss this.
How to Control Field Behavior in Angular Signal Forms
Schemas not only define validation rules but also further behavior. For instance, the schema can also specify under which circumstances the formField directive should disable a field:
// src/app/domains/ticketing/data/flight-schema.ts

import { disabled } from '@angular/forms/signals';

[...]
protected readonly filterForm = form(this.filter, (schema) => {
  [...]
  disabled(path.delay, (ctx) => !ctx.valueOf(path.delayed));
}
[...]
Instead of a boolean, you can also return a reason for the disabling:
// src/app/domains/ticketing/data/flight-schema.ts
protected readonly filterForm = form(this.filter, (schema) => {
  [...]
  disabled(path.delay, (ctx) =>
    ctx.valueOf(path.delayed) ? false : 'not delayed',
  );
}
All the reasons why a field is currently disabled are found in its disabledReasons Signal:
@for (reason of flightForm.delay().disabledReasons(); track $index) {
  <p>Disabled because {{ reason.message }}</p>
}
The functions hidden and readonly can be used to hide or make fields read-only in the same way. However, they always return boolean values and don't support reasons.
While Signal Forms automatically disables writing to bound fields, e.g., input elements, marked as read-only, hiding fields is left to the application. This is because, typically, hiding a field also requires hiding its label and perhaps other UI elements. Hence, hidden is only a hint that your template can use:
@if (!flightForm.delay().hidden()) {
  <div class="form-group">
    <label for="flight-delay">Delay (min)</label>
    <input
      class="form-control"
      [formField]="flightForm.delay"
      type="number"
      id="flight-delay"
    />
  </div>
}
How to Debounce Angular Signal Forms
Especially in reactive UIs with search filters, debouncing is essential: instead of firing an HTTP request on every keystroke, we trigger it only after the user pauses typing. In our example, this behavior appears in the flight search form.
As already teased in the previous chapter, the form's debouncing behavior is specified in its schema. For this, we added the debounce function in the FlightSearch component:
// .../feature-booking/flight-search/flight-search.ts

[...]

import { debounce, form, minLength, required } from '@angular/forms/signals';

[...]

protected readonly filterForm = form(this.filter, (path) => {
  debounce(path, 300);

  required(path.from);
  minLength(path.from, 3);
});
In cases where you want to debounce until the user left the input field, you can specify blur instead of a debounce time:
protected readonly filterForm = form(this.filter, (path) => {
  debounce(path, 'blur');
});
In most cases, just calling debounce with the debounce time in milliseconds is exactly what you need. However, if you want to control the debounce time using code, you can also pass in a custom debouncer function:
protected readonly filterForm = form(this.filter, (path) => {
  debounce(path, (ctx, _abortSignal) => {
    return new Promise((resolve) => {
      setTimeout(resolve, 300);
    });
  });

  required(path.from);
  minLength(path.from, 3);
});
Now, the returned Promise controls the debouncing. When it resolves, Angular continues processing the changes.
How to Validate Angular Signal Forms with Zod and Standard Schema
Often, there is already something, such as a Zod schema, that describes rules for valid objects. Perhaps you already have them for server-side code, or you generate them from a JSON Schema or an Open API document. Fortunately, you can directly validate against such schemas.
Let's imagine, Zod was already installed in our project (npm i zod) and we have this Zod schema for flights:
// src/app/domains/ticketing/data/flight-zod-schema.ts

import { z } from 'zod';

export const FlightZodSchema = z.object({
  id: z.number().int(),
  from: z.string().min(3).max(20),
  to: z.string().min(3).max(20),
  date: z.string(),
  delayed: z.boolean(),
})
Now, our Signal Form schema use validateStandardSchema to reference the Zod schema and use it to validate the form:
// src/app/domains/ticketing/data/flight-schema.ts

import { validateStandardSchema, schema } from '@angular/forms/signals';
import { FlightZodSchema } from './flight-zod-schema';

[...]

export const flightSchema = schema<Flight>((path) => {
  validateStandardSchema(path, FlightZodSchema);
  // ... other validation rules
});
This not only works with Zod but also with all other schema libraries that follow the Standard Schema definition such as Valibot.
Combined with the submit function discussed above, this is a quick and effective way to establish a client-side validation.
How to Submit Signal Forms
The perhaps biggest improvement in Signals Forms is about how we submit forms: We can now define the logic for submitting a form when calling the form function. After binding the resulting FieldTree to the form tag, all we need is a regular submit button. This section explains these new capabilities in more detail.
How Form Submission Works in Angular Signal Forms
For defining our submission logic, we use the new submission node in the options object that can be passed to the form helper:
// .../ticketing/feature-booking/flight-edit/flight-edit.ts

@Component({
  selector: 'app-flight-edit',
  imports: [
    [...]
    FormRoot,
  ],
  [...]
})
export class FlightEdit {

  [...]

  protected readonly flightForm = form(this.flight, flightSchema, {
    submission: {
      action: async (form) => this.save(form),
      ignoreValidators: 'none',
      onInvalid: (form) => this.reportValidationError(form),
    },
  });

  [...]
}
The action property points to the function to be executed when the user submits the form. By default, this method is not executed when there is any failing or pending validator. Pending validators are asynchronous validators that did not deliver a result yet. Using the ignoreValidators property, we can, however, change this behavior. It can have one of the following values:
none: Validators are not ignored and the form cannot be submitted when any validator is failing or pending. This is the default behavior.pending: Pending validators do not prevent submitting the form.all: All Validators are ignored. Hence, we can submit the form even when validators are failing or pending.
The onInvalid handler is executed when a submission is prevented by a failing validator.
The method registered with action can return validation error the application gets aware of when sending the data to the backend:
protected async save(form: FieldTree<Flight>) {
  try {
    await this.store.saveFlight(form().value());
    return null;
  } catch (error) {
    return {
      kind: 'processing_error',
      error: extractError(error),
    };
  }
}
These validation errors are placed in the object graph describing the Signal Form. Hence, the forms error property will provide the error message:
<p>
  {{ flightForm().errorSummary() | json }}
</p>
This interplay between validation errors received on the client side and validation errors we got during the submission is a welcoming new feature of Signal Forms. With the previous form implementations, such a behavior was difficult to achieve.
In our example the onInvalid handler is calling the reportValidationError that is displaying a snack bar and focussing the first input with a validation error:
private reportValidationError(form: FieldTree<Flight>): void {
  this.snackBar.open('Please correct the validation errors', 'OK');
  this.focusInvalid(form);
}

private focusInvalid(form: FieldTree<Flight>) {
  const errors = form().errorSummary();
  if (errors.length > 0) {
    errors[0].fieldTree().focusBoundControl();
  }
}
How to Submit Angular Signal Forms in the Template
To submit the form, we just need to connect the form element to our Signal Form. For this, we use the newly introduced formRoot directive:
<!-- .../ticketing/feature-booking/flight-edit/flight-edit.html -->

<h1>Flight Edit</h1>

<form [formRoot]="flightForm">

  [...]

  <div>
    <button>Save</button>
  </div>
</form>
This new directive takes care of several tasks at once:
- Disabling at default submission behavior, as we don't want to post back the form's content to the server as in traditional server-side rendered applications.
- Disabling the browser's built-in form validation, as Angular is taking care of this and we don't want to duplicate some of the validation messages.
- Connecting the submission action to the form.
As formRoot directly registeres the defined action with the form's submit event, we just need to add an ordinary button with the type submit to the form. As submit is the default type, we don't even need to add type="submit" as shown in the example above. But also when submitting the form by pressing enter, the action will be triggered.
How to Add Additional Submit Actions in Angular Signal Forms
If you have further submission actions, e.g., for handing in changes for approval, you can always add further buttons with type="button" and bind them to custom click handlers. In such cases, the submit function provided by Signal Forms helps to only execute the submission logic when the form is valid:
protected async requestApproval(): Promise<void> {
  await submit(this.flightForm, {
    action: async (form) => {
      await this.store.requestApproval(form().value());
    },
    ignoreValidators: 'none',
    onInvalid: (form) => this.reportValidationError(form),
  });
}
How Validation Works in Signal Forms
Custom validators allow you to implement validation logic that goes beyond the built-in validators, such as required and minLength. They can check against business rules and compare values.
How to Write Custom Validators for Angular Signal Forms
To define a custom validator, the validate function is used. It accepts the path to be validated and a lambda expression that performs the validation:
// src/app/domains/ticketing/data/flight-schema.ts

import { validate } from '@angular/forms/signals';

[...]
export const flightSchema = schema<Flight>((path) => {
  required(path.from);
  required(path.to);
  required(path.date);
  minLength(path.from, 3);

  const allowed = ['Graz', 'Hamburg', 'Zürich'];
  validate(path.from, (ctx) => {
    const value = ctx.value();
    if (allowed.includes(value)) {
      return null;
    }

    return {
      kind: 'city',
      value,
      allowed,
    };
  });
});
This example defines a custom rule that checks the field from against a list of allowed airports. In case of an error, this validator returns a ValidationError, which identifies the validation error via a string property called kind. The validator can provide more detailed error information using additional properties it can freely specify.
If a validator detects multiple errors, it can also return an array of ValidationError objects. If there are no errors, it returns the value null – true to the motto: no complaints are praise enough.
How to Refactor Signal Form Validators into Reusable Functions
To improve clarity and reuse, it is advisable to refactor custom validators to separate functions. They must at least accept the property for validation. This property is represented by the type SchemaPathTree<T>:
// src/app/domains/ticketing/data/flight-validators.ts

import { SchemaPathTree, validate } from '@angular/forms/signals';

export function validateCity(path: SchemaPathTree<string>, allowed: string[]) {
  validate(path, (ctx) => {
    const value = ctx.value();
    if (allowed.includes(value)) {
      return null;
    }

    return {
      kind: 'city',
      value,
      allowed,
    };
  });
}
This validator can check a string property passed via the path parameter against the list of allowed cities passed to the allowed parameter. To use the validator, the application calls it in the schema:
// src/app/domains/ticketing/data/flight-schema.ts

import { validateCity } from './flight-validators';

[...]

export const flightSchema = schema<Flight>((path) => {
  [...]
  validateCity(path.from, ['Graz', 'Hamburg', 'Zürich']);
});
How to Show Validation Errors in Angular Signal Forms
So far, we've only returned the errors object to describe the detected validation errors. However, the validators provided by Angular also give us the option to specify an error message for the user:
required(path.from, { message: 'Please enter a value!' });The validator places this error message in the message property of the respective ValidationError object. This means the application only needs to output all message properties it finds in the errors array.
In our example, the ValidationErrorsPane component handles this task. If a validation error does not have a message property, a standard error message determined by the helper function toMessage is used:
// src/app/domains/shared/ui-forms/validation-errors/validation-errors-pane.ts

import { Component, computed, input } from '@angular/core';
import { MinValidationError, ValidationError } from '@angular/forms/signals';

@Component({
  selector: 'app-validation-errors-pane',
  imports: [],
  templateUrl: './validation-errors-pane.html',
})
export class ValidationErrorsPane {
  readonly errors = input.required<ValidationError.WithField[]>();
  readonly showFieldNames = input(false);

  protected readonly errorMessages = computed(() =>
    toErrorMessages(this.errors(), this.showFieldNames()),
  );
}

function toErrorMessages(
  errors: ValidationError.WithField[],
  showFieldNames: boolean,
): string[] {
  return errors.map((error) => {
    const prefix = showFieldNames ? toFieldName(error) + ': ' : '';

    const message = error.message ?? toMessage(error);
    return prefix + message;
  });
}

function toFieldName(error: ValidationError.WithField) {
  return error.fieldTree().name().split('.').at(-1);
}

function toMessage(error: ValidationError): string {
  switch (error.kind) {
    case 'required':
      return 'Enter a value!';
    case 'roundtrip':
    case 'roundtrip_tree':
      return 'Roundtrips are not supported!';
    case 'min':
      return `Minimum amount: ${(error as MinValidationError).min}`;
    default:
      return error.kind ?? 'Validation Error';
  }
}
The template displays the error messages obtained in this way:
<!-- .../shared/ui-forms/validation-errors/validation-errors-pane.html -->

@if (errorMessages().length > 0) {
  <div class="validation-errors">
    @for (message of errorMessages(); track message) {
      <div>{{ message }}</div>
    }
  </div>
}
When using the ValidationErrorsPane, don't forget to import it in the consuming component:
// src/app/domains/ticketing/feature-booking/flight-edit/flight-edit.ts

[...]

import { ValidationErrorsPane }
  from '../../shared/ui-forms/validation-errors/validation-errors-pane';
[...]

@Component({
  selector: 'app-flight-edit',
  imports: [[...], ValidationErrorsPane],
  [...]
})
export class FlightEdit {
  [...]
}
Then, in the template, call it for each field and pass the errors array:
<!-- src/app/domains/ticketing/feature-booking/flight-edit/flight-edit.html -->
<div class="form-group">
  <label for="flight-from">From</label>
  <input [formField]="flightForm.from" id="flight-from" />
  <app-validation-errors-pane [errors]="flightForm.from().errors()" />
</div>
How Conditional Validation Works in Angular Signal Forms
Some validation rules only apply under specific circumstances. In the application shown, delay needs to be validated only when delayed is true. This simple case is representative of more complex cases in which the value of one field affects the validation of other fields.
Such situations can be handled with the applyWhenValue function. It accepts a path to validate, a predicate — typically a lambda expression —, and a schema. If the predicate returns true, the passed schema with all its validation rules is applied:
// src/app/domains/ticketing/data/flight-schema.ts

import { applyWhenValue, required, min, schema } from '@angular/forms/signals';

[...]

export const flightSchema = schema<Flight>((path) => {
  // ...
  applyWhenValue(path, (flight) => flight.delayed, delayedFlight);
});

export const delayedFlight = schema<Flight>((path) => {
  required(path.delay);
  min(path.delay, 15);
});
The schema contains the conditional validation rules. There are a few alternatives to applyWhenValue. One of them is applyWhen, whose predicate receives not just the value but the current context, which provides access to the entire field state:
applyWhen(path, (ctx) => ctx.valueOf(path.delayed), delayedFlight);Besides valueOf, the context also provides a function stateOf that returns the entire field state of a given path. This is useful if the predicate needs to check properties such as dirty.
Another option for conditional validations is the when property provided by the required validator:
required(path.delay, {
  when: (ctx) => ctx.valueOf(path.delayed),
});
How Cross-Field Validation Works in Angular Signal Forms
Sometimes we need to asses multiple fields to perform a validation. One option for achieving this is a validator provided for a common parent. For example, if a validator needs to ensure that from and to have different values, the application can implement it as a validator for the entire flight:
// src/app/domains/ticketing/data/flight-validators.ts

import { SchemaPathTree, validate } from '@angular/forms/signals';
import { Flight } from './flight';

export function validateRoundTrip(path: SchemaPathTree<Flight>) {
  validate(path, (ctx) => {
    const from = ctx.fieldTree.from().value();
    const to = ctx.fieldTree.to().value();

    // Alternative:
    // const from = ctx.valueOf(path.from);
    // const to = ctx.valueOf(path.to);

    if (from === to) {
      return {
        kind: 'roundtrip',
        from,
        to,
      };
    }
    return null;
  });
}
As usual, this validator must be included in the schema:
// src/app/domains/ticketing/data/flight-schema.ts

[...]
import { validateRoundTrip } from './flight-validators';

export const flightSchema = schema<Flight>((path) => {
  // ...
  validateRoundTrip(path);
});
Error messages returned by a validator are always associated with the validated level in the FieldTree. In the shown example, this is the flight itself, not from or to. Therefore, the template needs to access the flightForm's errors array to display this error message:
<!-- src/app/domains/ticketing/feature-booking/flight-edit/flight-edit.html -->

<app-validation-errors-pane [errors]="flightForm().errors()" />
<form>[…]</form>
In the screenshot shown initially, this is the first error message the component displays above the form. Validation errors from lower levels do not appear in errors. To retrieve these, the application can access the errors array on the respective level or a parent's errorSummary:
<app-validation-errors-pane
  [errors]="flightForm().errorSummary()"
  [showFieldNames]="true"
  />
<form>[…]</form>
Since this will reveal error messages for different levels and fields, it makes sense to output the name of the affected field for each error.
How to Access Sibling Fields in Angular Signal Forms
An alternative implementation of the round-trip validator in the previous section is to define a validator for from that also has access to its sibling field to. This is done using the valueOf function provided by the validation context:
export function validateRoundTrip2(path: SchemaPathTree<Flight>) {
  // Now, we are validating the 'from' field only
  validate(path.from, (ctx) => {
    const from = ctx.value();
    const to = ctx.valueOf(path.to);

    if (from === to) {
      return {
        kind: 'roundtrip',
        from,
        to,
      };
    }
    return null;
  });
}
In this case, the error message appears in the from field's errors array:
<app-validation-errors-pane [errors]="flightForm.from().errors()" />How Tree Validators Work in Angular Signal Forms
Tree validators are special multi-field validators that can define error messages for all levels of a field tree. To do so, they store the affected field in the ValidationError object:
// src/app/domains/ticketing/data/flight-validators.ts

import { SchemaPathTree, validateTree } from '@angular/forms/signals';
import { Flight } from './flight';

export function validateRoundTripTree(path: SchemaPathTree<Flight>) {
  validateTree(path, (ctx) => {
    const from = ctx.fieldTree.from().value();
    const to = ctx.fieldTree.to().value();

    if (from === to) {
      return {
        kind: 'roundtrip_tree',
        field: ctx.fieldTree.from,
        from,
        to,
      };
    }
    return null;
  });
}
After registering in the schema, the error message now appears at the field level:
// src/app/domains/ticketing/data/flight-schema.ts

[...]
import { validateRoundTripTree } from './flight-validators';

export const flightSchema = schema<Flight>((path) => {
  // ...
  validateRoundTripTree(path);
});
Since each validator can return multiple error messages in the form of an array, a tree validator can also return error messages for different fields. This makes it ideal for complex rules. Simple rules, however, can also be implemented as conventional validators that have access to neighboring fields as shown before.
How Async Validation Works in Angular Signal Forms
Asynchronous validators do not deliver validation results instantly; they determine them asynchronously. Typically, this is done via an HTTP call. The validateAsync function provided by Signal Forms enables this approach. It defines four mappings:
paramsmaps the form state to parametersfactorycreates a resource with these parametersonSuccessmaps the result determined by the resource to aValidationErroror aValidationErrorarrayonErrormaps a possible error returned by the resource to aValidationErroror aValidationErrorarray
The following example demonstrates this using an rxResource that calls the rxValidateAirport function to simulate an HTTP call for validating an airport:
// src/app/domains/ticketing/data/flight-validators.ts

import { rxResource } from '@angular/core/rxjs-interop';
import { SchemaPathTree, validateAsync } from '@angular/forms/signals';
import { delay, map, Observable, of } from 'rxjs';

export function validateCityAsync(path: SchemaPathTree<string>) {
  validateAsync(path, {
    params: (ctx) => ({
      value: ctx.value(),
    }),
    factory: (params) => {
      return rxResource({
        params,
        stream: (p) => {
          return rxValidateAirport(p.params.value);
        },
      });
    },
    onSuccess: (result: boolean, _ctx) => {
      if (!result) {
        return {
          kind: 'airport_not_found_http',
        };
      }
      return null;
    },
    onError: (error, _ctx) => {
      console.error('api error validating city', error);
      return {
        kind: 'api-failed',
      };
    },
  });
}

// Simulates a server-side validation
function rxValidateAirport(airport: string): Observable<boolean> {
  const allowed = ['Graz', 'Hamburg', 'Zürich'];
  return of(null).pipe(
    delay(2000),
    map(() => allowed.includes(airport)),
  );
}
This validator must also be added to the schema:
// src/app/domains/ticketing/data/flight-schema.ts

import { validateCityAsync } from './flight-validators';

[...]

export const flightSchema = schema<Flight>((path) => {
  [...]
  validateCityAsync(path.from);
});
As long as at least one synchronous validator fails, Angular doesn't execute asynchronous validators. This prevents unnecessary server calls. While Signal Forms waits for the result of an asynchronous validator, the pending property of the affected field is true:
<!-- .../ticketing/feature-booking/flight-edit/flight-form/flight-form.html -->

@if (flightForm.from().pending()) {
  <div>Waiting for Async Validation Result...</div>
}
How HTTP Validators Work in Angular Signal Forms
Most asynchronous validators initiate HTTP requests. Therefore, validateHttp provides a simplified version that directly returns a request for an HttpResource:
// src/app/domains/ticketing/data/flight-validators.ts

import { SchemaPathTree, validateHttp, metadata } from '@angular/forms/signals';
import { Flight } from './flight';

export function validateCityHttp(path: SchemaPathTree<string>) {
  validateHttp(path, {
    request: (ctx) => ({
      url: 'https://demo.angulararchitects.io/api/flight',
      params: {
        from: ctx.value(),
      },
    }),
    onSuccess: (result: Flight[], _ctx) => {
      if (result.length === 0) {
        return {
          kind: 'airport_not_found_http',
        };
      }
      return null;
    },
    onError: (error, _ctx) => {
      console.error('api error validating city', error);
      return {
        kind: 'api-failed',
      };
    },
  });
}
Like before, onSuccess maps the result of the resource to ValidationError objects and onError projects errors provided by the resource to this type. Here, too, you should remember to anchor the validator in the schema:
// src/app/domains/ticketing/data/flight-schema.ts

import { validateCityHttp } from './flight-validators';

[...]

export const flightSchema = schema<Flight>((path) => {
  [...]
  validateCityHttp(path.from);
});
How to Work with Nested Signal Forms and Form Arrays
Real-world applications often require forms that go beyond simple flat structures. Signal Forms support complex, nested data models with objects and arrays. This section demonstrates how to work with form groups (nested objects) and form arrays (repeating groups) and how to break down large forms into smaller, more manageable sub-components.
Nested Form Groups in Angular Signal Forms
So far, we've only bound a flat flight object to a form. However, Signal Forms also support more complex structures. To illustrate this, let's write validation rules for the aircraft object connected to a flight:
// src/app/domains/ticketing/data/aircraft-schema.ts

import { required, schema } from '@angular/forms/signals';
import { Aircraft } from './aircraft';

export const aircraftSchema = schema<Aircraft>((path) => {
  required(path.registration);
  required(path.type);
});
The flight schema uses the aircraft schema:
// src/app/domains/ticketing/data/flight-schema.ts

import { apply } from '@angular/forms/signals';
import { aircraftSchema } from './aircraft-schema';

[...]

export const flightSchema = schema<Flight>((path) => {
  [...]
  apply(path.aircraft, aircraftSchema);
});
The aircraft can be directly accessed via the flight. To avoid long chains like flightForm.aircraft.registration().errors(), I create an alias for each additional level using @let:
<!-- src/app/domains/ticketing/feature-booking/flight-edit/flight-edit.html -->

@let aircraftForm = aircraft();

<fieldset>
  <legend>Aircraft</legend>

  <div class="form-group">
    <label for="type">Type:</label>
    <input id="type" class="form-control" [formField]="aircraftForm.type" />
    <app-validation-errors-pane [errors]="aircraftForm.type().errors()" />
  </div>
  <div class="form-group">
    <label for="registration">Registration:</label>
    <input
      id="registration"
      class="form-control"
      [formField]="aircraftForm.registration"
    />
    <app-validation-errors-pane
      [errors]="aircraftForm.registration().errors()"
    />
  </div>
</fieldset>
Form Arrays in Angular Signal Forms
The repeating group with the prices is designed similarly to the aircraft form. First, you need to set up a schema:
// src/app/domains/ticketing/data/price-schema.ts

import { min, required, schema } from '@angular/forms/signals';
import { Price } from './price';

export const initialPrice: Price = {
  flightClass: '',
  amount: 0,
};

export const priceSchema = schema<Price>((path) => {
  required(path.flightClass);
  required(path.amount);
  min(path.amount, 0);
});
Unlike before, the flight schema must set up the pricing scheme for each individual price. Therefore, the applyEach function is used here instead of apply:
// src/app/domains/ticketing/data/flight-schema.ts

import { applyEach, schema } from '@angular/forms/signals';
import { priceSchema } from './price-schema';

export const flightSchema = schema<Flight>((path) => {
  // ...
  applyEach(path.prices, priceSchema);
});
In the template, the prices must now be iterated, and corresponding fields must be presented for each price:
<!-- src/app/domains/ticketing/feature-booking/flight-edit/flight-edit.html -->

@let pricesForm = prices();

<fieldset>
  <legend>Prices</legend>
  <app-validation-errors-pane [errors]="pricesForm().errors()" />
  <table class="datagrid">
    <tr>
      <th>Flight Class</th>
      <th>Amount</th>
      <th></th>
    </tr>
    @for (price of pricesForm(); track $index) {
      <tr>
        <td>
          <input [formField]="price.flightClass" class="medium" />
        </td>
        <td>
          <input [formField]="price.amount" type="number" class="small" />
        </td>
        <td class="error-col">
          <app-validation-errors-pane
            [errors]="price().errorSummary()"
            [showFieldNames]="true"
          />
        </td>
      </tr>
    }
  </table>
  <button (click)="addPrice()" type="button" class="btn btn-default ml3">
    Add
  </button>
</fieldset>
The Add button adds a new price to the array. This causes Angular to present fields for it as well:
// src/app/domains/ticketing/feature-booking/flight-edit/flight-edit.html

[...]

addPrice(): void {
  const prices = this.prices();
  prices().value.update((prices) => [...prices, { ...initialPrice }]);
}
How to Validate Form Arrays in Angular Signal Forms
Validation rules can be defined for all nodes in the object graph shown. Arrays like in our property prices are no exception. The following example demonstrates this using a validator that iterates through all prices and checks for duplicates:
// src/app/domains/ticketing/data/flight-validators.ts

import { SchemaPath, validate } from '@angular/forms/signals';
import { Price } from './price';

export function validateDuplicatePrices(path: SchemaPath<Price[]>) {
  validate(path, (ctx) => {
    const prices = ctx.value();
    const flightClasses = new Set<string>();

    for (const price of prices) {
      if (flightClasses.has(price.flightClass)) {
        return {
          kind: 'duplicateFlightClass',
          message: 'There can only be one price per flight class',
          flightClass: price.flightClass,
        };
      }
      flightClasses.add(price.flightClass);
    }

    return null;
  });
}
As always, you have to remember to include the validation rule:
// src/app/domains/ticketing/data/flight-schema.ts

import { validateDuplicatePrices } from './flight-validators';

[...]

export const flightSchema = schema<Flight>((path) => {
  [...]
  validateDuplicatePrices(path.prices);
});
How to Split Large Angular Signal Forms into Subforms
The code of large forms can quickly become unwieldy. Therefore, it's a good idea to break them down into multiple components. Let's imagine that our flight form is composed of three subforms: a flight form, a prices form, and an aircraft form. The main FlightEdit component then simply imports these components:
// src/app/domains/ticketing/feature-booking/flight-edit/flight-edit.ts
[...]

import { AircraftForm } from './aircraft-form/aircraft-form';
import { FlightForm } from './flight-form/flight-form';
import { PricesForm } from './prices-form/prices-form';

@Component({
  selector: 'app-flight-edit',
  imports: [
    AircraftForm,
    PricesForm,
    FlightForm,
    ValidationErrorsPane,
    RouterLink,
  ],
  templateUrl: './flight-edit.html',
  changeDetection: ChangeDetectionStrategy.OnPush,
})
export class FlightEdit {
  [...]
}
These components each receive a portion of the entire Signal Form via data binding:
<!-- src/app/domains/ticketing/feature-booking/flight-edit/flight-edit.html -->

@if (flight().id !== 0) {
  <app-validation-errors-pane [errors]="flightForm().errors()" />
  <form class="flight-form" novalidate>
    <app-flight [flight]="flightForm"></app-flight>
    <app-prices [prices]="flightForm.prices"></app-prices>
    <app-aircraft [aircraft]="flightForm.aircraft"></app-aircraft>

    <div class="mt-40">
      <button>Save</button>
    </div>
  </form>
}
Angular represents these individual parts as FieldTree<T>. Inputs must be set up for this:
// .../ticketing/feature-booking/flight-edit/aircraft-form/aircraft-form.ts

import { Component, input } from '@angular/core';
import { FieldTree, FormField } from '@angular/forms/signals';

import { ValidationErrorsPane }
  from '../../../../shared/ui-forms/validation-errors/validation-errors-pane';
import { Aircraft } from '../../../data/aircraft';

@Component({
  selector: 'app-aircraft',
  imports: [FormField, ValidationErrorsPane],
  templateUrl: './aircraft-form.html',
})
export class AircraftForm {
  aircraft = input.required<FieldTree<Aircraft>>();
}
For arrays like the price array in our example, the same procedure applies:
// .../ticketing/feature-booking/flight-edit/prices-form/prices-form.ts

import { Component, input } from '@angular/core';
import { FieldTree, FormField } from '@angular/forms/signals';

import { ValidationErrorsPane }
  from '../../../../shared/ui-forms/validation-errors/validation-errors-pane';
import { Price } from '../../../data/price';
import { initialPrice } from '../../../data/price-schema';

@Component({
  selector: 'app-prices',
  imports: [FormField, ValidationErrorsPane],
  templateUrl: './prices-form.html',
})
export class PricesForm {
  readonly prices = input.required<FieldTree<Price[]>>();

  addPrice(): void {
    const prices = this.prices();
    prices().value.update((prices) => [...prices, { ...initialPrice }]);
  }
}
How Signal Form Metadata Works
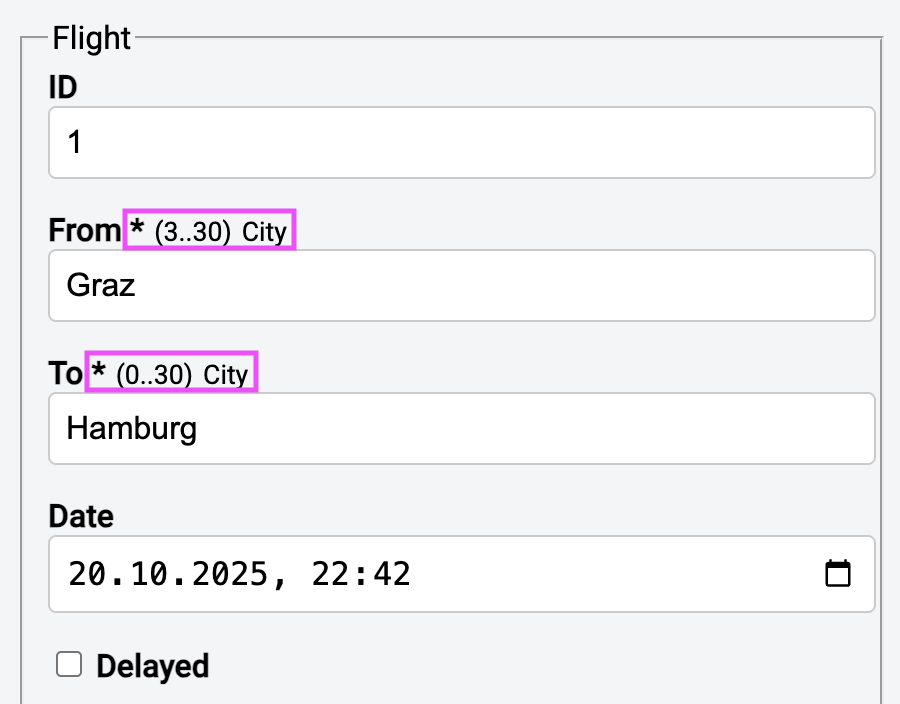
Instead of telling users after they entered something invalid, Signal Forms can provide metadata to let them know upfront which kind of value they are expected to provide:
 {width=50% }
How to Read Metadata in Angular Signal Forms
Most validators define metadata for the validated fields. To read it, call the metadata method with a key, e.g., REQUIRED or MIN_LENGTH. We move this task into a FieldMetaDataPane component that gets a field via an input:
// src/app/domains/shared/ui-forms/field-meta-data-pane/field-meta-data-pane.ts

import { Component, computed, input } from '@angular/core';
import {
  FieldTree,
  REQUIRED,
  MIN_LENGTH,
  MAX_LENGTH,
} from '@angular/forms/signals';

@Component({
  selector: 'app-field-meta-data-pane',
  imports: [],
  templateUrl: './field-meta-data-pane.html',
})
export class FieldMetaDataPane {
  readonly field = input.required<FieldTree<unknown>>();

  protected readonly fieldState = computed(() => this.field()());

  protected readonly isRequired = computed(
    () => this.fieldState().metadata(REQUIRED)?.() ?? false,
  );
  protected readonly minLength = computed(
    () => this.fieldState().metadata(MIN_LENGTH)?.() ?? 0,
  );
  protected readonly maxLength = computed(
    () => this.fieldState().metadata(MAX_LENGTH)?.() ?? 30,
  );
  protected readonly length = computed(
    () => `(${this.minLength()}..${this.maxLength()})`,
  );
}
Here is the template for this component:
<!-- .../shared/ui-forms/field-meta-data-pane/field-meta-data-pane.html -->

@if (isRequired()) {
  <span class="info">*</span>
}
<span class="info info-small">{{ length() }}</span>
How to Display Metadata in Angular Signal Forms
For displaying the metadata, our example imports the FieldMetaDataPane into the FlightForm component:
// .../ticketing/feature-booking/flight-edit/flight-form/flight-form.ts

[...]

import { FieldMetaDataPane }
  from '../../../shared/ui-forms/field-meta-data-pane/field-meta-data-pane';

[...]

@Component({
  selector: 'app-flight-form',
  imports: [[...], FieldMetaDataPane],
  [...]
})
export class FlightForm {
  [...]
}
In the template, it displays the metadata next to the respective field:
<!-- .../ticketing/feature-booking/flight-edit/flight-form/flight-form.html -->

<div class="form-group">
  <label for="flight-from">
    From
    <app-field-meta-data-pane [field]="flightForm.from" />
  </label>
  <input class="form-control" [formField]="flightForm.from" id="flight-from" />
  [...]
</div>
How to Define Custom Metadata in Angular Signal Forms
You create your own simple property with createMetadataKey:
// src/app/domains/shared/util-common/properties.ts

import { createMetadataKey } from '@angular/forms/signals';

//
//  Property
//
export const CITY = createMetadataKey<boolean>();
Now it gets a bit spicy: imagine two validators defining different values for the same property. The first one defines CITY as true, the second one as false. By default, the last defined value wins.
However, using a reducer, you can control how multiple values are combined. For instance, the reducer MetadataReducer.or() combines them via a logical OR (value1 || value2):
import { createMetadataKey, MetadataReducer } from '@angular/forms/signals';

//
//  AggregateProperty
//
export const CITY = createMetadataKey(MetadataReducer.or());
So, if one validator sets CITY to true, and another one to false, the final value will be true.
Besides MetadataReducer.or, there are several other reducers such as MetadataReducer.and, MetadataReducer.min, MetadataReducer.max, and MetadataReducer.list. The latter puts all values into an array.
For special cases, you can also implement your own reducer by implementing the MetadataReducer<T> interface. To illustrate this, here is a custom reducer that also combines boolean values via a logical OR:
const myOr: MetadataReducer<boolean, boolean> = {
  reduce(acc, item) {
    return acc || item;
  },
  getInitial() {
    return false;
  }
};

export const CITY = createMetadataKey(myOr);
To define a value for a metadata key, we use the metadata function. You can call it directly in the schema, but most likely, you'll call it inside a custom validator where you already define what you expect from the user:
// src/app/domains/ticketing/data/flight-validators.ts

[...]

export function validateCityHttp(path: SchemaPathTree<string>) {
  metadata(path, CITY, () => true);

  validateHttp(path, { ... });
}
How to Read Custom Metadata in Angular Signal Forms
Also custom metadata is read by passing the metadata key to the field's metadata method:
// src/app/domains/shared/ui-forms/field-meta-data-pane/field-meta-data-pane.ts

[...]

import { CITY } from '../../util-common/properties';

@Component({
  selector: 'app-field-meta-data-pane',
  imports: [],
  templateUrl: './field-meta-data-pane.html',
})
export class FieldMetaDataPane {
  readonly field = input.required<FieldTree<unknown>>();

  protected readonly fieldState = computed(() => this.field()());

  [...]

  protected readonly city = computed(() => this.fieldState().metadata(CITY));
}
To display our CITY metadata, we also need to extend the FieldMetaDataPane's template:
<!-- .../shared/ui-forms/field-meta-data-pane/field-meta-data-pane.html -->

[...]

@if (city()) {
  <span class="info info-small">City</span>
}
Why Signal Forms Avoid Undefined Values
It might come as a surprise that Signal Forms do not allow undefined values. The reason for this design decision is that undefined semantically means that the field does not exist. When initialized with an undefined value, the form function has no way of knowing that this field is supposed to exist.
To make this clearer, let’s use a thought experiment where the delay of our flights is optional:
export interface FlightDomainModel {
  id: number;
  from: string;
  to: string;
  date: string;
  delayed: boolean;

  // Optional delay
  delay?: number
}
Let's further assume that the backend only expects a delay value when delayed is true. In all other cases, the field is omitted and hence undefined. If you now create a form for this model in a component without a delay, Angular cannot find the needed metadata for the delay field. From its perspective, this field does not exist.
However, from the form's perspective, the field always exists, while sometimes it has no value. This shows that we have a difference between the domain perspective and the form perspective. For this reason, the Angular team recommends distinguishing these different views by defining two separate types:
export interface FlightFormModel {
  id: number;
  from: string;
  to: string;
  date: string;
  delayed: boolean;
  delay: number
}
Instead of undefined, Signal Forms would accept null as it has the semantics of 'empty value'. However, it is even better to go with a sound default value. In our example, we can simply set the default delay to 0. To bridge between the domain model and the form model, we use mapping functions when creating the Signal Form:
export function toFlightFormModel(model: FlightDomainModel): FlightFormModel {
  return {
    ...model,
    delay: model.delay ?? 0,
  };
}
For converting back, we have a similar function, given the backend does not accept a delay of 0 when delayed is false:
export function toFlightDomainModel(model: FlightFormModel): FlightDomainModel {
  return {
    ...model,
    delay: model.delayed ? model.delay : undefined,
  };
}
Furthermore, in our component, we can use a linked signal to automatically convert the domain model to the form model within the reactive data flow:
protected readonly flightDomainModel = signal<FlightDomainModel>({
  id: 0,
  from: '',
  to: '',
  date: '',
  delayed: false,
});

protected readonly flightFormModel = linkedSignal(
  () => toFlightFormModel(this.flightDomainModel())
);

protected readonly flightForm = form(this.flightFormModel);
When saving the form, we need to convert back to the domain model:
protected save(): void {
  const formModel = this.flightForm().value();
  const domainModel = toFlightDomainModel(formModel);
  [...]
}
When the form model needs to be converted back immediately after typing, a delegated signal, as described in @sec:state-services, can be used.
The same strategy is useful when dealing with fields that appear conditionally. From the form's perspective, these fields always exist, even if they are hidden in the UI. Hence, the correct way for modelling them is to always have them in the form model and to convert them accordingly when mapping to/from the domain model.
How to Build Custom Controls for Signal Forms
So far, we've only used the FormField directive with standard HTML elements. The question now is how to make this directive work with our own widgets. For example, let's imagine a DelayStepper component to change the flight delay in 15-minute increments. This should be able to be bound to a field with FormField, just like all other fields:
<!-- .../ticketing/feature-booking/flight-edit/flight-form/flight-form.html -->

<div class="form-group form-check">
  <label for="delay">Delay</label>
  <app-delay-stepper id="delay" [formField]="flightForm.delay" />
  <app-validation-errors-pane [errors]="flightForm.delay().errors()" />
</div>
In the past, such widgets had to be provided with a so-called Control Value Accessor. Unfortunately, this wasn't exactly straightforward, and the chance is quite low that the Control Value Accessor was ever on the top ten of the most popular Angular concepts.
Signal Forms makes the whole process much simpler: The widget implements the FormValueControl<T> interface, which simply enforces a ModelSignal named value. It also defines other optional properties, such as disabled or errors, which the widget can access as needed:
// src/app/domains/shared/ui-common/delay-stepper/delay-stepper.ts

import { Component, effect, input, model } from '@angular/core';
import { FormValueControl, ValidationError } from '@angular/forms/signals';

@Component({
  selector: 'app-delay-stepper',
  imports: [],
  templateUrl: './delay-stepper.html',
})
export class DelayStepper implements FormValueControl<number> {
  readonly value = model(0);

  readonly disabled = input(false);
  readonly errors = input<readonly ValidationError.WithOptionalField[]>([]);

  constructor() {
    effect(() => {
      console.log('DelayStepper, errors', this.errors());
    });
  }

  protected inc(): void {
    this.value.update((v) => v + 15);
  }

  protected dec(): void {
    this.value.update((v) => Math.max(v - 15, 0));
  }
}
The DelayStepper component uses the disabled property to indicate whether the field is disabled due to a schema rule. It receives all validation errors from Signal Forms via the input errors. An effect writes this property to the console for demonstration purposes. The disabled property is used alongside the value in the template:
<!-- src/app/domains/shared/ui-common/delay-stepper/delay-stepper.html -->

@if (disabled()) {
  <div class="delay">No Delay!</div>
} @else {
  <div class="delay">{{ value() }}</div>
  <div>
    <button type="button" (click)="inc()">+15 Minutes</button> |
    <button type="button" (click)="dec()">-15 Minutes</button>
  </div>
}
Note on Custom Checkboxes
FormValueControl can also be used for checkboxes, as it provides an optional checked property. However, for this purpose, Signal Forms also provides a specialized FormCheckboxControl interface. It defines a mandatory checked property and an optional value.
Angular Signal Forms FAQ
What are Angular Signal Forms?
Angular Signal Forms are a forms API in @angular/forms/signals that model form values, validation, metadata, and submission state with Signals. This keeps forms aligned with Angular's signal-based reactivity instead of introducing a separate abstraction layer.
How are Signal Forms different from Angular Reactive Forms?
Reactive Forms revolve around classes such as FormGroup, FormControl, and FormArray. Signal Forms instead expose a FieldTree whose state is read through Signals, which makes derived UI state, validation feedback, and composition fit more naturally into signal-first Angular applications.
Do Signal Forms support async validation and nested forms?
Yes. Signal Forms support asynchronous validators, cross-field validation, nested objects, form arrays, and subforms. This makes them suitable for both simple inputs and larger business forms with complex validation rules.
Why should form models avoid undefined values?
Signal Forms interpret undefined as a missing field, not as an empty value. For optional data, it is usually better to model a concrete form value such as null or a domain-specific default and map it back to the domain model when saving.
Summary
Signal Forms introduce a signal-based model for building and validating forms in Angular. Form state, values, and validation results are represented as signals, making them fully reactive and composable. This unifies user interaction and application state under a single set of reactive primitives.
Validation is defined declaratively through schemas that can be composed, reused, and applied conditionally. Signal Forms support built-in, custom, multi-field, and asynchronous validators, as well as integration with external schema standards such as Zod. Errors, pending states, and validation metadata are all part of the reactive form state and can be consumed directly by the UI.
Complex forms are modeled using nested objects, arrays, and subforms, allowing large forms to be split into focused components. A clear separation between domain models and form models avoids issues with optional or undefined values. Custom form controls integrate through a simple signal-based interface, making advanced UI widgets first-class citizens in the form system.