

A structured way for implementing a shell for micro frontends.
This blog post is part of an article series about micro frontends:
- A Software Architect's Approach Towards Using Angular (And SPAs In General) For Microservices Aka Microfrontends
- Micro Apps With Web Components Using Angular Elements
- Angular, React, Vue.Js and Co. peacefully united thanks to Micro Apps and Web Components
Related series about Web Components with Angular Elements:
- Angular Elements, Part I: A Dynamic Dashboard In Four Steps With Web Components
- Angular Elements, Part II: Lazy And External Web Components
- Angular Elements, Part III: Angular Elements without Zone.js
- Angular Elements, Part IV: Content Projection with Slots in Angular Elements (>=7)
- Angular Elements, Part V: Your Options For Building Angular Elements With The CLI
In the last time, I helped numerous companies implementing Angular SPAs for microservice environments. As outlined in a former blog article, there are several approaches for this.
In this article, I show how to implement one of them in 6 steps: A shell loading micro frontends on demand. Other than in my article about micro frontends and web components, I don't use web components for the macro architecture. Instead, I just go with ordinary SPAs which are loaded and bootstrapped on demand. For the micro architecture I still use web components.
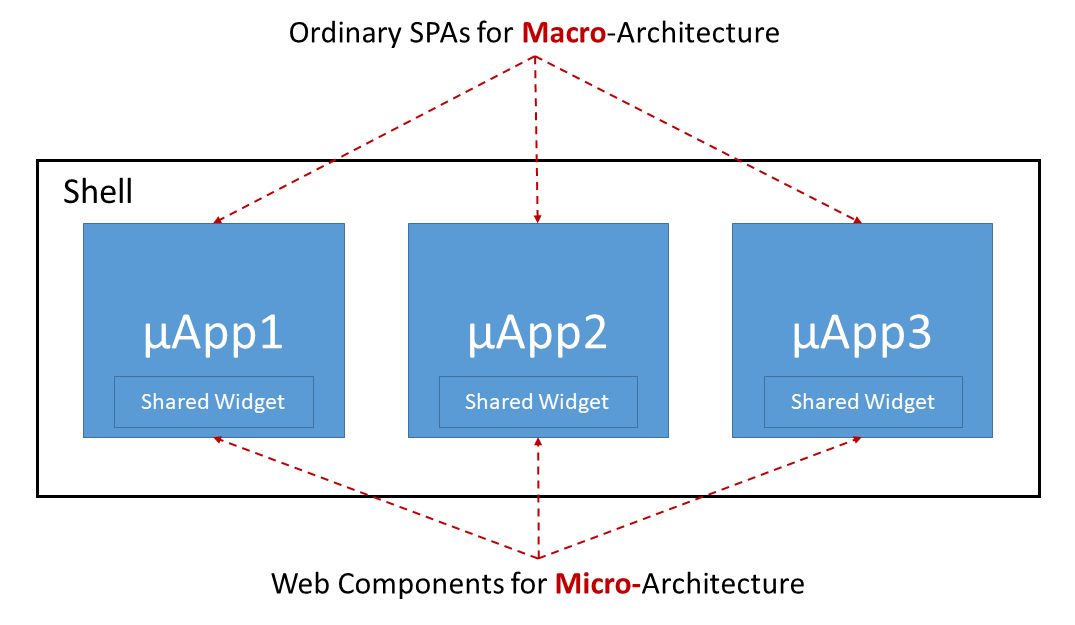
While this decision simplifies the implementation, we can still isolate different applications using shadow DOM as Angular also supports this standard associated with web components for traditional Angular components since its first day.
The case study loads a simple client-a and a simple client-b into the shell. Also, the former one shares a widget with the latter one:


The source code for this can be found in my GitHub account here.
Step 0: Make sure you need it
Make sure this approach fits to your architectural goals. Micro frontends come with a lot of consequences. You should be aware of them. My blog article here provides some guidance.
Step 1: Implement Your SPAs
Implement your micro frontends as ordinary Angular applications. In an micro service architecture it's quite common that every part gets its own repository in order to decouple them as much as possible (see Componentization via Services) On contrary, I've seen a lot of micro frontends based upon monorepos for practical reasons.
Of course, now, we could discuss when the term micro frontend is appropriate. I won't, because this discussion doesn't really help. What counts is to find a architecture that fits your goals and to be aware of its consequences.
If we go with a monorepo, we have to ensure, e. g. with linting rules, that the micro frontends are not coupled to each other. Nrwl's Nx provides a great solution for that: It allows to set up access restrictions defining which library can access which other one. Also, Nx can detect which parts of your monorepo are affected by a change in order to only recompile and retest them.
Of course, this decision has consequences, as discussed in the mentioned blog article.
To make routing across micro frontends easier, it's a good idea to prefix all the routes with the application's name. In the following case, the application name is client-a
@NgModule({
  imports: [
    ReactiveFormsModule,
    BrowserModule,
    RouterModule.forRoot([
      { path: 'client-a/page1', component: Page1Component },
      { path: 'client-a/page2', component: Page2Component },
      { path: '**', component: EmptyComponent}
    ], { useHash: true })
  ],
  [...]
})
export class AppModule {
  [...]
}
Step 2: Expose Shared Widgets
Expose widgets you want to share as Web Components/ Custom Elements. Please note that from the perspective of micro services, you should avoid sharing code between micro frontends as much as possible. The reason is that this causes coupling which is exactly what you want to avoid with this architectural style.
For exposing an Angular Component as a Custom Element, you can use Angular Elements. My blog article about Angular Elements and lazy and external Angular Elements provides the necessary information.
Step 3: Compile your SPAs
Webpack, and hence the Angular CLI, use a global array for registering bundles. It enables different (lazy) chunks of your application to find each other. However, if we are going to load several SPAs into one page, they will compete over this array, mess it up, and stop working.
For this dilemma, we have two solutions:
1) Just put everything into one bundle, so that this global array is not needed
2) Rename the global array
Here, I use solution 1) because a micro frontend is by definition small and just having one bundle makes loading it on demand easier. Also, as we will see later, we can share libraries like RxJS or Angular itself between them.
To accompish this, you can leverage ngx-build-plus which extenses the CLI by a --single-bundle switch:
ng add ngx-build-plus
ng build --prod --single-bundle
This switch makes the CLI to put your whole code into one main bundle. However, scripts, styles, and polyfills are still put into a bundle of their own. The reason behind this is, that it's very likely that the shell already loads these aspects and you don't want to load them again.
If you favor solution 2) you could use ngx-build-plus to influence the CLI's webpack config. Using the setting output.jsonpFunction you can define the name for the array mentioned.
We also offer an advanced Angular workshop containing this topic and more strategies for your Angular-based enterprise architectures. Please find all the information about it here

Step 4: Create a shell and load the bundles on demand
Loading the bundles on demand is straight forward. All you need is some vanilla JavaScript code dynamically creating a script tag and the tag for application's root element:
// add script tag
const script = document.createElement('script');
script.src = '[...]/client-a/main.js';
document.body.appendChild(script);

// add app
const frontend = document.createElement('client-a');
const content = document.getElementById('content');
content.appendChild(frontend);
Of course, you can also wrap this into a directive.
Also, you need some code to show and hide the loaded micro frontend on demand:
frontend['visible'] = false;Step 5: Communication Between Microfrontends
In general, we should keep the communication between microfrontends at a minimum, as it couples them to each other.
To implement communication, we have several options. Here, I go with the least obtrusive one: using the query string. This has several advantages:
1) It does not matter in which order the micro frontends are loaded. When they are loaded, they can grab the current parameters from the url
2) It allows deep linking
3) It's like the web is supposed to work
4) It's easy to implement
Setting an url parameter with the Angular router is just a matter of calling one method:
this.router.navigate(['.'], { queryParamsHandling: 'merge', queryParams: { id: 17 }});The option merge makes sure that the existing url parameters are not lost. If there is already a parameter id, the router will overwrite it.
Also, listening for changes within url parameters is also something the Angular router can help with:
route.queryParams.subscribe(params => {
    console.debug('params', params);
});
There are some alternatives for this:
- If you wrap your micro frontends into web components, you could use their properties and events to communicate with the shell.
-
The shell could put a "message bus" into the global namespace:
(window as any).messageBus = new BehaviorSubject(null); Both, the shell and the Microfrontends could now subscribe to this message bus and listen for specific events they are interested into. Also, both can emit events.
-
Using custom Events provided by the browser:
// Sender
const customer = { id: 17, ... };
window.raiseEvent(new CustomEvent('CustomerSelected', {details: customer}))

// Receiver
window.addEventListener('CustomerSelected', (e) => { ... })
Step 6: Sharing Libraries Between Micro Frontends
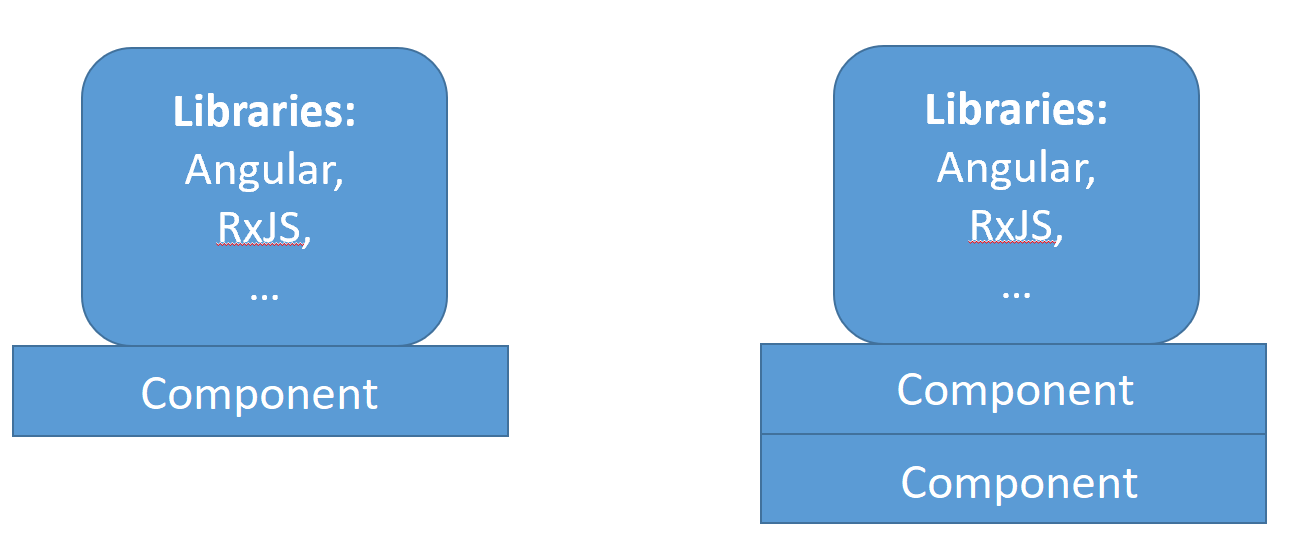
Now, as we have several self-contained micro frontends, each of them has its own dependencies, e. g. Angular itself or RxJS. From an micro service perspective, this is perfect because it allows each team behind your micro frontends to choose any library or framework in any version. They can even decide by their own if and when to update to newer versions.
However, from the perspective of performance and loading time, this is a bad situation because it leads to code duplication within the bundles. For instance, we could end up with having a specific angular version in several of your bundles:
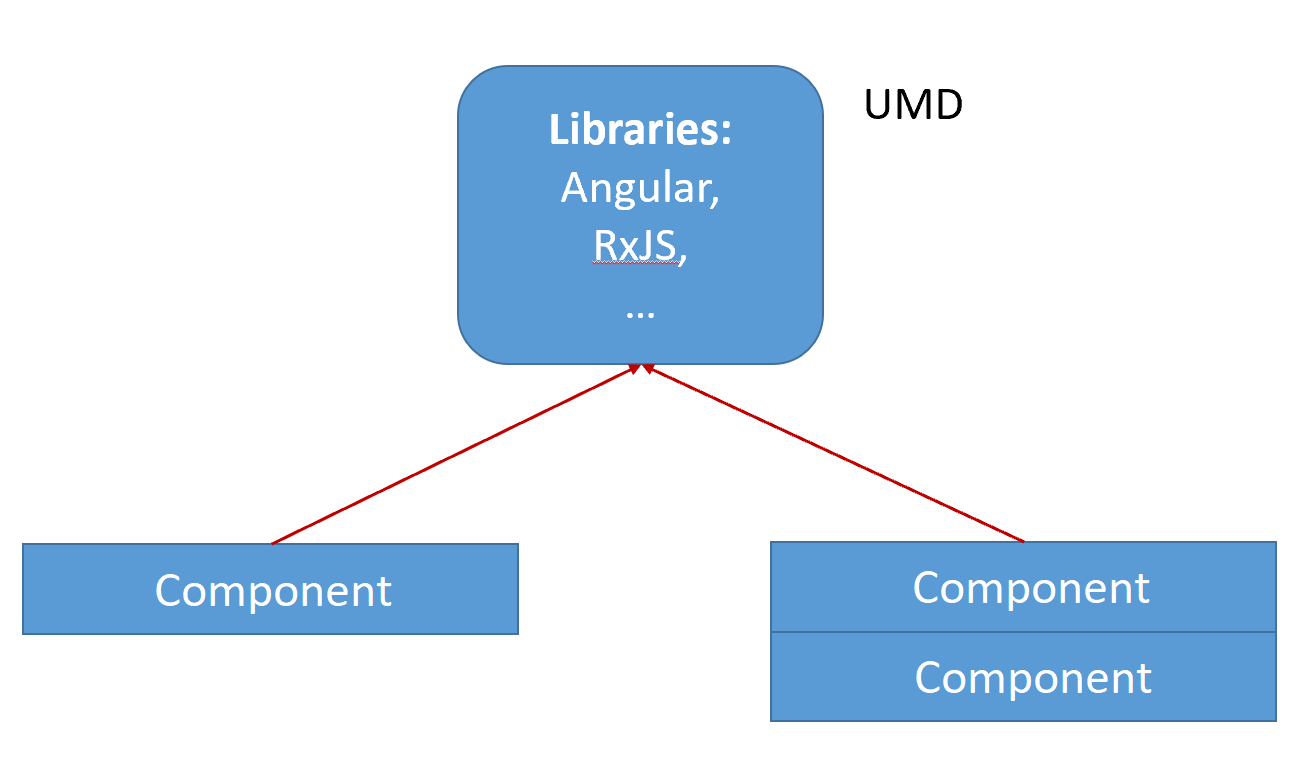
Fortunately, there is a solution for this: Webpack externals. I've already written about it in the context of external (standalone) Angular Elements and for micro apps I will repeat the most important aspects here:
Externals allow us to share common libraries. For this, they are just loaded so that they can be referenced via the global namespace. In the case of most libraries we can use UMD bundles which do exactly this besides other things. Then, we have to tell webpack to not bundle them together with every micro frontend but to reference it within the global namespace instead:
To use webpack externals together with the Angular CLI you can leverage ngx-build-plus which even comes with a schematic introducing the needed changes into your application.
To get it, you can ng add it:
ng add ngx-build-plusThen, call the following schematic:
ng g ngx-build-plus:externalsThis also introduces an npm script build:<project-name>:externals. For the default project there is a script build:externals too.
If you look into the angular.json after running this script, you see that Angular is loaded using UMD bundles:
"scripts": [
  "node_modules/rxjs/bundles/rxjs.umd.js",
  "node_modules/@angular/core/bundles/core.umd.js",
  "node_modules/@angular/common/bundles/common.umd.js",
  "node_modules/@angular/common/bundles/common-http.umd.js",
  "node_modules/@angular/compiler/bundles/compiler.umd.js",
  "node_modules/@angular/elements/bundles/elements.umd.js",
  "node_modules/@angular/platform-browser/bundles/platform-browser.umd.js",
  "node_modules/@angular/platform-browser-dynamic/bundles/platform-browser-dynamic.umd.js"
]
These UMD bundles put Angular into window.ng where it can be reused by several separately compiled micro frontends.
Also, if you have a look into the generated webpack.externals.js, you find a section mapping package names to global variables:
const webpack = require('webpack');

module.exports = {
    "externals": {
        "rxjs": "rxjs",
        "@angular/core": "ng.core",
        "@angular/common": "ng.common",
        "@angular/common/http": "ng.common.http",
        "@angular/platform-browser": "ng.platformBrowser",
        "@angular/platform-browser-dynamic": "ng.platformBrowserDynamic",
        "@angular/compiler": "ng.compiler",
        "@angular/elements": "ng.elements",
        "@angular/router": "ng.router",
        "@angular/forms": "ng.forms"
    }
}
This, for instance, makes the produced bundle to reference the global variable ng.core when it needs code>@angular/core. Hence, code>@angular/core does not need to be part of the bundle anymore.
Please note that this is not the default operation mode for Angular and hence it comes with some risks.
Conclusion
With the right wrinkles, implementing a shell for micro elements is not that difficult. However, as outlined here, this is only one way for implementing micro apps and -- as all -- it comes with its very own advantages and disadvantages. Hence, before implementing it, make sure it fits your architectural goals.
More Free e-Book
If you liked this article, you also may like my free e-Book on Angular Architecture, which can be found here.
Also, we offer an advanced Angular workshop containing this topic and more strategies for your Angular-based enterprise architectures.
