

- Angular Elements, Part I: A Dynamic Dashboard In Four Steps With Web Components
- Angular Elements, Part II: Lazy And External Web Components
- Angular Elements, Part III: Angular Elements without Zone.js
- Angular Elements, Part IV: Content Projection with Slots in Angular Elements (>=7)
- Angular Elements, Part V: Your Options For Building Angular Elements With The CLI
In this article you will learn:
- ? How to provide a single bundle for your Angular Elements
- ? How to use polyfills for legacy browsers
- ? How Ivy can help with bundle sizes (once it’s released) and where it cannot
- ? How differential serving can help (not only) with Angular Elements
- ? How to share dependencies between separately compiled Angular Elements
Currently, Angular Elements officially supports exposing Angular Components as Web Components -- or more precisely: as Custom Elements -- within Angular projects. Upcoming versions will very likely also support exporting Web Components which can be used with other frameworks or VanillaJS. I'm using the term external web component for referring to this. Another term is standalone (web) component.
In this article, I provide several strategies you can use to provide external web components already today. Some of them will definitely benefit from the introduction of Ivy and some of them address different aspects.
One more time, I want to thank Rob Wormald -- the father of and master mind behind Angular Elements -- for discussions that led to some of the solutions presented here.
Initial Situation
The example used here is a variation of the dashboard tile component from my introduction to Angular Elements:
It can be found here and consists of a CLI workspace with two projects. One of them called dashboard-tile exposes a simple dashboard tile as an external component:
The code behind it is quite simple:
@Component({
  // selector: 'app-external-dashboard-tile',
  templateUrl: './external-dashboard-tile.component.html',
  styleUrls: ['./external-dashboard-tile.component.css']
})
export class ExternalDashboardTileComponent implements OnInit {

  @Input() src: number = 1;

  a: number;
  b: number;
  c: number;

  constructor(private http: HttpClient) {
  }

  ngOnInit(): void {
    this.load();
  }

  load() {
    this.http.get(/assets/stats-<span class="hljs-subst">${this.src}</span>.json).subscribe(
      data => {
        this.a = data['a'];
        this.b = data['b'];
        this.c = data['c'];
      }
    );
  }

  more() {
    this.src++;
    if (this.src > 3) {
      this.src = 1;
    }
    this.load();
  }

}
In order to provide this component as a custom element when the Angular application starts up, the respective code is placed in the AppModule's ngDoBootstrap method:
@NgModule({
   imports: [
      HttpClientModule,
      BrowserModule
   ],
   declarations: [
      ExternalDashboardTileComponent
   ],
   bootstrap: [],
   entryComponents: [
      ExternalDashboardTileComponent
   ]
})
export class AppModule {
    constructor(private injector: Injector) {
    }

    ngDoBootstrap() {
        const externalTileCE = createCustomElement(ExternalDashboardTileComponent, { injector: this.injector });
        customElements.define('external-dashboard-tile', externalTileCE);
    }

}
Here, ngDoBootstrap is needed because the application does not have a bootstrap component. This is because I don't want to bootstrap an ordinary Angular component but just register a custom element with the browser.
In theory, you should be able to call the web component directly within the index.html after exposing it that way.
<external-dashboard-tile src="1"></external-dashboard-tile>
In practice, you get the following error when trying this out with the starter branch of the provided source code:
Failed to construct 'HTMLElement': Please use the 'new' operator, this DOM object constructor cannot be called as a function.
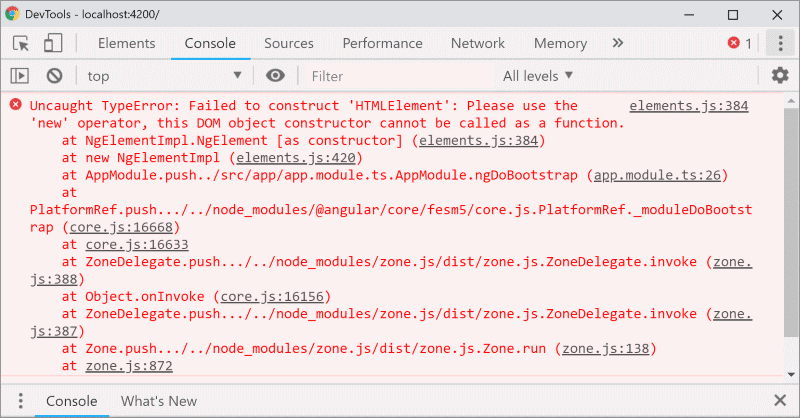
This error occors at least, when using EcmaScript 5 as a compilation target in order to support older browsers like Internet Explorer 11.This is because Custom Elements are to be used with EcmaScript 2015 and above by definition.
Hence, we need a polyfill for newer browsers which expect EcmaScript 2015+ Custom Elements and another polyfill for older browsers like Internet Explorer 11.
Differential loading, introduced with Angular CLI 8, allows to create EcmaScript 5 and EcmaScript 2015 bundles side by side. In one of the next sections, I'll provide more information about this.
Polyfills
In order to also support old browsers, I've decided to go with the polyfills in the @webcomponents/webcomponentsjs package. To load them, I register them as scripts within angular.json:
[...],
"scripts": [
  {
    "bundleName": "polyfill-webcomp-es5",
    "input": "node_modules/@webcomponents/webcomponentsjs/custom-elements-es5-adapter.js"
  },
  {
    "bundleName": "polyfill-webcomp",
    "input": "node_modules/@webcomponents/webcomponentsjs/bundles/webcomponents-sd-ce-pf.js"
  }
],
[...]
If you only compile to es2015+, you can omit the first script.
When building, this leads to two further bundles: polyfill-webcomp-es5.js and polyfill-webcomp.
Adding Polyfills Automatically
To automate the cumbersome task of adding polyfills, I've written a schematic which is part of my community project ngx-build-plus. To install it, use ng add:
ng add ngx-build-plus --project dashboard-tile
After that, you can install the polyfills with an included schematic:
ng g ngx-build-plus:wc-polyfill --project dashboard-tile
Please note that you need to reference the CUSTOM_ELEMENTS_SCHEMA in your respective modules if you want to use a custom element within an Angular Component:
@NgModule({
  declarations: [
    AppComponent
  ],
  imports: [
    BrowserModule
  ],
  providers: [],
  schemas: [CUSTOM_ELEMENTS_SCHEMA],
  bootstrap: [AppComponent]
})
export class AppModule { }
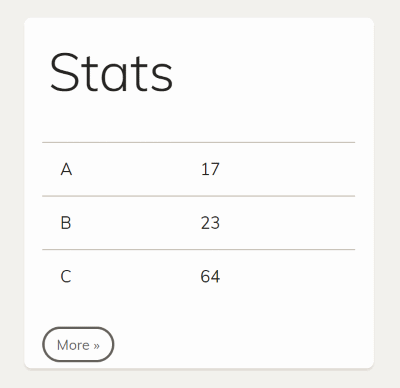
After starting the solution (npm start) you should see something like this in Chrome:
Angular Elements comes with an alternative polyfill that is registered within your
angular.jsonwhen installing it withng add @angular/elements. This one is far more lightweight than the one I'm using here. However, it just can be used with browsers supporting EcmaScript 2015 and above. Hence, when you don't need to target Internet Explorer, this one should be prefered.
Differential Loading
To leverage differential loading, just point to EcmaScript 2015+ in your tsconfig.json and make sure the browserslist file in your workspace root points to at least one EcmaScript 5 browser (which is normally the case). This makes the CLI build two versions of your bundles -- one with EcmaScript 5 and another one with EcmaScript 2015.
As now, newer browsers get EcmaScript 2015 code, we don't need to include the above shown custom-elements-es5-adapter.js script.
Build
Now, let's create a bundle for our web component using ng build:
ng build --prod
This gives us several (!) bundles:
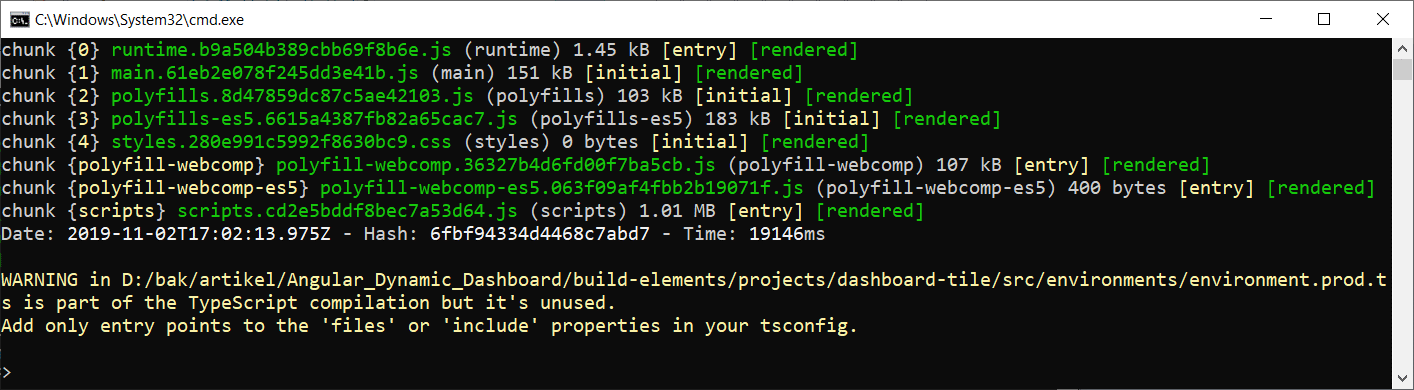
While this is ok for an ordinary SPA, it's far too much for a simple web component. In our case, having just one self-contained bundle would be better.
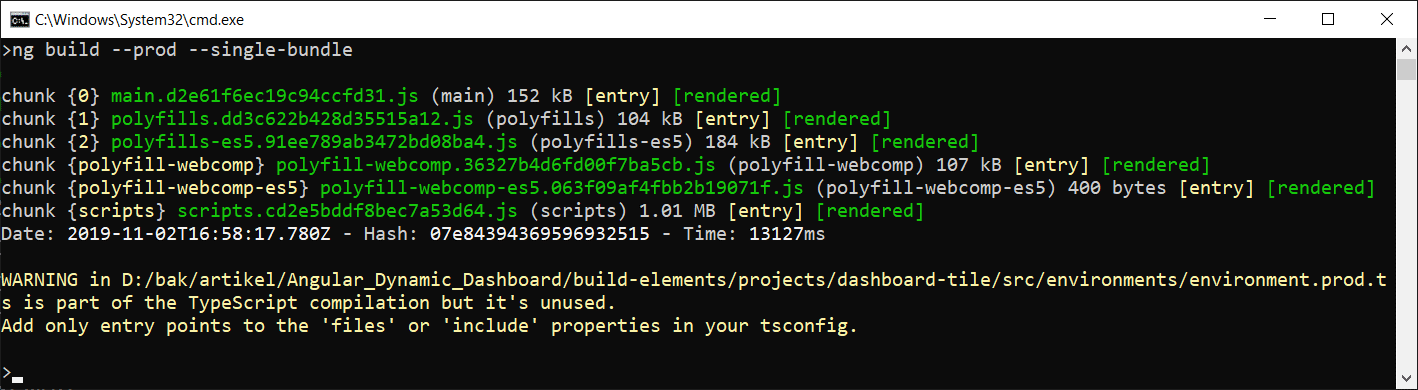
My above mentioned community project ngx-build-plus provides a simple solution for this with its --single-bundle switch:
ng build --prod --single-bundle
After running this, we get one bundle called main instad of main, vendor and runtime:
The latest version of ngx-build-plus still emits polyfills, styles and scripts in addition. This comes in handy for testing. However, you will normally not ship these files because the consuming application will very likely have its own verions of them.
An alternative to
--single-bundleyou see sometimes is manually copying the four bundles into one file. Unfortunately, this does not work if you have more than one such meta-bundle. The reason is that webpack is exposing a global variable and this would get overwritten when using several such bundles that have been compiled separately.
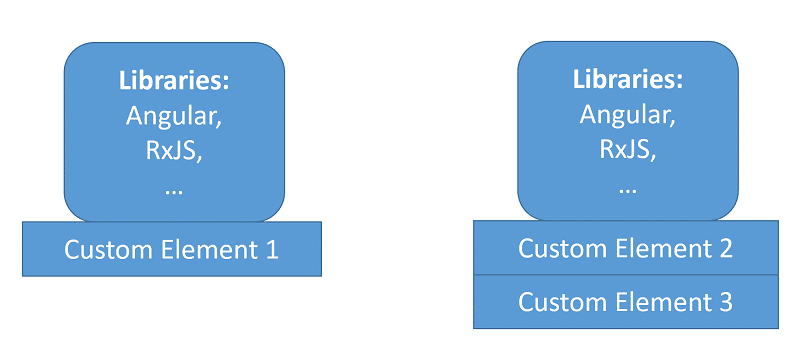
When you look at the bundle sizes, you immediately realize that they are far to huge for such a simple web component. That's because they include Angular, RxJS and other libs -- at least the parts of it that have not been tree-shaken off. It's even worse: If you compile several bundles separately, each of them get a copy of those libraries:
This is where Ivy comes in.
Ivy
Beginning with Angular 9 we will get the new Ivy compiler by default. It makes Angular more tree-shakable and compiles the UI part of components down to code which is quite close to the DOM. For this reason, typical web components will benefit a lot from Ivy and the resulting bundle won't need much of Angular.
In the best case, two separately generated bundles with Angular Elements will look like this:
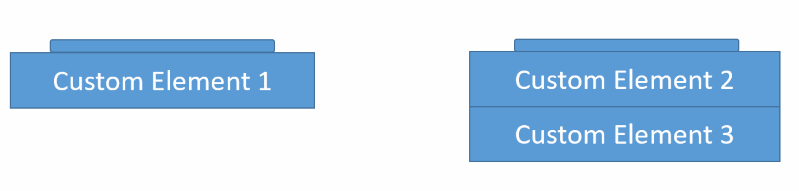
They just contain their component code and a very tiny remainder of Angular which acts as the runtime. As mentioned: in the best case!
However, while Ivy has a lot of potential, we should not expect wonders like Minko Gechev who is now part of the Angular Team told us at twitter:
Ivy will enable new features in Angular, which will come gradually, and it may reduce your app size but do not expect wonders - it will not make your JS disappear. I'd strongly recommend to not wait for ivy but instead, shrink JavaScript bundles today https://angular.io/guide/lazy-loading-ngmodules …
Especially, if our components contain lots of libraries besides UI code, Ivy will not help much. Or to put it in another way: It cannot make the used parts of packages like @angular/forms or @angular/common/http disappear.
In this case, we very likely need to find a way to share such dependencies among separately built bundles. This leads to an idea presented in one of the following sections.
Sharing Libraries
In order to share libraries like @angular/common/http which is used in our above shown Angular Element, we could load them into the web site's global scope and reuse them in our web component bundles:
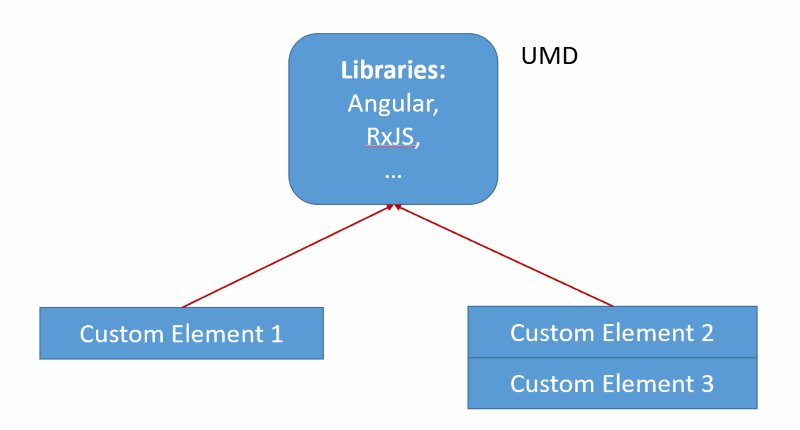
This is something that was quite usual some years ago. Think about using jQuery. We needed to load jQuery and jQuery UI once and the bundles with our jQuery widgets just referenced them.
However, Angular projects are normally built into several bundles that only know each other and other bundles cannot easily access their code.
To solve this issue, Angular's Rob Wormald came up with a interesting idea: Let's tweak the build process so that the generated bundles expect the shared libraries not to be part of them but are located within the global scope. In order to make this possible, we need to find a way to put Angular and its dependencies there.
Fortunately, the Angular package format prescribes to expose Angular libraries also as UMD bundles and they do this job. In the case of Angular itself, they register themselves at window.ng.core, window.ng.common, etc.
This involves a lot of manual steps I've automated with another schematic:
ng g ngx-build-plus:externals --project dashboard-tile
To compile everything, use this npm script generated by ngx-build-plus:
npm run build:dashboard-tile:externals
After this, you can switch to your dist folder and try out your solution:
npm i -g live-server
cd dist
cd dashboard-tile
live-server
Behind the covers
Now, let's talk about what happened here. The schematic we've executed created a partial webpack configuration, which defines where the shared libraries can be found within the browser's window object.
const webpack = require('webpack');

module.exports = {
    "externals": {
        "rxjs": "rxjs",
        "@angular/core": "ng.core",
        "@angular/common": "ng.common",
        "@angular/common/http": "ng.common.http",
        "@angular/platform-browser": "ng.platformBrowser",
        "@angular/platform-browser-dynamic": "ng.platformBrowserDynamic",
        "@angular/compiler": "ng.compiler",
        "@angular/elements": "ng.elements",

        // Uncomment and add to scripts in angular.json if needed
        // "@angular/router": "ng.router",
        // "@angular/forms": "ng.forms"
    }
}
When compiling, the CLI does not include these dependencies in your bundles. Instead it just uses references, e. g. to window.ng.core or window.ng.common.
To load Angular and RxJS into the window object, the schematic also references the respective UMD bundles in the scripts section within angular.json:
"scripts": [
  [...]
  "node_modules/rxjs/bundles/rxjs.umd.js",
  "node_modules/@angular/core/bundles/core.umd.js",
  "node_modules/@angular/common/bundles/common.umd.js",
  "node_modules/@angular/common/bundles/common-http.umd.js",
  "node_modules/@angular/compiler/bundles/compiler.umd.js",
  "node_modules/@angular/elements/bundles/elements.umd.js",
  "node_modules/@angular/platform-browser/bundles/platform-browser.umd.js",
  "node_modules/@angular/platform-browser-dynamic/bundles/platform-browser-dynamic.umd.js"
]
Conclusion
There are several strategies for building web components and they differ from those normally used for building full blown SPAs. Ivy will help a lot with reducing the bundle sizes if your project mainly contains UI code. Besides this, it also improves tree-shakability in general.
For sharing libraries you can use externals. The community project ngx-build-plus helps with this and with creating a single bundle. It also helps with installing polyfills for legacy browsers.
In addition, differential loading makes sure that only browsers which needs the polyfills get them. It also makes sure that modern browsers get smaller and more optimized EcmaScript 2015+ bundles.